
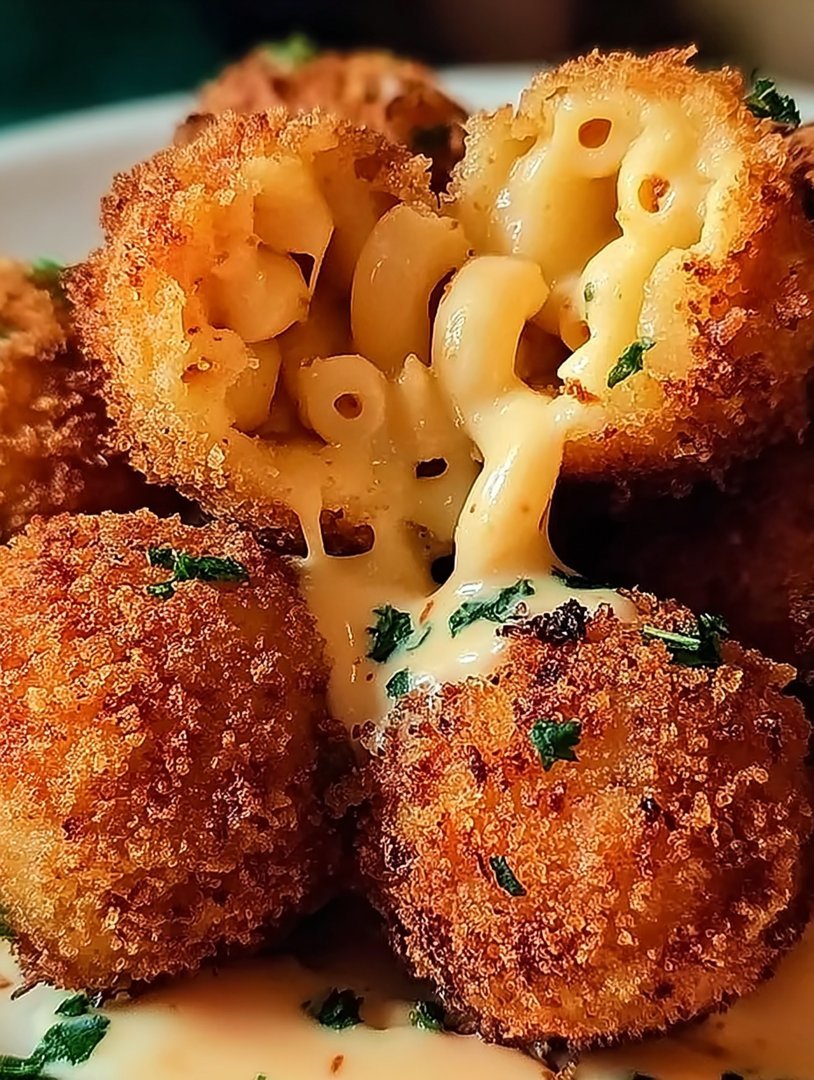
Picture this: golden-brown spheres, a symphony of textures where a crispy shell gives way to a molten, cheesy core. Crispy Fried Mac and Cheese Balls are not just food; they’re a culinary adventure, a comfort food revolution ready to explode in your mouth.
Imagine the satisfying crunch as you bite into one of these little treasures, followed by the warm, gooey embrace of perfectly cooked macaroni and a blend of rich, creamy cheeses. These delightful bites are perfect for parties, snacks, or even a fun twist on a classic meal. This is the ultimate indulgence.
- Effortless recipe suitable for chefs of all levels, ensuring a delightful cooking experience.
- Explosion of flavors that combine creamy cheese with a satisfying crispy exterior.
- Visually stunning appetizer or snack, certain to impress your family and friends.
- Highly versatile dish, perfect for game day, parties, or a unique weeknight treat.
Ingredients for Crispy Fried Mac and Cheese Balls
Here’s what you’ll need to make this delicious dish:
The full ingredients list, including measurements, is provided in the recipe card directly below.
How to Make Crispy Fried Mac and Cheese Balls
Follow these simple steps to prepare this delicious dish:
Step 1: Cook the Macaroni
Cook the elbow macaroni according to package directions until al dente. Drain well and set aside. Overcooking will result in mushy mac and cheese balls.
Step 2: Prepare the Cheese Sauce
In a large saucepan, melt the butter over medium heat. Whisk in the flour and cook for 1-2 minutes to create a roux. Gradually whisk in the milk until smooth. Bring to a simmer, stirring constantly until the sauce thickens. Reduce heat to low. Stir in the cheddar cheese, Monterey Jack cheese, and Parmesan cheese until melted and smooth. Season with salt, pepper, garlic powder, and onion powder.
Step 3: Combine Macaroni and Cheese Sauce
Add the cooked macaroni to the cheese sauce and stir to combine thoroughly. Ensure all the macaroni is evenly coated with the cheese sauce.
Step 4: Chill the Mixture
Pour the mac and cheese mixture into a baking dish. Spread evenly and cover with plastic wrap, pressing the wrap directly onto the surface to prevent a skin from forming. Refrigerate for at least 2 hours, or preferably overnight, until firm.
Step 5: Form the Mac and Cheese Balls
Once the mac and cheese mixture is firm, use a spoon or small ice cream scoop to form into 1-inch balls. Place the balls on a baking sheet lined with parchment paper.
Step 6: Bread the Mac and Cheese Balls
In one shallow dish, beat the eggs. In another shallow dish, place the bread crumbs. Dip each mac and cheese ball into the egg, then dredge in the bread crumbs, ensuring it is fully coated.
Step 7: Fry the Mac and Cheese Balls
Heat the vegetable oil in a large, deep skillet or pot to 350°F (175°C). Carefully drop the breaded mac and cheese balls into the hot oil, a few at a time, being careful not to overcrowd the pan. Fry for 2-3 minutes, or until golden brown and crispy, turning occasionally to ensure even cooking.
Step 8: Drain and Serve
Remove the fried mac and cheese balls with a slotted spoon and place them on a paper towel-lined plate to drain excess oil. Serve immediately while hot and crispy. Transfer to plates and serve warm for the perfect crispy, cheesy delight.
Variations and Add-Ins for Your Crispy Fried Mac and Cheese Balls (H2)
Craving a little something extra? These Crispy Fried Mac and Cheese Balls are incredibly versatile! Feel free to get creative and customize them to your liking. Let’s dive into some fun and flavorful variations that will take your mac and cheese game to the next level.
Spice It Up! (H3)
If you’re a fan of heat, consider adding a pinch of cayenne pepper or a dash of hot sauce to your cheese sauce. Finely diced jalapeños or a sprinkle of red pepper flakes can also kick things up a notch. For a smoky flavor, try incorporating a bit of smoked paprika. Just remember to add these in moderation, so you don’t overpower the cheesy goodness.
Add Some Protein (H3)
For a heartier snack or appetizer, mix in some cooked and crumbled chicken, beef, or turkey into the mac and cheese mixture before chilling. These additions make the balls more substantial and add a delicious savory element.
Veggie Delight (H3)
Sneak in some extra nutrients by adding finely chopped vegetables to your mac and cheese. Broccoli florets, peas, carrots, or bell peppers work wonderfully. Just be sure to cook them slightly before adding them to the mixture to ensure they’re tender and palatable.
Cheese, Please! (H3)
Experiment with different cheese combinations to create unique flavor profiles. Gruyere, Gouda, or Fontina can add a sophisticated twist to your mac and cheese balls. Consider using a blend of cheeses to achieve a balanced and complex flavor.
Dip It Good! (H3)
Don’t forget about the dipping sauce! A classic marinara sauce is always a hit, but you can also try a creamy ranch dressing, a tangy barbecue sauce, or a spicy aioli. Get creative and offer a variety of dipping options to cater to different tastes.
Tips for Achieving the Perfect Crispy Fried Mac and Cheese Balls (H2)
Mastering the art of the Crispy Fried Mac and Cheese Ball requires a few insider tips and tricks. Follow these guidelines to ensure each batch is a golden, crispy, cheesy success.
Chill Out (H3)
This is perhaps the most crucial step. Chilling the mac and cheese mixture thoroughly, preferably overnight, is essential for forming the balls and preventing them from falling apart during frying. The colder and firmer the mixture, the easier it will be to handle.
Bread Like a Pro (H3)
The breading process is key to achieving that perfect crispy exterior. Make sure to coat each ball evenly with egg and bread crumbs. A double dip in the egg and bread crumbs can add an extra layer of crispiness. Press the bread crumbs gently onto the balls to ensure they adhere well.
Temperature Matters (H3)
Maintaining the correct oil temperature is crucial for even cooking and preventing the mac and cheese balls from becoming greasy. Use a thermometer to monitor the oil temperature and adjust the heat as needed. Aim for a temperature of 350°F (175°C).
Don’t Overcrowd the Pan (H3)
Frying too many mac and cheese balls at once can lower the oil temperature and result in uneven cooking. Fry them in batches, being careful not to overcrowd the pan. This will ensure each ball is golden brown and crispy.
Drain Thoroughly (H3)
After frying, place the mac and cheese balls on a paper towel-lined plate to drain excess oil. This will help them stay crispy and prevent them from becoming soggy. Serve them immediately while they are still hot and crispy.
Serving Suggestions for Crispy Fried Mac and Cheese Balls (H2)
These delightful Crispy Fried Mac and Cheese Balls are incredibly versatile and can be enjoyed in a variety of ways. Here are a few serving suggestions to inspire your culinary creativity:
Appetizer Perfection (H3)
Serve them as a crowd-pleasing appetizer at your next party or gathering. Arrange them on a platter with a selection of dipping sauces for guests to enjoy.
Game Day Snack (H3)
These mac and cheese balls are the perfect snack for game day. They’re easy to eat, packed with flavor, and sure to be a hit with sports fans of all ages.
Side Dish Sensation (H3)
Add them as a fun and unexpected side dish to your favorite main courses. They pair well with grilled chicken, beef, or turkey.
Lunchbox Treat (H3)
Pack them in your lunchbox for a delicious and satisfying midday treat. They’re a great way to add some excitement to your lunch routine.
Movie Night Munchies (H3)
Enjoy them as a tasty snack during movie night. They’re the perfect accompaniment to your favorite films.
Enjoy experimenting with these Crispy Fried Mac and Cheese Balls! They are a guaranteed crowd-pleaser, no matter how you serve them.
Perfecting the Cooking Process
To achieve culinary nirvana with your Crispy Fried Mac and Cheese Balls, streamline the cooking process. First, cook your macaroni, then craft the cheese sauce while it simmers. Allow the mixture to cool completely before forming and frying to ensure they hold their shape beautifully.
Add Your Touch
Unleash your inner chef! Customize your Crispy Fried Mac and Cheese Balls by swapping cheddar for Gruyere, adding a dash of smoked paprika, or incorporating finely diced jalapenos for a kick. These variations can elevate the dish to suit your preferences.
Storing & Reheating
Store cooled Crispy Fried Mac and Cheese Balls in an airtight container in the refrigerator for up to three days. Reheat them in an air fryer or oven for the crispiest results. Avoid microwaving, which can lead to a less desirable texture.
Here are some helpful tips for perfecting your Crispy Fried Mac and Cheese Balls:
- Ensure the mac and cheese mixture is thoroughly chilled before forming the balls to prevent them from falling apart during frying.
- Use a neutral oil with a high smoke point, like canola or vegetable oil, to achieve a golden-brown crust without burning.
- Don’t overcrowd the frying pan; fry the balls in batches to maintain the oil temperature and ensure even cooking.
(Personal anecdote formated as paragraph subheading (very important! don’t write any title for this paragraph))
I remember the first time I made these for a potluck. They disappeared so fast, I barely got one! My friend declared them “the food of the gods,” and I’ve been making them ever since.
Alright, buckle up, buttercups, because we are about to dive headfirst into a culinary adventure that will have your taste buds singing opera. Forget everything you thought you knew about mac and cheese because we’re taking it to a whole new level. We’re talking Crispy Fried Mac and Cheese Balls! Yes, you heard that right. Golden, crunchy, cheesy, and utterly addictive.
This isn’t just a recipe; it’s a transformation. We’re turning a classic comfort food into a sophisticated snack that’s perfect for parties, game nights, or, let’s be honest, a Tuesday when you need a little extra joy in your life. Trust me, these little spheres of cheesy goodness are guaranteed to bring a smile to your face and maybe a happy dance or two.
Why Crispy Fried Mac and Cheese Balls? Why Not?!
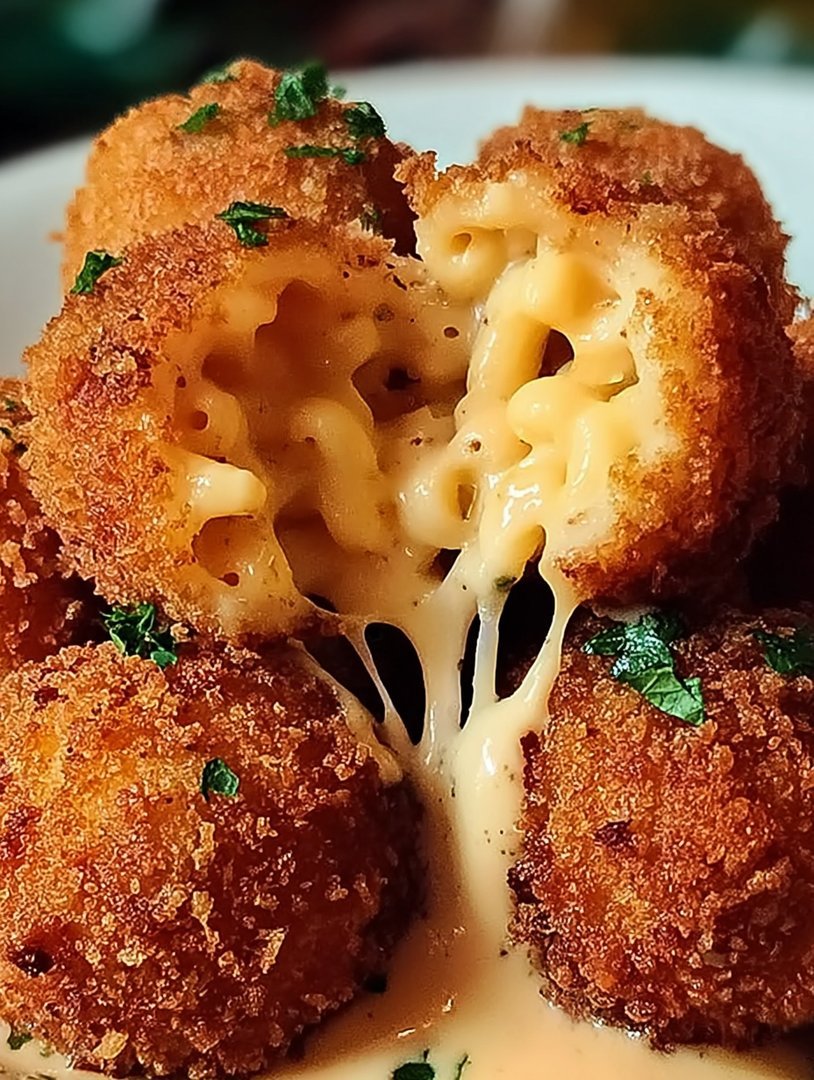
Let’s be real, mac and cheese is already amazing. But sometimes, amazing just isn’t enough. Sometimes, you need that extra *oomph*, that little bit of je ne sais quoi that elevates a dish from good to unforgettable. That’s where the frying comes in. The crispy exterior provides the perfect contrast to the creamy, cheesy interior, creating a textural symphony in your mouth. Plus, who doesn’t love fried food?
And these aren’t just any fried mac and cheese balls. We’re talking about balls of cheesy perfection, meticulously crafted to ensure maximum flavor and crunch. No soggy, sad excuses for mac and cheese here. Only golden, crispy spheres of delight.
Gathering Your Arsenal: The Ingredients You’ll Need
Before we embark on this cheesy quest, let’s make sure we have all the necessary ingredients. Think of it as assembling your culinary Avengers team.
- **Macaroni:** Elbow macaroni is the classic choice, but feel free to experiment with other shapes like shells or cavatappi. Just make sure they’re cooked al dente – nobody likes mushy mac.
- **Butter:** Because everything is better with butter. This is the foundation of our creamy cheese sauce.
- **Flour:** A little bit of flour helps thicken the sauce and gives it that smooth, velvety texture.
- **Milk:** Whole milk is preferred for the richest flavor, but you can use 2% if you’re feeling virtuous.
- **Cheese:** This is where the magic happens. A combination of cheddar and Gruyere is my go-to, but feel free to experiment with your favorites. Monterey Jack, Parmesan, or even a little bit of pepper jack for a kick would all work well.
- **Spices:** A pinch of salt, pepper, garlic powder, and smoked paprika add depth and complexity to the cheese sauce.
- **Eggs:** These act as a binder to help the mac and cheese balls hold their shape.
- **Breadcrumbs:** Panko breadcrumbs are the key to achieving that perfect crispy exterior. They’re lighter and flakier than regular breadcrumbs, resulting in a superior crunch.
- **Oil:** You’ll need a neutral oil with a high smoke point for frying, such as canola or vegetable oil.
The Cheese Sauce Symphony: Crafting the Creamy Center
Now, let’s get down to business and create the heart and soul of our Crispy Fried Mac and Cheese Balls: the cheese sauce.
1. **Melt the Butter: ** In a large saucepan over medium heat, melt the butter until it’s smooth and golden.
2. **Whisk in the Flour: ** Add the flour and whisk constantly for about a minute until it forms a smooth paste, also known as a roux. This will help thicken the sauce.
3. **Slowly Add the Milk: ** Gradually whisk in the milk, making sure to incorporate it completely before adding more. This will prevent lumps from forming.
4. **Simmer and Thicken: ** Bring the mixture to a simmer, stirring occasionally, until it thickens slightly. This should take about 5-7 minutes.
5. **Add the Cheese: ** Remove the saucepan from the heat and stir in the cheese until it’s completely melted and smooth.
6. **Season to Perfection: ** Season with salt, pepper, garlic powder, and smoked paprika. Taste and adjust the seasoning as needed. Remember, cheese is salty, so go easy on the salt at first.
Macaroni Magic: Combining Pasta and Cheese
Once the cheese sauce is ready, it’s time to combine it with the cooked macaroni.
1. **Drain the Macaroni: ** Drain the cooked macaroni thoroughly. You don’t want any excess water diluting the cheese sauce.
2. **Combine and Coat: ** Add the macaroni to the cheese sauce and stir until it’s evenly coated. Make sure every noodle is enveloped in cheesy goodness.
Chilling Out: The Importance of Cooling
This is a crucial step that you absolutely cannot skip. The mac and cheese mixture needs to be completely chilled before you can form it into balls.
1. **Spread it Out: ** Pour the mac and cheese mixture into a baking dish and spread it out in an even layer. This will help it cool more quickly.
2. **Chill for at Least 2 Hours: ** Cover the baking dish with plastic wrap and refrigerate for at least 2 hours, or even better, overnight. The colder the mixture, the easier it will be to handle.
Ball Formation: Shaping the Cheesy Spheres
Now for the fun part! Once the mac and cheese mixture is chilled, it’s time to form it into balls.
1. **Prepare Your Work Station: ** Set up a work station with a bowl of beaten eggs and a bowl of panko breadcrumbs.
2. **Scoop and Roll: ** Use a spoon or ice cream scoop to portion out the chilled mac and cheese mixture. Roll each portion into a ball about 1-2 inches in diameter.
3. **Egg Wash and Breadcrumbs: ** Dip each ball into the beaten eggs, making sure it’s fully coated. Then, dredge it in the panko breadcrumbs, pressing gently to ensure they adhere.
Frying Frenzy: Achieving Golden Perfection
Now for the moment we’ve all been waiting for: frying!
1. **Heat the Oil: ** Heat about 2-3 inches of oil in a large pot or deep fryer to 350°F (175°C).
2. **Fry in Batches: ** Carefully add the mac and cheese balls to the hot oil in batches, making sure not to overcrowd the pot. Overcrowding will lower the oil temperature and result in soggy balls.
3. **Fry Until Golden Brown: ** Fry for about 2-3 minutes per batch, or until the balls are golden brown and crispy.
4. **Drain and Serve: ** Remove the fried mac and cheese balls from the oil with a slotted spoon and place them on a wire rack lined with paper towels to drain excess oil. Serve immediately and watch them disappear!
Dipping Delights: Sauces to Elevate Your Experience
While these Crispy Fried Mac and Cheese Balls are delicious on their own, a dipping sauce can take them to the next level. Here are a few suggestions:
- **Spicy Ranch:** A classic combination that never disappoints.
- **Sriracha Mayo:** For those who like a little heat.
- **Honey Mustard:** Sweet and tangy perfection.
- **BBQ Sauce:** Adds a smoky and savory dimension.
Troubleshooting Tips for Mac and Cheese Mastery
Let’s face it, cooking doesn’t always go according to plan. Here are a few common problems and how to fix them:
- **Mac and Cheese Balls Falling Apart:** This usually happens when the mac and cheese mixture isn’t chilled enough. Make sure it’s completely cold and firm before forming the balls.
- **Soggy Fried Balls:** This can be caused by overcrowding the pot, not using hot enough oil, or not draining the balls properly after frying.
- **Cheese Sauce is Lumpy:** This is usually caused by adding the milk too quickly or not whisking constantly. If your sauce is lumpy, try using an immersion blender to smooth it out.
Variations: Unleash Your Inner Chef
Once you’ve mastered the basic recipe, feel free to experiment with different variations.
- **Add some protein:** Stir in cooked chicken, beef, lamb, or turkey for a heartier snack.
- **Spice it up:** Add diced jalapenos or a pinch of cayenne pepper to the cheese sauce.
- **Add vegetables:** Stir in cooked broccoli, peas, or carrots for a healthier twist.
- **Experiment with different cheeses:** Try using Gruyere, Monterey Jack, or pepper jack for a different flavor profile.
Crispy Fried Mac and Cheese Balls are more than just a recipe, they’re an experience. They’re a celebration of comfort food, a testament to the power of cheese, and a guaranteed crowd-pleaser. So go ahead, gather your ingredients, put on your apron, and get ready to create some cheesy magic. Your taste buds will thank you for it.
Conclusion for Crispy Fried Mac and Cheese Balls :
These Crispy Fried Mac and Cheese Balls are more than just a recipe; they are a guaranteed crowd-pleaser. Remember to chill your mac and cheese, use a cookie scoop for uniform balls, and fry in hot oil for a crispy exterior. Serve with your favorite dipping sauce and watch them disappear. With a little patience and these tips, you will be the star of your next gathering. So, go ahead, and get frying!
Print
Crispy Fried Mac and Cheese Balls
Delicious crispy fried mac and cheese balls recipe with detailed instructions and nutritional information.
- Total Time: 35 minutes
- Yield: 4 servings 1x
Ingredients
- 1 box (12-16 oz) prepared macaroni and cheese
- 1 cup all-purpose flour
- 2 large eggs, beaten
- 2 cups panko bread crumbs
- 1/2 cup vegetable oil, for frying
- 1/4 teaspoon garlic powder
- 1/4 teaspoon onion powder
Instructions
- Step 1: Allow the macaroni and cheese to cool completely in the refrigerator for at least 2 hours, or preferably overnight. This will make it easier to form the balls.
- Step 2: In a shallow dish, place the flour mixed with garlic powder and onion powder. In a second shallow dish, place the beaten eggs. In a third shallow dish, place the panko bread crumbs.
- Step 3: Scoop about 1-2 tablespoons of the chilled macaroni and cheese and roll it into a ball. Repeat until all the macaroni and cheese has been formed into balls.
- Step 4: Dredge each macaroni and cheese ball in the flour, then dip it in the beaten egg, and finally coat it thoroughly with the panko bread crumbs.
- Step 5: Heat the vegetable oil in a large skillet over medium heat. Carefully place the mac and cheese balls in the hot oil, being careful not to overcrowd the pan.
- Step 6: Fry the mac and cheese balls for 2-3 minutes per side, or until golden brown and crispy. Remove them from the skillet and place them on a paper towel-lined plate to drain. Serve immediately.
Notes
- Store leftover fried mac and cheese balls in an airtight container in the refrigerator for up to 3 days.
- To reheat, bake in a preheated oven at 350°F (175°C) for 5-10 minutes, or until heated through and crispy again.
- Serve these crispy balls with a side of marinara sauce or ranch dressing for dipping!
- For extra cheesy flavor, stir in a handful of shredded cheddar or parmesan into the mac and cheese before chilling to help it bind.
- Prep Time: 15 minutes
- Cook Time: 20 minutes
- Method: Stovetop
- Cuisine: American
FAQs :
Can I prepare the Crispy Fried Mac and Cheese Balls ahead of time?
Absolutely! You can totally be that organized friend who shows up with the best appetizer ever. Prepare the mac and cheese, form the balls, and even coat them in breadcrumbs. Then, pop them into the fridge for a few hours (or even overnight). Just remember to give them a little extra frying time to ensure they’re heated through when you finally unleash their cheesy goodness upon your eagerly awaiting guests. This makes party prep a breeze!
What’s the secret to perfectly round Crispy Fried Mac and Cheese Balls?
Ah, the age-old question! My secret weapon? A cookie scoop. Seriously, that little gadget is a lifesaver for uniform portions and consistently round shapes. Also, make sure your mac and cheese is nice and chilled before you start rolling. Warm mac and cheese is a sticky nightmare, trust me, I’ve been there. A little patience and a well-chilled base are your best friends in this cheesy endeavor.
How do I prevent my Crispy Fried Mac and Cheese Balls from exploding in the fryer?
Nobody wants a cheesy explosion, except maybe in a cheesy action movie. The key is to ensure the oil is hot enough (around 350°F/175°C) before adding the balls. A thermometer is your best friend here. Also, don’t overcrowd the fryer. Frying in batches helps maintain the oil temperature and ensures each ball gets that glorious golden-brown crust without turning into a gooey disaster.
What dipping sauces pair well with the Fried Mac and Cheese Balls?
Oh, the possibilities are endless! For a classic twist, try marinara sauce. A creamy ranch is always a crowd-pleaser. If you’re feeling adventurous, try a spicy sriracha mayo or a tangy barbecue sauce. Or go crazy and make a cheese dipping sauce to compliment these Crispy Fried Mac and Cheese Balls. Honestly, anything goes! Let your taste buds be your guide and create your own dipping masterpiece.

Leave a Comment