
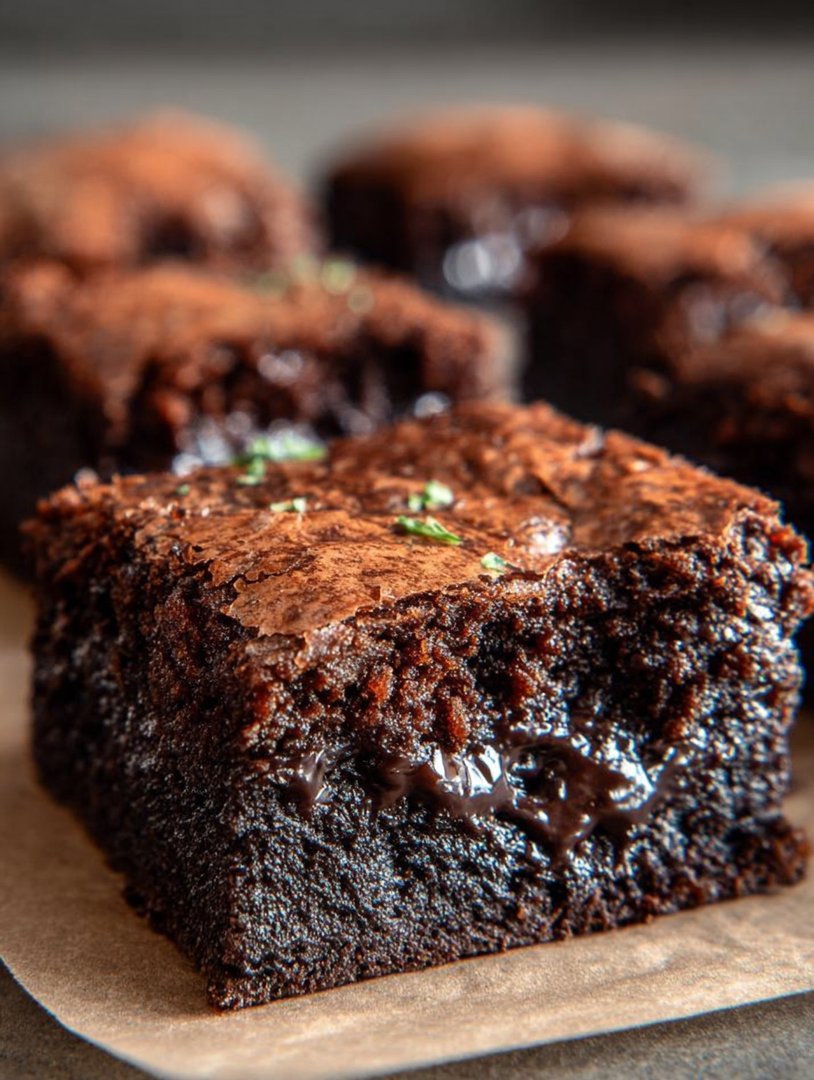
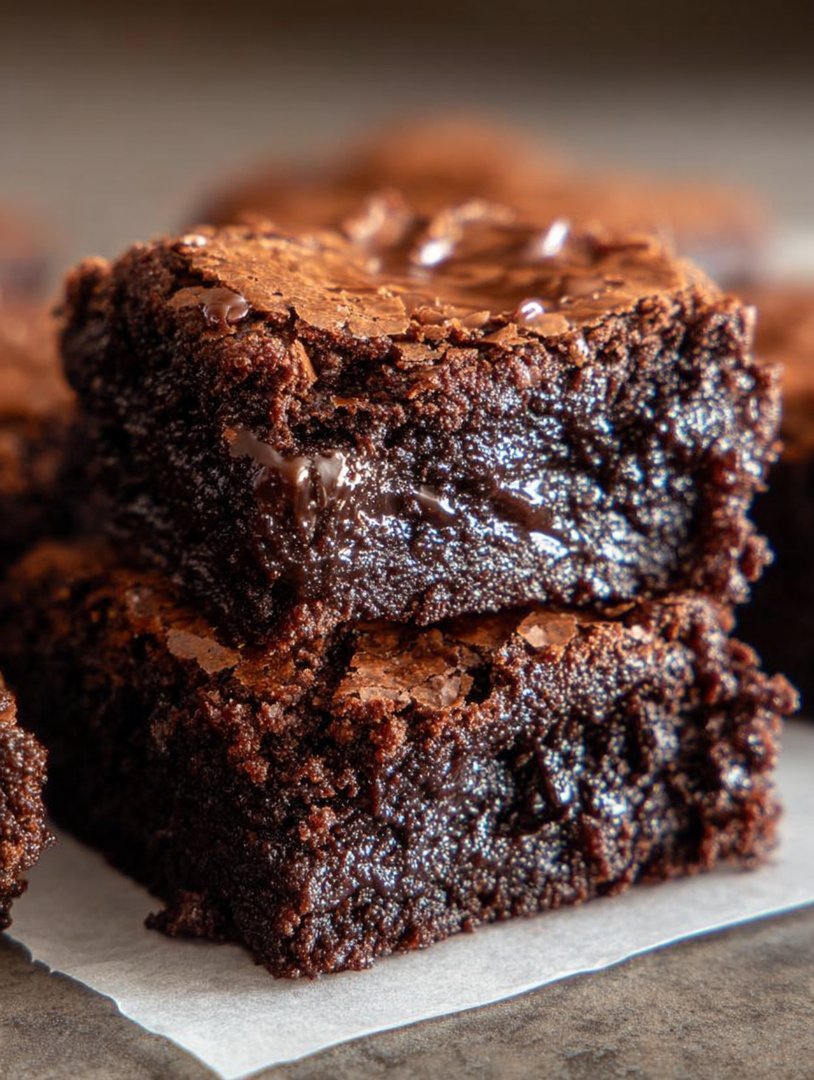
Imagine sinking your teeth into a square of pure chocolate bliss, a Homemade Brownies Recipe that’s fudgy, chewy, and intensely satisfying. The rich aroma alone is enough to transport you to a happy place where worries melt away faster than butter in a hot pan.
These aren’t just any brownies; they’re the kind that evokes warm memories and happy sighs. Whether you’re celebrating a milestone or just need a little pick-me-up, these decadent treats are guaranteed to turn any moment into a special occasion. Get ready to embark on a delicious journey that will leave you craving more.
- Effortless preparation requiring minimal kitchen skills and readily available ingredients, perfect for novice bakers.
- The recipe produces brownies with a rich, deep chocolate flavor complemented by a perfectly fudgy and chewy texture.
- Visually stunning with a glossy top and a dense, moist interior, making them ideal for presentation at any gathering.
- Highly adaptable with options to add nuts, chocolate chips, or a swirl of fruit preserves to personalize your treat.
Ingredients for Homemade Brownies Recipe
Here’s what you’ll need to make this delicious dish:
The full ingredients list, including measurements, is provided in the recipe card directly below.
How to Make Homemade Brownies Recipe
Follow these simple steps to prepare this delicious dish:
Step 1: Get Ready to Bake
Preheat your oven to 350°F (175°C). Grease and flour an 8×8 inch baking pan. This will prevent the brownies from sticking and ensure easy removal. Trust me, no one wants a brownie casualty!
Step 2: Melt the Butter
In a microwave-safe bowl, melt the butter. This usually takes about 30-45 seconds, but keep an eye on it! You want it melted, not exploded.
Step 3: Mix the Sugars
In a large mixing bowl, combine the melted butter, granulated sugar, and brown sugar. Mix well until everything is nicely combined. This is where the magic starts to happen!
Step 4: Add the Eggs and Vanilla
Add the eggs one at a time, mixing well after each addition. Then, stir in the vanilla extract. This step is crucial for a smooth and delicious batter.
Step 5: Combine Dry Ingredients
In a separate bowl, whisk together the flour, cocoa powder, and salt. This ensures that the dry ingredients are evenly distributed.
Step 6: Mix Wet and Dry
Gradually add the dry ingredients to the wet ingredients, mixing until just combined. Be careful not to overmix – a few streaks of flour are okay. Fold in the chocolate chips.
Step 7: Bake to Perfection
Pour the batter into the prepared pan and spread it evenly. Bake for 25-30 minutes, or until a toothpick inserted into the center comes out with moist crumbs.
Step 8: Cool and Enjoy
Let the brownies cool in the pan for at least 15 minutes before cutting into squares. Trust me, patience is a virtue here. Serve warm or at room temperature, and enjoy your Homemade Brownies Recipe!
Tips for the Best Homemade Brownies Recipe (formated as H2 subheading)
Mastering the Mix: The Secret to Fudgy Brownies (formated as H3 subheading)
One of the most important things to remember when baking these delightful squares is not to overmix the batter. Overmixing develops the gluten in the flour, which can result in tough, cakey brownies. What we’re aiming for is that glorious fudgy texture, so mix until just combined. A few streaks of flour are perfectly acceptable; they’ll disappear during baking, leaving you with brownies that are tender and melt in your mouth. It’s like giving your brownies a spa day – minimal stress, maximum relaxation!
The Right Pan: Choosing Your Baking Battlefield (formated as H3 subheading)
The type of pan you use can drastically affect the outcome of your brownies. A metal pan will conduct heat more efficiently, resulting in brownies with crisp edges and a slightly firmer texture. On the other hand, a glass pan will bake more slowly and evenly, producing softer, fudgier brownies. Experiment to see which you prefer! No matter which pan you choose, make sure to grease and flour it properly to prevent sticking. Nobody wants a brownie disaster when it’s time to serve up the goodness.
Chocolate Choices: Decoding the Cocoa (formated as H3 subheading)
The cocoa powder you select can make a significant difference in the final flavor of your brownies. Dutch-processed cocoa powder has a smoother, milder flavor and a darker color, while natural cocoa powder has a more intense, slightly acidic flavor. Both will work beautifully in this recipe, but consider your personal preferences. And don’t be afraid to experiment with different types of chocolate chips! Semi-sweet, dark, or even white chocolate chips can add a unique twist to your homemade brownies. It’s your brownie adventure, so choose wisely!
Temperature Tango: Mastering the Oven (formated as H3 subheading)
Oven temperature is key to baking the perfect brownies. Most ovens aren’t perfectly calibrated, so it’s always a good idea to use an oven thermometer to ensure accuracy. Baking the brownies at the correct temperature will ensure they cook evenly and achieve that desirable fudgy center. Overbaking can lead to dry, crumbly brownies, so keep a close eye on them during the last few minutes of baking. When a toothpick inserted into the center comes out with moist crumbs, you know they’re ready.
Cutting Capers: The Art of Slicing (formated as H3 subheading)
Cutting brownies neatly can be a bit of a challenge, but here’s a trick: let them cool completely before slicing. Use a sharp knife and wipe it clean between each cut for professional-looking squares. For extra-clean cuts, try running the knife under hot water and drying it before each slice. This will prevent the brownies from sticking to the knife and create beautiful, even portions. Presentation is everything, even when it comes to brownies!
Variations on the Homemade Brownies Recipe (formated as H2 subheading)
Nutty Nirvana: Adding Crunch and Flavor (formated as H3 subheading)
If you’re a fan of nuts, adding them to your brownie recipe is a fantastic way to enhance both texture and flavor. Walnuts, pecans, or even almonds can provide a satisfying crunch that complements the fudgy interior. Simply chop your favorite nuts and fold them into the batter before baking. For an extra layer of flavor, toast the nuts lightly before adding them. This will bring out their natural oils and create a richer, more complex taste.
Swirls of Delight: Adding Fruit Preserves (formated as H3 subheading)
For a burst of fruity flavor, try swirling a spoonful of fruit preserves into the brownie batter before baking. Raspberry, cherry, or even apricot preserves can add a tangy sweetness that cuts through the richness of the chocolate. To create the swirl effect, drop small dollops of preserves onto the batter and use a knife or toothpick to gently swirl them together. Be careful not to overmix, as this can muddy the flavors.
Coffee Kick: Espresso Powder Boost (formated as H3 subheading)
Enhance the chocolate flavor by adding a teaspoon of espresso powder to the dry ingredients. The coffee intensifies the cocoa and adds a subtle depth of flavor that will have everyone asking for your secret ingredient. This addition is especially delicious when paired with dark chocolate chips or a drizzle of coffee-flavored glaze.
Mint Madness: Cool and Refreshing (formated as H3 subheading)
For a refreshing twist, add a few drops of peppermint extract to the batter. This will create a cool, minty flavor that pairs perfectly with the rich chocolate. You can also add mint chocolate chips for an extra burst of minty goodness. Garnish with fresh mint leaves for a beautiful presentation.
Sea Salt Sensation: Sweet and Salty Perfection (formated as H3 subheading)
Sprinkle a pinch of sea salt on top of the brownies before baking for a sweet and salty treat. The salt enhances the sweetness of the chocolate and adds a delightful contrast in flavors. Use coarse sea salt for the best texture and visual appeal.
Serving Suggestions for Homemade Brownies Recipe (formated as H2 subheading)
Warm with Ice Cream: The Classic Combo (formated as H3 subheading)
There’s nothing quite like a warm brownie topped with a scoop of vanilla ice cream. The combination of warm, fudgy brownie and cold, creamy ice cream is a match made in dessert heaven. Add a drizzle of chocolate syrup or caramel sauce for an extra touch of indulgence.
Brownie Sundaes: Elevate Your Dessert Game (formated as H3 subheading)
Take your brownie game to the next level by creating brownie sundaes. Top the brownies with ice cream, whipped cream, sprinkles, and your favorite sauces. Get creative with different toppings and flavors to create a sundae that’s uniquely yours.
Coffee Pairing: A Perfect Afternoon Treat (formated as H3 subheading)
Pair your brownies with a cup of coffee for a delightful afternoon treat. The rich chocolate flavor of the brownies complements the bitterness of the coffee perfectly. Try different coffee blends to find your favorite pairing.
Party Platters: A Crowd-Pleasing Dessert (formated as H3 subheading)
Brownies are always a hit at parties and gatherings. Cut them into small squares and arrange them on a platter with other desserts. Add some fresh fruit or berries for a pop of color and freshness.
Homemade Gifts: Share the Love (formated as H3 subheading)
Brownies make a thoughtful and delicious homemade gift. Wrap them in cellophane bags or arrange them in a decorative box. Add a ribbon and a handwritten note for a personal touch.
Storing Your Homemade Brownies Recipe (formated as H2 subheading)
Room Temperature Storage: The Basics (formated as H3 subheading)
To keep your brownies fresh at room temperature, store them in an airtight container. They’ll stay moist and delicious for up to 3 days. Make sure they’re completely cooled before storing to prevent condensation.
Fridge Storage: Extending Freshness (formated as H3 subheading)
For longer storage, keep your brownies in the refrigerator. They’ll stay fresh for up to a week. Wrap them tightly in plastic wrap or store them in an airtight container to prevent them from drying out.
Freezing Brownies: A Sweet Escape (formated as H3 subheading)
Yes, you can freeze brownies! Wrap them individually in plastic wrap and then place them in a freezer-safe bag or container. They’ll stay good for up to 3 months. Thaw them at room temperature or in the refrigerator before serving.
Reviving Stale Brownies: A Quick Fix (formated as H3 subheading)
If your brownies have gone a bit stale, don’t despair! You can revive them by microwaving them for a few seconds. Just be careful not to overheat them, or they’ll become hard and dry.
Perfecting the Cooking Process
The secret to incredible brownies lies in timing. Melt the butter and chocolate first, then let them cool slightly before adding the eggs. This prevents scrambled eggs in your brownie batter, which is a brownie disaster we all want to avoid. Finally, bake until just set for fudgy perfection.
Add Your Touch
Feel free to get creative! Swap out the chocolate chips for chopped nuts, dried fruit, or even a swirl of peanut butter. For a flavor boost, add a teaspoon of vanilla extract, orange zest, or a pinch of espresso powder. The possibilities are endless! Let your imagination run wild.
Storing & Reheating
To keep your brownies fresh, store them in an airtight container at room temperature for up to three days. For longer storage, freeze them for up to two months. Reheat individual brownies in the microwave for a few seconds, or enjoy them straight from the freezer.
Here are some tips to ensure your **homemade brownies recipe** turns out perfectly every time:
- Don’t overmix the batter! Overmixing develops gluten, which leads to tough brownies. Mix until just combined.
- Use high-quality chocolate for the best flavor. The better the chocolate, the better the brownies.
- Line your baking pan with parchment paper. This makes it easy to remove the brownies and prevents sticking.
(Personal anecdote formated as paragraph subheading)
I remember one time I forgot to set a timer and ended up with a brownie brick. My dog enjoyed it more than I did! Always double-check the oven.
Conclusion for Homemade Brownies Recipe :
This Homemade Brownies Recipe delivers rich, fudgy goodness without any fuss. We’ve covered how to customize them with nuts and various chocolates, along with the secrets to keeping them perfectly moist and preventing that dreaded cakey texture. Remember to store your brownies properly to maintain their freshness. These brownies are easy to make and even easier to devour, perfect for any occasion. Go ahead, bake up a batch and enjoy!
Print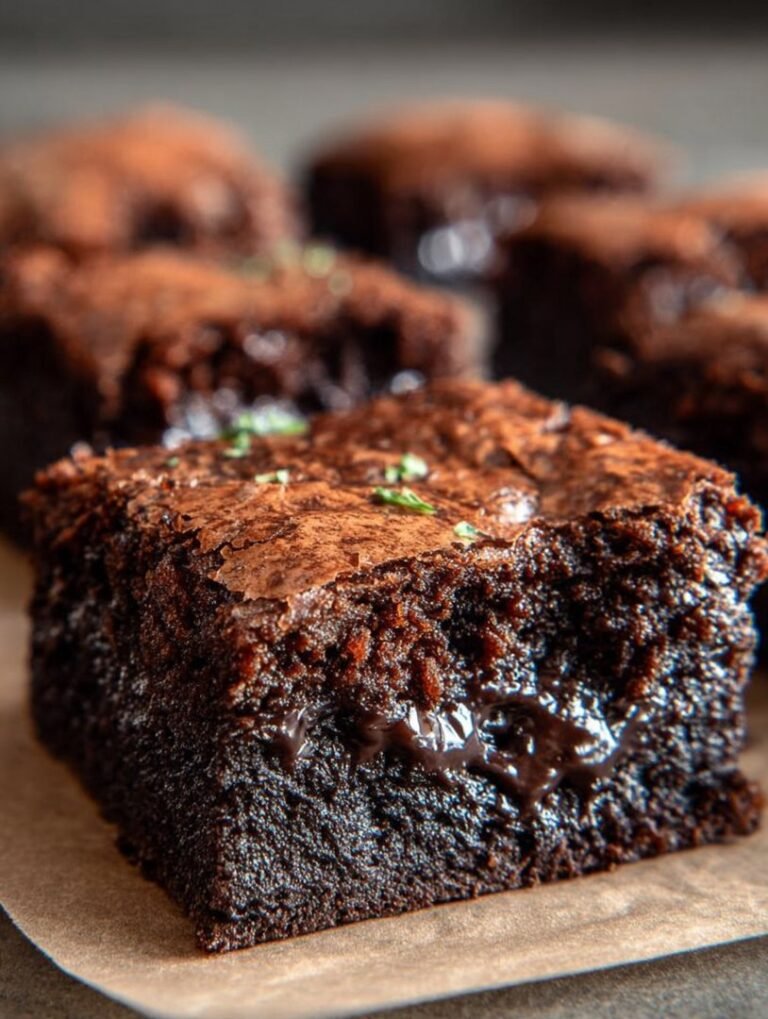
Homemade Brownies Recipe
Delicious homemade brownies recipe recipe with detailed instructions and nutritional information.
- Total Time: 35 minutes
- Yield: 4 servings
Ingredients
- Unsalted Butter: 1/2 cup (1 stick), melted
- Granulated Sugar: 1 cup
- Brown Sugar: 1/2 cup, packed
- Eggs: 2 large
- Vanilla Extract: 1 teaspoon
- All-Purpose Flour: 1/2 cup
- Unsweetened Cocoa Powder: 1/2 cup
- Salt: 1/4 teaspoon
Instructions
- Step 1: Preheat oven to 350°F (175°C). Grease and flour an 8×8 inch baking pan.
- Step 2: In a large bowl, combine the melted butter, granulated sugar, and brown sugar. Mix well until smooth.
- Step 3: Beat in the eggs one at a time, then stir in the vanilla extract.
- Step 4: In a separate bowl, whisk together the flour, cocoa powder, and salt.
- Step 5: Gradually add the dry ingredients to the wet ingredients, mixing until just combined. Be careful not to overmix.
- Step 6: Pour the batter into the prepared pan and bake for 20-25 minutes, or until a toothpick inserted into the center comes out with moist crumbs. Let cool completely before cutting into squares.
Notes
- To keep brownies extra fudgy, store them in an airtight container at room temperature for up to 3 days.
- For a warm, gooey treat, microwave a brownie square for 10-15 seconds before serving.
- Serve brownies with a scoop of vanilla ice cream and a drizzle of chocolate sauce for an irresistible dessert.
- For intensely chocolatey brownies, use Dutch-processed cocoa powder; it's darker and less acidic.
- Prep Time: 15 minutes
- Cook Time: 20 minutes
- Method: Stovetop
- Cuisine: American
FAQs :
Can I add nuts to this Homemade Brownies Recipe?
Absolutely! If you’re nuts for nuts (see what I did there?), feel free to toss in about ¾ cup of your favorite kind. Walnuts, pecans, or even chopped almonds work wonderfully. Add them in with the chocolate chips or swirl them into the batter before baking. Just remember to give them a little chop beforehand, unless you’re going for that “surprise whole nut” experience. Adding nuts will give your brownies a delightful crunch and extra flavor complexity. Don’t be shy – experiment and find your perfect nutty brownie combination!
What is the best way to store these delicious brownies?
To keep your Homemade Brownies Recipe fresh and fudgy, store them in an airtight container at room temperature. They’ll stay moist and delicious for up to three days. If you want to extend their shelf life, pop them in the fridge – they’ll last for about a week, though they might lose a little of that soft, gooey texture. For long-term storage, wrap them individually in plastic wrap and freeze them. Frozen brownies are good for up to three months, just thaw them out before enjoying!
Can I use a different type of chocolate for the Homemade Brownies Recipe?
Definitely! Feel free to experiment with different types of chocolate to customize the flavor of your Homemade Brownies Recipe. Dark chocolate will give you a richer, more intense flavor, while milk chocolate will result in a sweeter, milder brownie. You could even use a combination of different chocolates for a more complex flavor profile. Just make sure the total amount of chocolate remains the same as in the recipe to maintain the correct texture and consistency. Get creative and find your ultimate chocolate blend!
How do I prevent my brownies from being cakey?
The key to fudgy Homemade Brownies Recipe is to avoid overmixing the batter. Overmixing develops the gluten in the flour, which leads to a cakey texture. Mix the wet and dry ingredients until just combined, and don’t worry if there are a few lumps. Also, be careful not to overbake the brownies. They should be slightly soft in the center when you take them out of the oven. Remember, underbaked brownies are better than overbaked ones when you’re aiming for that perfect fudgy consistency.


Leave a Comment