
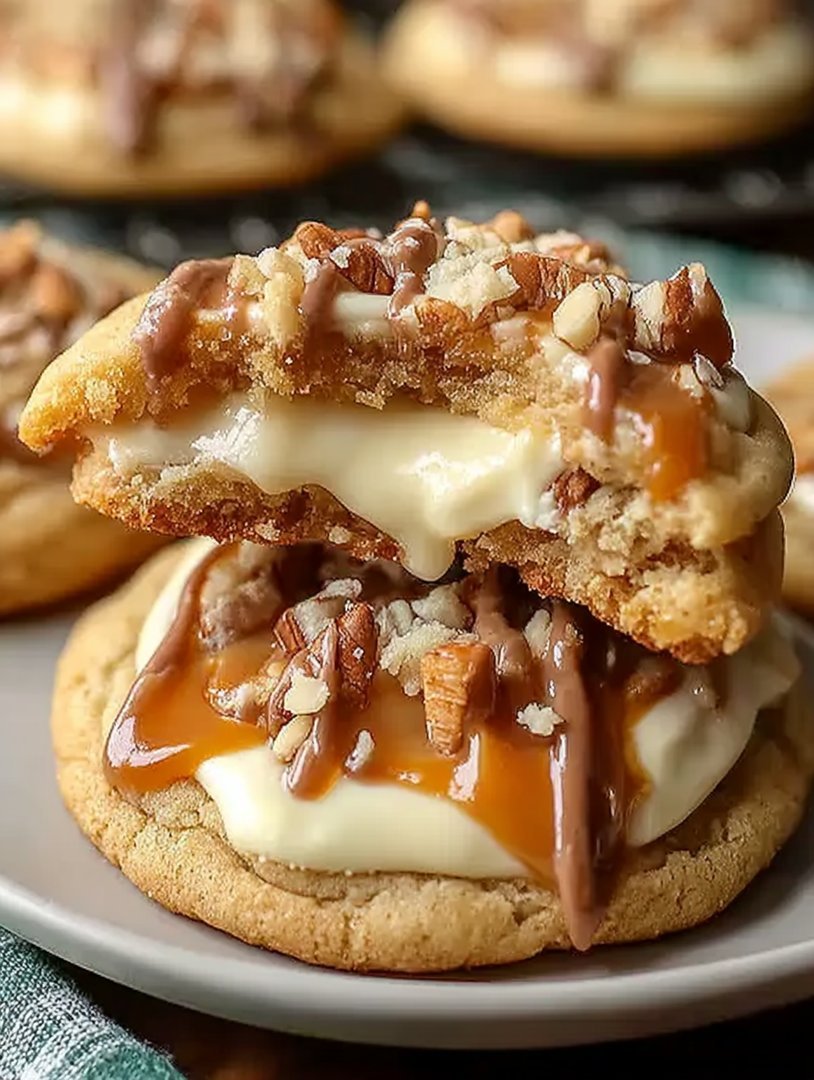
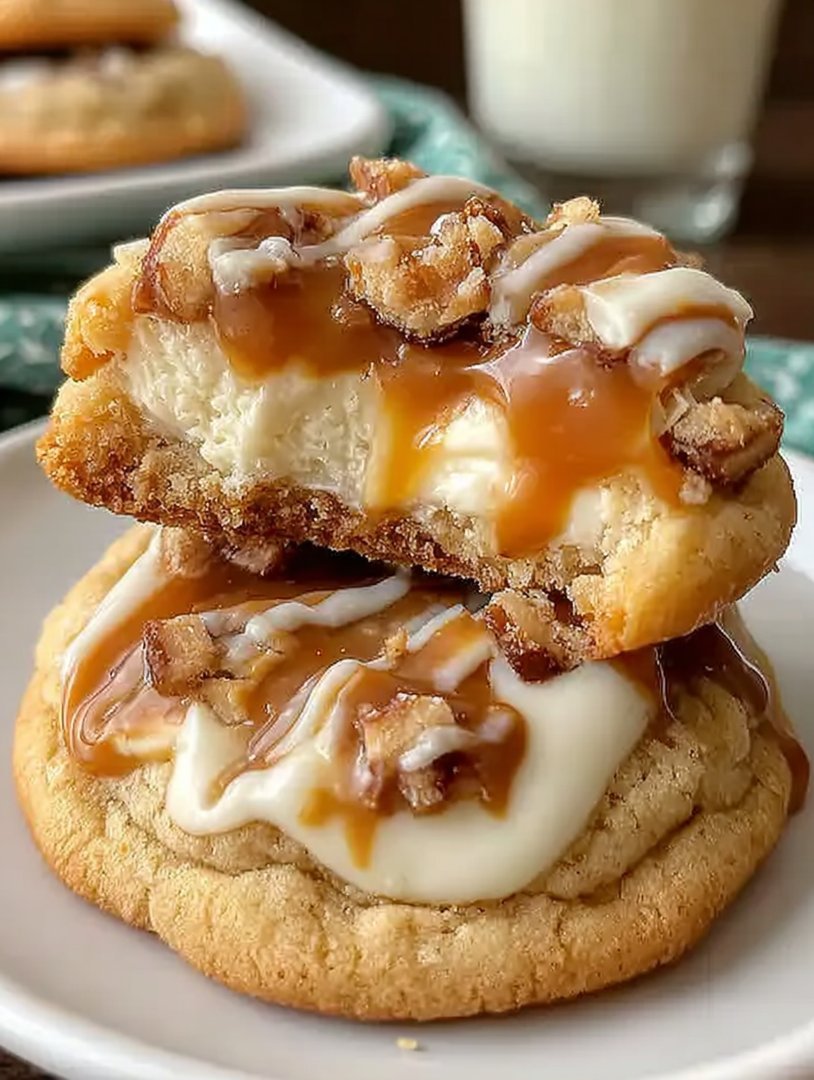
Forget the fancy dinner parties; the real magic happens when dessert takes center stage. These amazingCaramel Cheesecake Cookiesare the rebellious love child of a rich, buttery cookie and a tangy, decadent cheesecake that redefines indulgence. Get ready to ditch the complicated springform pan because we are making gourmet magic on a humble baking sheet. These magnificent caramel cheesecake treats possess the structural integrity of a cookie but the creamy heart of a slice of New York’s finest. If you’ve ever found yourself torn between a chewy classic and a cool, smooth dessert, prepare to have your delicious dilemma solved.
- Creamy, tangy cheesecake filling nestled inside a buttery, soft cookie base offers a truly luxurious and sophisticated mouthfeel.
- Drizzled with rich homemade salted caramel, their striking visual appeal makes them the undisputed star of any holiday dessert platter.
- This simplified recipe eliminates the complexity of a water bath, making perfect cheesecake baking achievable even for the most tentative beginners.
- They are incredibly versatile, easily adapting to different seasonal toppings like spiced pecans or dark chocolate shavings for extra decadence.
The Tangled Tale of Cookie and Cheesecake
My relationship with traditional cheesecake is complicated. It usually involves spending three hours monitoring a slow-motion water bath ritual only to discover a tragic fissure running straight through the center when it cools. I was desperate for the flavor without the frantic performance, and that is how the idea forCaramel Cheesecake Cookieswas born—out of sheer, exhausted culinary impatience.
The first attempt was, to put it mildly, a structural disaster. The filling exploded out of the sides like a rogue volcano of dairy delight. But after several highly caffeinated nights of testing, tweaking the ratio of butter to cream cheese, and perfecting the “cookie moat” technique, I finally achieved equilibrium. These cookies are not just a convenient shortcut; they are genuinely the best of both worlds. They offer the satisfying chew of a perfectly baked cookie combined with that glorious, slightly sour tang of rich cheesecake, all crowned with a salty ribbon of caramel.
We need to talk about the caramel. While you can certainly use store-bought sauce, making your own salted caramel takes about ten minutes and tastes like victory after a long, hard week. The salty counterpoint to the sweetness of the dough and the tang of the cheese elevates these treats from “nice dessert” to “Why didn’t I make four dozen?” They are fantastic for gifting, essential for bake sales, and absolutely non-negotiable for satisfying that late-night “I need something sweet but sophisticated” craving.
Ingredients for Caramel Cheesecake Cookies
Here’s what you’ll need to make this delicious dish:
- All-Purpose FlourUse a standard unbleached flour, ensuring it is properly measured by spooning it into the measuring cup rather than scooping.
- Unsalted ButterNeeds to be softened slightly but not melted, which is crucial for achieving that light, fluffy cookie dough texture.
- Granulated Sugar and Brown SugarThe combination provides structure and moisture; brown sugar adds a necessary depth and chewiness to the cookie base.
- Cream Cheese (Full Fat)This is the star of the filling; make sure it is completely softened to prevent lumps, otherwise your filling will be chunky.
- EggYou will use a whole egg for the cookie dough and an egg yolk for the filling, which provides richness and stability to the cream cheese mixture.
- Vanilla Bean PasteUse a high-quality extract to boost both the cookie and the filling flavor profile, avoiding artificial imitations.
- Baking Soda and SaltThe leavening agent (baking soda) helps the cookies rise slightly, while salt balances the intense sweetness of the caramel and sugars.
- Homemade Salted Caramel SauceWe need a thick, buttery caramel sauce, preferably with a touch of sea salt incorporated, for the final elegant drizzle.
The full ingredients list, including measurements, is provided in the recipe card directly below.
How to Make Caramel Cheesecake Cookies
Follow these simple steps to prepare this delicious dish:
-
Step 1: Prep the Dough and Filling Bases
Preheat your oven to 350°F (175°C) and line two large baking sheets with parchment paper or silicone mats. In a large bowl, cream the softened butter and sugars until light and fluffy—about three minutes on medium speed. Beat in the whole egg and vanilla until combined. In a separate bowl, whisk together the flour, baking soda, and salt, then gradually add the dry ingredients to the wet ingredients until just combined. Do not overmix the dough.
-
Step 2: Prepare the Tangy Cheesecake Center
In a medium bowl, combine the completely softened cream cheese, granulated sugar, the single egg yolk, and a splash of vanilla bean paste. Beat this mixture on medium speed until it is entirely smooth and lump-free. The filling should be very creamy, similar in texture to thick Greek yogurt, ensuring it bakes evenly inside the cookie.
-
Step 3: Scoop, Assemble, and Chill
Scoop the cookie dough into balls roughly 1.5 tablespoons in size and place them two inches apart on the prepared baking sheets. Using the back of a measuring spoon or your thumb, gently create a wide, deep well in the center of each cookie ball. Carefully fill each indentation with about 1 teaspoon of the cream cheese mixture. If the dough is too sticky, chill the trays for 15 minutes before baking to help the cookie hold its shape against the filling.
-
Step 4: The Golden Bake
Bake the cookies for 12 to 15 minutes, rotating the pan halfway through. The edges of the cookies should be golden brown, but the cheesecake filling should still look soft and slightly jiggly in the center. Once removed from the oven, the filling will continue to set. Allow the cookies to cool completely on the baking sheet for at least 30 minutes before attempting to move them.
-
Step 5: The Grand Finale Drizzle
Once the cookies are completely cool, transfer them to a cooling rack. Warm your homemade salted caramel sauce slightly if necessary, so it drizzles easily. Use a spoon or a piping bag to generously coat the filling of each cookie with beautiful ribbons of caramel. Let the caramel set for a few minutes before serving. Transfer to plates and prepare for immediate adoration.
Expert Tips for Perfect Caramel Cheesecake Treats
Achieving bakery-quality results requires attention to a few sneaky details that can make or break your batch. These cookies are relatively straightforward, but because they combine two distinct baking disciplines (cookie making and cheesecake setting), precision is key. Mastering the technique ensures a creamy center that doesn’t crack or spread outside the cookie moat.
Mastering the Perfect Cheesecake Filling Consistency
The most important rule when working with cream cheese is temperature. If the cream cheese is even slightly cold, it will fight your efforts and yield a clumpy filling. Ensure the cream cheese is at room temperature—soft enough that you can easily press your finger into it. Also, avoid over-beating the filling once the sugar and egg yolk are added. Excessive beating incorporates too much air, which can cause the filling to puff up excessively in the oven and then tragically deflate and crack upon cooling.
The Cookie Moat: Your Secret Weapon
When you create the well in the dough for the filling, don’t be shy about it. You need a sturdy, deep depression—we call this the “cookie moat.” The edges must be thick enough to act as a barrier, containing the filling as it expands slightly during baking. If the moat is too shallow, the cheesecake will spill over the sides and burn, leaving you with crunchy, sad edges instead of a lovely soft border. Aim for a well that leaves about a half-inch of thick cookie dough around the perimeter.
Chilling for Stability
If you live in a warm environment or find your cookie dough too soft to handle after mixing, chilling is your friend. Placing the scooped and filled cookies in the refrigerator for 15 to 20 minutes before baking helps the butter firm up. This prevents the dough from spreading excessively when it hits the heat of the oven, ensuring your cookies maintain their height and your beautiful, creamy centers stay intact.
Storage and Flavor Variations
One of the best things about theseCaramel Cheesecake Cookiesis their relatively long shelf life, provided you store them correctly. Since they contain a dairy-based filling, they require different storage considerations than standard chocolate chip cookies.
Keeping Your Cookies Fresh
Due to the cream cheese filling, these cookies must be stored in an airtight container in the refrigerator. They will last beautifully for up to five days. If you prefer a slightly softer texture, you can let them sit at room temperature for about 15 minutes before serving to take the chill off the filling. You can also freeze the baked cookies before adding the caramel drizzle. To freeze, place the cooled cookies in a single layer on a baking sheet until solid, then transfer them to a freezer-safe bag or container for up to three months. Thaw them overnight in the refrigerator and add the caramel just before serving.
Swapping the Flavor Profile
The base recipe is fantastic, but the world of cheesecake fillings is vast and beckons creativity. While the FK focuses on caramel, you can easily change the profile. Instead of caramel, consider topping the cooled cookies with a tart raspberry or cherry reduction, or perhaps a luxurious dark chocolate ganache. For a fall treat, add a pinch of cinnamon and nutmeg to the cookie dough and mix a tablespoon of pumpkin puree into the cream cheese filling. These simple changes turn one recipe into a dozen different sophisticated desserts, proving just how versatile a small, perfect cookie can be.
The Accidental Discovery of Sunshine on a Plate
I originally tried to make a boring cheesecake, but gravity intervened, and the filling rebelled all over the counter. I salvaged the disaster by swirling the creamy mess into cookie dough, accidentally creating these gloriousCaramel Cheesecake Cookiesthat taste exactly like a perfect sunny afternoon.
Perfecting the Cooking Process
Start by chilling the cookie dough base thoroughly—this prevents spreading. While the dough chills, prepare your cheesecake and caramel filling. Scoop, fill, and chill the stuffed cookie balls again right before baking for that ideal, puffy dome structure.
Add Your Touch
For a twist, swap the classic vanilla bean paste for a hint of almond or lemon zest in the cookie base. You can also drizzle the finished cookies with dark chocolate or sprinkle them with flaky sea salt to amplify that rich, buttery caramel flavor.
Storing & Reheating
Store these delights in an airtight container at room temperature for up to three days, or refrigerate for a week. If you prefer them warm, pop a cookie in the microwave for 10 seconds; the caramel will soften beautifully, tasting fresh-baked.
There are certain recipes that feel less like baking projects and more like psychological interventions. Before I perfected these incredibleCaramel Cheesecake Cookies, my life was a confusing blur of mismatched Tupperware lids and poorly timed dinner parties. I needed order, I needed comfort, and frankly, I needed a dessert that wouldn’t judge me when I ate three of them straight off the cooling rack. These cookies—these majestic, creamy, caramel-swirled beauties—were the answer to a prayer I didn’t even realize I was whispering to the universe. They combine the decadent tang of classic cheesecake with the comforting chew of a perfect sugar cookie, all wrapped up with a gooey hug of rich caramel. They are not just cookies; they are edible therapy, guaranteed to induce a state of blissful, crumbs-on-your-face happiness.
The journey to cookie perfection was, predictably, riddled with errors. My first attempt resulted in what I affectionately termed “Caramel Lava Puddles.” The cheesecake filling exploded, the caramel leaked out, and the resulting mess fused permanently to the parchment paper. It was a tragedy worthy of a small operetta. But through intense trial and error, I learned the critical secrets to maintaining structural integrity, ensuring that the creamy center stays exactly where it should: nestled snugly inside the buttery cookie dough. This recipe is the culmination of those failures, a roadmap to success that avoids all the pitfalls of a novice baker who tries to put a dairy product inside a dry starch shell. Trust me, temperature control is your new best friend.
Ingredients for Your Edible Therapy Session
Before you even think about preheating the oven, gather your supplies. Precision matters when you are dealing with a stuffed cookie, especially one featuring an unruly dairy component. We are aiming for crisp edges, soft centers, and absolutely zero internal explosions. Make sure your butter and cream cheese are perfectly softened—not melted, not cold—just soft enough to leave a dent when poked, like a marshmallow that has seen better days.
- For the Cookie Dough:
- 1 cup (2 sticks) unsalted butter, softened
- 3/4 cup granulated sugar
- 1/2 cup packed light brown sugar
- 2 large eggs
- 1 tablespoon vanilla bean paste
- 2 1/2 cups all-purpose flour
- 1 teaspoon baking soda
- 1/2 teaspoon salt
- For the Creamy Filling:
- 8 ounces full-fat cream cheese, softened
- 1/4 cup granulated sugar
- 1 teaspoon vanilla bean paste
- 1 egg yolk
- 1/4 teaspoon lemon juice (optional, for a tang)
- For the Caramel Swirl:
- 1/2 cup thick, prepared caramel sauce (make sure it’s cooled and thickened; store-bought is fine, or a thick, homemade dulce de leche style sauce works wonders)
- Flaky sea salt (optional, for sprinkling)
Crafting the Ideal Cookie Dough Base
The base of these creamy caramel delights needs to be strong enough to contain the creamy, gooey chaos within. Start by creaming the softened butter with both the granulated and brown sugars until the mixture is light and fluffy. This step is non-negotiable; it incorporates the air necessary for a tender cookie. Don’t rush this process; let your mixer run for a good three to five minutes until the color lightens noticeably. Once fluffy, beat in the eggs one at a time, followed by the vanilla bean paste, scraping down the sides of the bowl frequently to ensure everything integrates properly.
In a separate bowl, whisk together the dry ingredients: the flour, baking soda, and salt. Gradually add the dry mixture to the wet mixture, mixing only until just combined. Overmixing the dough develops the gluten too much, resulting in tough cookies that resemble hockey pucks, which is not the goal here. Once the dough comes together, cover it tightly and place it in the refrigerator. A minimum 30-minute chill time is crucial; it halts the spreading and makes the dough infinitely easier to handle during the stuffing process. You want the dough firm enough to work with, but not rock hard.
The Secret to the Swirl: Preparing the Filling
While your cookie dough is cooling its jets, tackle the cheesecake filling. In a medium bowl, beat the softened cream cheese until it is silky smooth and entirely lump-free. Add the granulated sugar, vanilla bean paste, egg yolk, and the optional lemon juice. Beat everything until perfectly combined. The mixture should be thick, smooth, and slightly fluffy. Now comes the trickiest part: getting this creamy delight into the center of the dough without turning your kitchen into a sticky crime scene.
You cannot simply dollop the filling into the center of the cookie dough and expect stability. The filling needs structure. Using a small spoon or a piping bag, create small discs of the cheesecake mixture, about one teaspoon each, onto a parchment-lined plate. Place these filling discs into the freezer for at least 20 minutes, or until they are solid enough to handle easily. Think of them as tiny, frozen, creamy UFOs ready for deployment. This freezing step is the absolute key to preventing the inevitable leakage that plagues novice stuffed cookie makers. If you try to stuff them soft, you will end up with a mess.
Assembling and Baking Your Cheesecake Delights
Preheat your oven to 350°F (175°C) and line two baking sheets with parchment paper. Take your chilled cookie dough and roll it into 1 1/2-inch balls. Divide each ball in half. Flatten the bottom half slightly and place a frozen cheesecake disc right in the center. Top with a tiny drizzle of thickened caramel sauce (about 1/4 teaspoon). This caramel needs to be dense so it doesn’t melt instantly.
Now, gently place the remaining half of the cookie dough on top and carefully seal the edges completely, ensuring the filling is entirely encased. Think of it as wrapping a fragile present; absolute coverage is necessary. If you leave a seam, the cheesecake will escape and cause a delightful but messy explosion. Gently roll the sealed ball between your palms to smooth out the edges and disguise the seam. This extra step helps maintain a beautiful, uniform shape during baking.
Place the stuffed dough balls back on the baking sheet and optionally sprinkle the tops with a few flakes of sea salt to enhance the caramel flavor. Bake for 10 to 12 minutes. The edges should be set and lightly golden, but the centers should still look slightly soft. Remember, cookies continue to cook even after you pull them out of the oven. Letting them cool completely on the baking sheet for about five minutes helps them set up and prevents the centers from collapsing into despair when you move them to a wire rack. These delightful Caramel Cheesecake Cookies require patience, but the creamy, sweet reward is worth the wait.
Ensure you space the cookies out adequately on the baking sheet, giving them room to spread slightly without merging into one giant, flat “cookie bar.” If your kitchen is warm, you might even consider chilling the assembled cookies for 10 minutes before baking to ensure they don’t spread too quickly when introduced to the heat.
Ensure your cream cheese is truly softened, but not warm, before beating; this prevents lumps and ensures the filling remains velvety smooth during mixing.
-
Ensure your cream cheese is truly softened, but not warm, before beating; this prevents lumps and ensures the filling remains velvety smooth during mixing.
-
Do not skip freezing the cheesecake filling discs; this step is vital for structure and prevents the filling from melting out of the cookie too quickly during baking.
-
When sealing the dough around the filling, pinch the seams tightly and gently roll the finished ball to hide the seals, avoiding blowouts in the oven.
I distinctly remember the moment my very skeptical neighbor, Harold, tried the first batch. He stopped mid-chew, looked me dead in the eye, and simply said, “These are illegal.” High praise from Harold, who usually reserves his compliments for the local news coverage about traffic patterns.
Conclusion for Caramel Cheesecake Cookies
These gloriousCaramel Cheesecake Cookiessuccessfully bridge the gap between a classic chewy cookie and a tangy, decadent dessert. They prove that sometimes, the most delicious culinary creations arise from kitchen chaos and subsequent structural intervention. By following the crucial steps of chilling the dough, freezing the creamy centers, and sealing them tightly, you guarantee yourself a batch of perfectly structured, irresistible treats. Whether you are baking for a party or just desperately seeking an edible escape from reality, these creamy caramel rounds offer a taste of sunshine. Go ahead, embrace the joy of a stuffed cookie, and enjoy every rich, satisfying bite.
Print
Caramel Cheesecake Cookies
Sink your teeth into the ultimate dessert fusion! Creamy cheesecake meets chewy cookie perfection. Our quick method uses softened cream cheese for a fluffy texture.
- Total Time: 35 minutes
- Yield: 4 servings
Ingredients
- All-Purpose Flour: 1 3/4 cups
- Unsalted Butter (softened): 1/2 cup (1 stick)
- Granulated Sugar: 1/2 cup
- Cream Cheese (softened): 4 ounces
- Large Egg: 1
- Alcohol-Free Vanilla Extract: 1 teaspoon
- Baking Powder: 1/2 teaspoon
- Salted Caramel Sauce: 1/4 cup (plus extra for topping)
Instructions
- Step 1: Preheat the oven to 350°F (175°C). In a large bowl, cream together the softened butter, granulated sugar, and softened cream cheese using an electric mixer until the mixture is light and fluffy, scraping down the sides as needed.
- Step 2: Beat in the egg and vanilla bean paste until fully combined. In a separate bowl, whisk together the flour and baking powder, then gradually add the dry mixture into the wet ingredients, mixing only until just combined and no streaks of flour remain.
- Step 3: Scoop the dough using a 1.5 tablespoon cookie scoop and place mounds onto a baking sheet lined with parchment paper, spacing them about two inches apart. Bake for 10-12 minutes, or until the edges are lightly golden and the centers are set.
- Step 4: Immediately after removing the cookies from the oven, use the back of a measuring spoon or a small spatula to gently press a slight indentation into the center of each warm cookie. Allow the cookies to cool on the sheet for 5 minutes before transferring to a wire rack.
- Step 5: Fill each indentation with approximately 1/2 teaspoon of the salted caramel sauce. Once the cookies are completely cool, drizzle them with extra caramel sauce, if desired, before serving.
Notes
- Due to the cream cheese, store these cookies in an airtight container in the refrigerator for up to 5 days; let them come to room temperature before serving for the best texture.
- If you prefer a warm cookie, gently reheat them in a preheated oven (300°F/150°C) for just 3-4 minutes to soften the cookie and warm the caramel without burning the drizzle.
- Elevate this decadent treat by serving it alongside a scoop of high-quality vanilla bean ice cream or a strong cup of black coffee to balance the sweetness of the caramel.
- To achieve the perfect, deep well for your caramel filling, press the indentation tool firmly into the warm cookie centers immediately after they leave the oven, as they will firm up quickly as they cool.
- Prep Time: 15 minutes
- Cook Time: 20 minutes
- Method: Stovetop
- Cuisine: American


Leave a Comment