
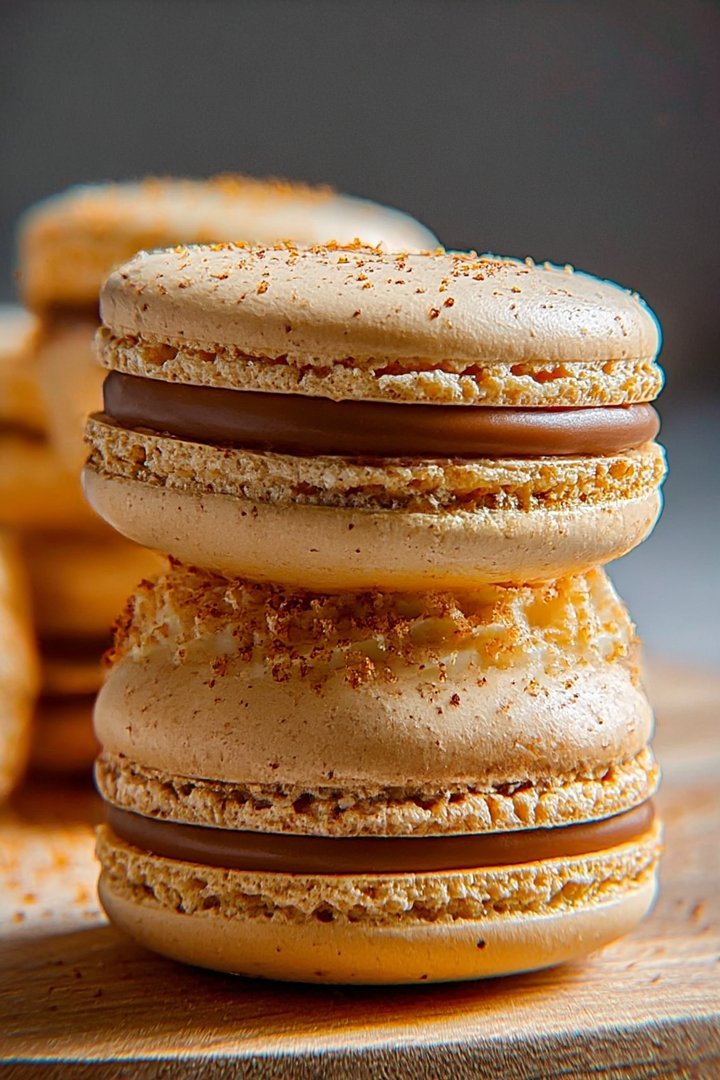
The aroma of freshly brewed coffee intertwines with the sweet, delicate scent of almond, creating a symphony of deliciousness. These Coffee Macarons are a delightful indulgence that will transport you to a Parisian cafe, one heavenly bite at a time.
Imagine biting into a crisp shell that gives way to a chewy interior, infused with the rich, bold flavor of coffee. They are perfect for an afternoon treat, a special occasion, or simply a moment of self-care. Get ready to embark on a baking adventure!
Here’s why you’ll absolutely adore these Coffee Macarons:
- Achieve perfect macaron shells with this recipe, thanks to detailed instructions and helpful tips.
- Experience the delightful marriage of robust coffee flavor and sweet almond in every bite.
- Impress your friends and family with a visually stunning dessert that tastes as good as it looks.
- Customize your macarons with different coffee intensities to suit your preferred taste profile perfectly.
Ingredients for Coffee Macarons
Here’s what you’ll need to make this delicious dish:
The full ingredients list, including measurements, is provided in the recipe card directly below.
How to Make Coffee Macarons
Follow these simple steps to prepare this delicious dish:
Step 1: Prepare the Almond Flour Mixture
Combine almond flour and icing sugar in a food processor and pulse until finely ground. Sift the mixture to remove any large particles and set aside. This ensures a smooth macaron shell.
Step 2: Make the Italian Meringue
In a saucepan, combine granulated sugar and water. Heat over medium heat until it reaches 245°F (118°C), using a candy thermometer. While the sugar syrup is heating, begin whipping the egg whites in a stand mixer until stiff peaks form. Gradually pour the hot sugar syrup into the egg whites, continuing to whip until the meringue is glossy and cooled.
Step 3: Macaronage
Gently fold the almond flour mixture into the Italian meringue in three additions. Add instant coffee powder to the mixture. The goal is to achieve a lava-like consistency, where the batter flows smoothly off the spatula. Be careful not to overmix, or the macarons will be flat.
Step 4: Pipe and Rest
Transfer the macaron batter into a piping bag fitted with a round tip. Pipe the batter onto baking sheets lined with parchment paper or silicone mats, creating even circles about 1.5 inches in diameter. Tap the baking sheets firmly on the counter several times to release any air bubbles. Let the macarons rest for 30-60 minutes, or until a skin forms on top.
Step 5: Bake
Preheat the oven to 300°F (150°C). Bake the macarons for 12-15 minutes, or until they have “feet” and are firm to the touch. Let them cool completely on the baking sheets before removing them.
Step 6: Prepare the Coffee Buttercream
In a stand mixer, beat the softened butter until light and fluffy. Gradually add the icing sugar, espresso powder, and Alcohol-free vanilla extract, mixing until well combined. Add a splash of heavy cream to achieve a smooth and creamy consistency.
Step 7: Assemble the Macarons
Pair up the macaron shells based on size. Pipe the coffee buttercream onto one shell and gently sandwich it with another. Refrigerate the assembled macarons for at least 24 hours to allow the flavors to meld.
Step 8: Enjoy
Remove the macarons from the refrigerator about 30 minutes before serving. These Coffee Macarons are the perfect treat to enjoy with a cup of coffee or tea.
Perfecting the Cooking Process
Efficiency is key! Start by preparing your coffee buttercream, as it needs time to chill. While it’s firming up, tackle the macaron shells. Remember, precise measurements are your friend. Finally, assemble those delightful coffee macarons!
Add Your Touch
Feeling adventurous? Try adding a pinch of cinnamon to the shells for a warm, spicy note. Or, for a mocha twist, swirl a bit of melted dark chocolate into your coffee buttercream. A little sea salt sprinkled on top is divine!
Storing & Reheating
These little beauties are best stored in an airtight container in the refrigerator. They’ll stay fresh for up to a week (if they last that long!). No need to reheat; enjoy them straight from the fridge for that perfect chewy texture.
Chef’s Tips for Macaron Mastery
- Make sure your almond flour is finely ground. Sifting it twice will ensure a smooth, glossy macaron shell without any unwanted bumps.
- Don’t overmix the macaron batter! You want the consistency of “lava.” This is key for those perfect feet.
- Let the piped macarons rest before baking until a skin forms. Gently touch the surface; if it doesn’t stick, you’re good to go!
(Personal anecdote formated as paragraph subheading)
I remember the first time I made these. They were a disaster! My sister said they looked like little brown hockey pucks. Thankfully, I’ve learned a few tricks since then.
It all began with a caffeine craving. Not just any caffeine craving, but the kind that hits you like a runaway train on a Monday morning. You know the feeling. The one where you’d sell your favorite socks for a decent cup of coffee. That’s where I found myself, staring blankly into the pantry, willing the coffee beans to magically transform into something…more. And that, my friends, is the birth story of my obsession with coffee macarons.
Now, I know what you’re thinking. Macarons? Those notoriously finicky French cookies that strike fear into the hearts of even seasoned bakers? Yep, those ones. But I’m not one to back down from a challenge, especially when it involves coffee. Plus, I figured, how hard could it *really* be? (Spoiler alert: very). But, the allure of a tiny, elegant cookie packed with the invigorating flavor of coffee was too strong to resist.
So, I plunged headfirst into the world of almond flour, egg whites, and precisely measured ingredients. Armed with a stand mixer, a piping bag, and a healthy dose of optimism (which quickly turned into desperation), I embarked on my coffee macaron journey.
The first batch? Let’s just say they resembled something closer to lumpy pancakes than the delicate, airy cookies I envisioned. The “feet” were nonexistent, the shells were cracked, and the overall texture was…well, let’s just call it “rustic.” My confidence took a nosedive faster than a sugar rush comedown.
But I’m nothing if not persistent (or stubborn, depending on who you ask). I scoured the internet, devoured countless blog posts, and watched approximately 7,432 YouTube tutorials on macaron making. I analyzed every variable, tweaked every measurement, and experimented with different baking times and temperatures. My kitchen looked like a powdered sugar explosion zone, and my sanity was hanging by a thread.
Slowly, painstakingly, things started to improve. The feet began to emerge, tentatively at first, like shy little toes peeking out from under a blanket. The shells became smoother, the cracks disappeared, and the texture…oh, the texture! That perfect balance of chewy and crisp, the melt-in-your-mouth sensation that makes macarons so addictive.
And then there was the coffee flavor. I experimented with different types of coffee – espresso powder, instant coffee, even brewed coffee reduced to a syrupy concentrate. Finally, I landed on the perfect combination: a generous dose of espresso powder in the shells and a creamy, dreamy coffee buttercream filling that would make even the most discerning coffee snob swoon.
The result? Little bites of caffeinated bliss. Each coffee macaron is a perfect balance of sweetness, bitterness, and that unmistakable coffee aroma that makes you want to curl up with a good book and never leave your kitchen.
These coffee macarons aren’t just cookies; they’re a labor of love, a testament to perseverance, and a celebration of the magical power of coffee. They’re perfect for a fancy brunch, a sophisticated afternoon tea, or a late-night indulgence when you need a little pick-me-up.
So, if you’re feeling brave, and you’re ready to embrace the challenge (and the potential for powdered sugar-induced madness), I urge you to give these coffee macarons a try. Trust me, the reward is worth the effort. And even if your first batch resembles lumpy pancakes, don’t despair. Just remember my story, take a deep breath, and try, try again.
Essential Equipment
- Stand mixer: A stand mixer makes whipping the meringue much easier, but a hand mixer will also do the trick.
- Piping bags and tips: You’ll need piping bags and a round tip to pipe the macaron shells.
- Baking sheets: Use baking sheets lined with parchment paper or silicone mats.
- Digital scale: Precision is key when making macarons, so a digital scale is a must.
Gather Your Ingredients for the Shells
- 150g almond flour: Finely ground almond flour is essential for smooth macaron shells.
- 150g powdered sugar: Sift the powdered sugar to remove any lumps.
- 100g egg whites: Aged egg whites (separated 24-48 hours in advance) whip up better.
- 150g granulated sugar: Use regular granulated sugar for the meringue.
- 2 tablespoons espresso powder: This adds a rich coffee flavor to the shells.
Brewing the Coffee Buttercream Filling
- 1 cup (2 sticks) unsalted butter: Softened to room temperature.
- 3 cups powdered sugar: Sifted to remove any lumps.
- 1/4 cup heavy cream: For a smooth and creamy texture.
- 4 tablespoons espresso powder: Adjust to your desired coffee intensity.
- 1 teaspoon Alcohol-free vanilla extract: Enhances the overall flavor.
Macaron Mastery: The Step-by-Step Guide
Preparing the Almond Flour Mixture
1. In a food processor, combine the almond flour and powdered sugar. Pulse until finely ground. This step ensures a smooth texture for your macarons. Sift the mixture through a fine-mesh sieve into a large bowl. Discard any large particles.
2. Add the espresso powder to the almond flour mixture and whisk to combine. This ensures even distribution of the coffee flavor. Set aside.
Whipping the Meringue
1. In a clean, grease-free bowl of a stand mixer fitted with the whisk attachment, beat the egg whites on medium speed until soft peaks form. This usually takes a few minutes.
2. Gradually add the granulated sugar, one tablespoon at a time, while continuing to beat on medium-high speed. Beat until stiff, glossy peaks form. The meringue should hold its shape and not droop.
The Macaronage: Achieving the Perfect Batter Consistency
1. Add the dry ingredients to the meringue. Using a spatula, gently fold the mixture together until just combined. Be careful not to overmix.
2. Now comes the macaronage: the crucial step of deflating the batter to the right consistency. Continue folding the batter, scraping the sides of the bowl, until the batter flows like lava. You should be able to draw a figure eight with the batter without it breaking.
Piping the Macarons
1. Transfer the macaron batter to a piping bag fitted with a round tip.
2. Pipe 1.5-inch circles onto baking sheets lined with parchment paper or silicone mats, spacing them about 1 inch apart.
3. Tap the baking sheets firmly on the counter several times to release any air bubbles. This will help prevent cracked shells.
Resting the Macarons
1. Let the piped macarons rest at room temperature for 30-60 minutes, or until a skin forms on the surface. You should be able to gently touch the surface without the batter sticking to your finger. This step is crucial for developing those characteristic “feet.”
Baking to Perfection
1. Preheat your oven to 300°F (150°C).
2. Bake the macarons for 12-15 minutes, or until the feet are well-risen and the shells are set.
3. Let the macarons cool completely on the baking sheets before removing them.
Crafting the Coffee Buttercream
1. In a large bowl, beat the softened butter with a stand mixer or hand mixer until light and fluffy.
2. Gradually add the powdered sugar, one cup at a time, beating well after each addition.
3. Add the heavy cream, espresso powder, and Alcohol-free vanilla extract. Beat until smooth and creamy. Adjust the amount of espresso powder to your desired coffee strength.
The Grand Finale: Assembling the Coffee Macarons
1. Pair up the macaron shells by size and shape.
2. Pipe or spread a generous amount of coffee buttercream onto the flat side of one shell.
3. Top with another shell, gently pressing down to create a sandwich.
4. Refrigerate the assembled macarons for at least 24 hours before serving. This allows the flavors to meld and the texture to improve.
Troubleshooting Common Macaron Mishaps
Cracked Shells
This is often caused by air bubbles in the batter or insufficient resting time. Make sure to tap the baking sheets firmly to release air bubbles and allow the macarons to rest until a skin forms.
No Feet
This can be due to overmixing the batter, insufficient resting time, or oven temperature issues. Be careful not to overmix the batter and ensure that the macarons rest until a skin forms. Also, check your oven temperature for accuracy.
Hollow Shells
This is often caused by baking at too high a temperature. Try lowering the oven temperature slightly and baking for a longer time.
Unevenly Baked Macarons
This can be due to hot spots in your oven. Rotate the baking sheets halfway through baking to ensure even baking.
Now go forth and conquer the world of coffee macarons! With a little practice and patience, you’ll be whipping up these delightful treats in no time. And who knows, maybe you’ll even start your own coffee macaron obsession. You’ve been warned!
Conclusion for Coffee Macarons:
Coffee macarons are a sophisticated and flavorful treat that’s easier to make than you might think. The combination of delicate almond meringue shells and a rich coffee buttercream is simply irresistible. By following the tips and tricks outlined in this recipe, you can create these delightful treats at home and impress your friends and family. So go ahead, get baking, and enjoy the deliciousness of homemade coffee macarons. These are not just a dessert; they’re an experience.
Print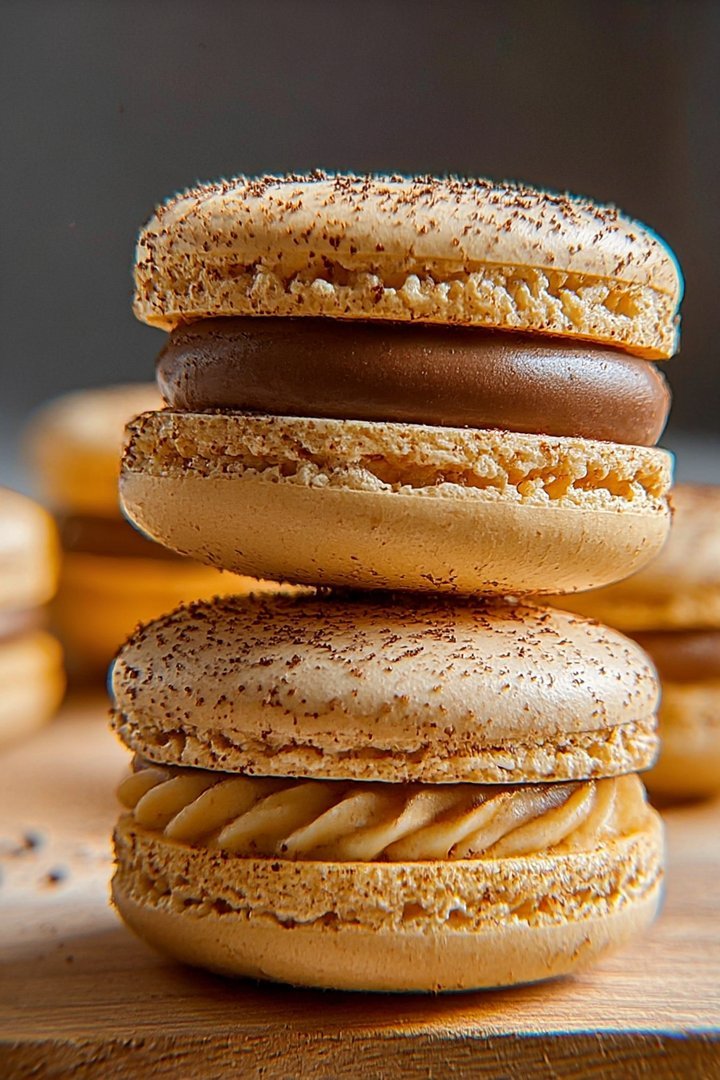
Coffee Macarons
Delicious coffee macarons recipe with detailed instructions and nutritional information.
- Total Time: 35 minutes
- Yield: 4 servings
Ingredients
- Almond flour, finely ground: 100g
- Powdered sugar: 100g
- Egg whites, aged 2-3 days: 55g (divided)
- Granulated sugar: 50g
- Instant espresso powder: 1 tablespoon
- Water: 1 teaspoon
- Vanilla extract: 1/2 teaspoon
- Coffee buttercream filling (recipe follows)
Instructions
- Step 1: Prepare the coffee powder. Dissolve the instant espresso powder in the water to form a paste. Set aside.
- Step 2: Sift together the almond flour and powdered sugar into a large bowl. Discard any large pieces. Add the coffee paste and mix well.
- Step 3: In a clean, dry bowl, whisk the egg whites until soft peaks form. Gradually add the granulated sugar and continue whisking until stiff, glossy peaks form.
- Step 4: Add half of the meringue to the almond flour mixture and mix well to form a paste. Then, gently fold in the remaining meringue until the batter is smooth and flows like lava, forming a ribbon that slowly disappears back into the batter.
- Step 5: Transfer the batter to a piping bag fitted with a round tip. Pipe circles onto a baking sheet lined with parchment paper or a silicone mat. Tap the baking sheet firmly on the counter several times to release any air bubbles. Let the macarons rest at room temperature for 30-60 minutes, or until a skin forms on top.
- Step 6: Preheat oven to 300°F (150°C). Bake for 13-15 minutes, or until the feet are well developed and the macarons are set. Let the macarons cool completely on the baking sheet before removing them. Fill with coffee buttercream filling and store in an airtight container in the refrigerator.
Notes
- For best flavor, allow filled macarons to mature in the refrigerator for 24-48 hours before enjoying.
- If your macarons become too chilled, let them sit at room temperature for about 15 minutes before serving to soften the filling slightly.
- Pair these coffee macarons with a cup of your favorite coffee or tea for a delightful treat.
- Dissolving the espresso powder completely is crucial for a smooth batter and even coffee flavor distribution.
- Prep Time: 15 minutes
- Cook Time: 20 minutes
- Method: Stovetop
- Cuisine: American
FAQs:
What makes these Coffee Macarons so special?
Oh, honey, these aren’t just any macarons. These are *coffee macarons*. We’re talking about a delightful dance of almond meringue and a rich, creamy coffee-infused buttercream. They’re the kind of treat that makes you feel fancy, even if you’re just wearing your pajamas. Each bite is a little hug for your soul, perfectly balancing sweetness with that distinctive coffee kick. Plus, they look absolutely gorgeous! I mean, who wouldn’t want to impress their friends (or just themselves) with these little beauties?
Can I use instant coffee for the Coffee Macarons filling?
While you *could* use instant coffee, I wouldn’t recommend it for the filling. For the best flavor, use a strong brewed coffee or espresso. The instant stuff tends to be a little too harsh and won’t give you that smooth, decadent coffee flavor we’re aiming for in our special macarons. A freshly brewed shot of espresso added to your buttercream gives an intense and genuine coffee flavor that elevates the overall macaron experience. You might be surprised by how much of a difference it makes!
How do I store my Coffee Macarons?
Proper storage is key to keeping your coffee macarons fresh and delicious. After baking and filling, store them in an airtight container in the refrigerator. They’ll need at least 24 hours to “mature,” allowing the flavors to meld together beautifully. Before serving, let them sit at room temperature for about 15-20 minutes to soften slightly. They can be stored in the refrigerator for up to 3 days, or frozen for longer storage (up to a month). Just remember to thaw them in the fridge before enjoying!
What if my Coffee Macaron shells crack?
Cracked shells are a common macaron problem, but don’t despair! It usually happens if the oven temperature is too high or if the shells haven’t dried properly before baking. Make sure to let your piped shells sit and form a skin before baking—this can take anywhere from 30 minutes to an hour, depending on humidity. Also, double-check your oven temperature with an oven thermometer. Even a slight adjustment can make a huge difference. And hey, even if they crack, they’ll still taste amazing! We can call them “rustic coffee macarons.”


Leave a Comment