
Imagine sinking your teeth into a warm, fragrant slice of bread, the savory aroma of Italian herbs mingling with the rich, comforting taste of melted cheese. That’s the magic of **delicious Italian herb and cheese bread**, a simple yet utterly irresistible creation that elevates any meal.
This isn’t just bread; it’s an experience. A taste of home, a burst of flavor, and a guaranteed crowd-pleaser, perfect for cozy nights in or celebratory gatherings. Get ready to embark on a culinary adventure that will fill your kitchen with the most delightful scents and leave you craving more.
- Effortlessly create a bakery-worthy loaf with minimal ingredients and simple instructions, making it perfect for bakers of all skill levels.
- Savor the delightful combination of aromatic Italian herbs and gooey, melted cheese in every bite, delivering an explosion of flavor.
- Impress your family and friends with a visually stunning bread that boasts a golden-brown crust and an enticing herb-studded interior.
- Enjoy this versatile bread as a delicious appetizer, a satisfying side dish, or even as the star of a gourmet sandwich.
Ingredients for Delicious Italian Herb and Cheese Bread
Here’s what you’ll need to make this delicious dish:
The full ingredients list, including measurements, is provided in the recipe card directly below.
How to Make Delicious Italian Herb and Cheese Bread
Follow these simple steps to prepare this delicious dish:
Step 1: Activate the Yeast
In a large bowl, dissolve the active dry yeast and sugar in warm water. Let it stand for 5-10 minutes, or until foamy. This indicates that the yeast is active and ready to use.
Step 2: Combine Wet and Dry Ingredients
Add the olive oil and salt to the yeast mixture. Gradually add the flour, mixing with a wooden spoon or your hands until a shaggy dough forms.
Step 3: Knead the Dough
Turn the dough out onto a lightly floured surface and knead for 8-10 minutes, or until smooth and elastic. Alternatively, use a stand mixer with a dough hook for 6-8 minutes.
Step 4: First Rise
Place the dough in a lightly oiled bowl, turning to coat. Cover with plastic wrap or a clean kitchen towel and let rise in a warm place for 1-1.5 hours, or until doubled in size.
Step 5: Shape the Bread
Punch down the dough to release the air. On a lightly floured surface, roll the dough into a large rectangle. Sprinkle with the Italian herb blend, mozzarella cheese, Parmesan cheese, and fresh parsley.
Step 6: Roll and Bake
Starting from one long end, tightly roll the dough into a log. Place the log seam-side down on a baking sheet lined with parchment paper. Bake in a preheated oven at 375°F (190°C) for 30-35 minutes, or until golden brown.
Step 7: Cool and Serve
Let the bread cool on a wire rack for at least 15 minutes before slicing and serving. Enjoy warm, on its own, or alongside your favorite Italian dishes.
Tips for Perfect Delicious Italian Herb and Cheese Bread
Creating **delicious Italian herb and cheese bread** doesn’t have to be a daunting task. With a few helpful tips and tricks, you can achieve bakery-quality results in your own kitchen. From proofing the yeast to mastering the perfect bake, let’s dive into the secrets that will elevate your bread-making game.
Yeast Activation: The Key to Success
Yeast is the heart and soul of any good bread, and activating it properly is crucial. The water should be warm, not hot; think lukewarm bathwater. Too hot, and you’ll kill the yeast, too cold, and it won’t activate. Patience is key here. Give the yeast a good 5-10 minutes to bubble and foam, which indicates it’s alive and ready to work its magic. If it doesn’t foam, your yeast might be past its prime, and it’s time to grab a fresh batch.
Kneading: Building Strength and Structure
Kneading develops the gluten in the flour, giving the bread its structure and elasticity. Don’t be afraid to get your hands dirty! Push, fold, and turn the dough, incorporating air and creating a smooth, pliable texture. If you’re using a stand mixer, let it do the work for you with the dough hook attachment. Either way, aim for 8-10 minutes of kneading until the dough is smooth and springs back when you poke it.
The Perfect Rise: Time and Temperature
The first rise is where the dough doubles in size, thanks to the yeast producing carbon dioxide. Find a warm spot in your kitchen, away from drafts. A slightly warm oven (turned off!) or a sunny windowsill can work wonders. Cover the dough with plastic wrap or a damp kitchen towel to prevent it from drying out. Be patient, as the rising time can vary depending on the temperature and humidity.
Cheese Selection: Flavor and Texture
Choosing the right cheese can make or break your **delicious Italian herb and cheese bread**. Mozzarella is a classic choice for its meltability and mild flavor, but don’t be afraid to experiment. Provolone adds a tangy kick, while fontina brings a nutty richness. A sprinkle of Parmesan provides a salty, savory note. Use a mix of cheeses for a complex flavor profile that will tantalize your taste buds.
Herb Blend: Aromatic Magic
The Italian herb blend is what gives this bread its signature flavor. A combination of oregano, basil, rosemary, and thyme creates a symphony of aromas that will fill your kitchen. Feel free to adjust the blend to your liking. Add a pinch of red pepper flakes for a spicy kick, or a sprinkle of garlic powder for extra savory goodness. Fresh herbs can also be used, but be sure to chop them finely for even distribution.
Shaping: Creating Visual Appeal
Shaping the dough into a log creates a beautiful swirl of herbs and cheese throughout the bread. Roll the dough tightly to prevent air pockets and ensure an even bake. Place the log seam-side down on the baking sheet to prevent it from unrolling during baking. You can also score the top of the bread with a sharp knife to allow steam to escape and create a beautiful crust.
Baking: Achieving Golden Perfection
Baking at the right temperature is crucial for achieving a golden-brown crust and a perfectly cooked interior. A preheated oven is essential for even baking. Bake the bread until it’s golden brown and sounds hollow when you tap the bottom. If the top is browning too quickly, tent it with foil to prevent burning. Let the bread cool on a wire rack before slicing to prevent it from becoming soggy.
Serving Suggestions for Delicious Italian Herb and Cheese Bread
**Delicious Italian herb and cheese bread** is incredibly versatile and can be enjoyed in a variety of ways. Whether you’re looking for a simple snack, a satisfying side dish, or a gourmet sandwich ingredient, this bread has you covered. Let’s explore some creative and delicious serving suggestions to make the most of your freshly baked loaf.
As a Scrumptious Appetizer
Slice the bread into thick, rustic pieces and serve it alongside a platter of olives, sun-dried tomatoes, and marinated artichoke hearts. Drizzle with extra virgin olive oil and sprinkle with a pinch of sea salt for an extra touch of flavor. This makes a perfect appetizer for parties or a casual get-together with friends.
Accompanying Soups and Salads
Serve warm slices of **delicious Italian herb and cheese bread** with a hearty bowl of tomato soup, minestrone, or lentil soup. The bread is perfect for dipping and soaking up all the delicious flavors. It also complements a fresh garden salad beautifully, adding a touch of warmth and savory goodness to the meal.
Creating Gourmet Sandwiches
Elevate your sandwich game by using this bread as the base for gourmet creations. Layer with sliced turkey, roasted chicken, or grilled vegetables, along with your favorite cheeses and spreads. The robust flavor and sturdy texture of the bread can handle even the most loaded sandwiches.
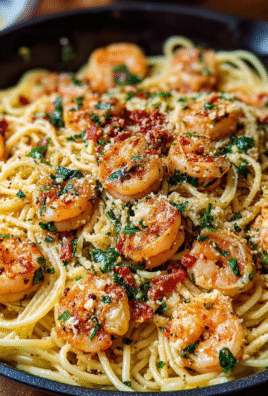
Pairing with Pasta Dishes
Serve warm slices of this flavorful bread alongside your favorite pasta dishes, such as spaghetti, lasagna, or ravioli. The bread is perfect for soaking up the sauce and adding a satisfying textural contrast to the meal. It’s also a great way to use up any leftover sauce!
Dipping in Olive Oil and Balsamic Vinegar
For a simple yet elegant appetizer, serve slices of **delicious Italian herb and cheese bread** with a mixture of olive oil and balsamic vinegar. The combination of the savory bread, rich olive oil, and tangy balsamic vinegar is a match made in culinary heaven.
As a Side Dish for Grilled Meats
Serve warm slices of this flavorful bread alongside grilled chicken, steak, or lamb. The savory flavors of the bread complement the smoky flavors of the grilled meats, creating a balanced and satisfying meal.
Making Garlic Bread
For an extra indulgent treat, brush slices of **delicious Italian herb and cheese bread** with garlic butter and broil until golden brown and bubbly. The combination of the Italian herbs, cheese, and garlic is simply irresistible.
Variations to Enhance Your Delicious Italian Herb and Cheese Bread
While the classic recipe for **delicious Italian herb and cheese bread** is a winner, there’s always room for experimentation and personalization. Let’s explore some creative variations that will allow you to customize the bread to your liking and add your own unique touch.
Different Cheese Combinations
Instead of just mozzarella and Parmesan, try using a mix of different cheeses for a more complex flavor profile. Provolone adds a tangy kick, fontina brings a nutty richness, and Asiago provides a salty, savory note. Experiment with different combinations to find your perfect cheese blend.
Adding Vegetables
Incorporate finely chopped vegetables into the dough for added flavor and nutrition. Sun-dried tomatoes, roasted red peppers, spinach, or zucchini all work well. Just be sure to drain any excess moisture from the vegetables before adding them to the dough.
Spicy Kick
Add a pinch of red pepper flakes to the dough or herb blend for a spicy kick. This will add a delightful warmth and complexity to the bread. You can also use chili-infused olive oil for an extra layer of flavor.
Garlic Infusion
Add minced garlic or garlic powder to the dough or herb blend for a more intense garlic flavor. You can also roast garlic cloves and mash them into a paste to add to the dough.
Sweet and Savory Twist
Add a touch of sweetness to the bread by incorporating dried cranberries, raisins, or apricots into the dough. This creates a delightful contrast to the savory herbs and cheese.
Different Herbs
Experiment with different herbs to create unique flavor combinations. Rosemary, sage, thyme, and oregano all pair well with cheese and bread. You can also use fresh herbs for a more vibrant flavor.
Olive Addition
Add chopped olives to the dough for a salty, briny flavor. Kalamata olives, green olives, or black olives all work well. Just be sure to pit the olives before chopping them.
Sun-Dried Tomato Pesto Swirl
Spread a layer of sun-dried tomato pesto over the dough before rolling it into a log. This creates a beautiful swirl of flavor throughout the bread.
Adding Seeds
Sprinkle the top of the bread with sesame seeds, poppy seeds, or sunflower seeds before baking for added texture and flavor.
Enjoy experimenting with these variations and creating your own signature **delicious Italian herb and cheese bread**!
Perfecting the Cooking Process

For the most amazing results, start by prepping all your ingredients. Get your dough ready first. Then, prepare your herb and cheese mixture. Bake until golden brown and enjoy! This way, everything comes together seamlessly.
Add Your Touch
Feel free to get creative with your herb blend. Rosemary, thyme, or even a pinch of red pepper flakes can add a fun twist. Different cheeses, like Gruyere or Fontina, can also enhance the flavor. Make it your own!
Storing & Reheating
Wrap any leftover herb and cheese bread tightly in foil or plastic wrap, then store at room temperature for up to two days. Reheat slices in a toaster oven or regular oven until warm and crispy for the best taste.
**Chef’s Tips for Herb and Cheese Bread Perfection**
- Don’t skip the proofing time! This allows the dough to develop its full flavor and airy texture, making all the difference in your bread.
- Use high-quality cheese and herbs. The better the ingredients, the more flavorful and aromatic your bread will become—it’s that simple.
- For an extra crispy crust, brush the loaf with olive oil before baking. This adds richness and a delightful golden-brown finish.
(Personal anecdote)
The first time I baked this bread for my family, it disappeared within minutes! My uncle jokingly asked if I had a secret bread-baking ninja. It’s become a family favorite ever since, and I always get requests to make it for gatherings.
Delicious Italian Herb and Cheese Bread: An Ode to Aromatic Baking
Alright, folks, gather ‘round! Let’s talk about something truly magical: the *Delicious Italian Herb and Cheese Bread*. I’m not just talking about any old bread here. I’m talking about the kind of bread that makes you close your eyes, inhale deeply, and momentarily forget all your troubles. You know, *that* kind of bread. The kind that practically sings to your soul with its herbaceous aroma and cheesy goodness.
I remember the first time I attempted to bake bread from scratch. Let’s just say it involved a lot of flour, a small kitchen fire (nothing major, don’t panic!), and a loaf that could have doubled as a doorstop. But, like any determined (or perhaps slightly insane) baker, I persevered. And after countless attempts, tweaks, and flour-dusted mishaps, I finally nailed it. And *this* recipe, my friends, is the culmination of all that hard-won baking wisdom. This herb and cheese bread? It’s not just a recipe; it’s a journey!
Why This Herb and Cheese Bread Is a Game Changer
So, what makes this particular herb and cheese bread so darn special? Well, for starters, it’s ridiculously easy to make. Seriously, if I can do it after setting my oven on fire, you can definitely handle it. But beyond its simplicity, it’s the flavor that truly sets it apart. The combination of fragrant herbs, perfectly melted cheese, and that glorious, golden-brown crust is simply irresistible.
Plus, let’s be honest, who doesn’t love the smell of freshly baked bread wafting through the house? It’s like a warm hug in carbohydrate form. Forget expensive candles; bake this bread, and your home will instantly become the coziest, most inviting place on earth.
Gather Your Ingredients for Delicious Italian Herb and Cheese Bread
Before we dive into the nitty-gritty of bread-making, let’s make sure we have all our ingredients ready to go. Think of it as assembling your baking dream team.
**For the Dough: **
- 3 cups all-purpose flour (plus extra for dusting – because flour explosions are inevitable)
- 1 packet (2 1/4 teaspoons) active dry yeast (the magic ingredient!)
- 1 teaspoon granulated sugar (a little sugar to wake up the yeasties)
- 1 teaspoon salt (because everything needs a little salt)
- 1 1/4 cups warm water (not too hot, not too cold – Goldilocks water)
- 2 tablespoons olive oil (for that touch of Italian flair)
**For the Herb and Cheese Filling: **
- 1 cup shredded mozzarella cheese (the classic choice)
- 1/2 cup grated Parmesan cheese (for that salty, nutty goodness)
- 2 tablespoons chopped fresh rosemary (because rosemary is amazing)
- 2 tablespoons chopped fresh thyme (thyme is on our side!)
- 2 cloves garlic, minced (garlic makes everything better)
- 1/4 cup olive oil (to bind it all together)
See? Nothing too scary, right? Just a bunch of simple ingredients that, when combined, transform into something truly extraordinary.
Dough-lightful Preparation: Bringing the Bread to Life
Now for the fun part! Let’s get our hands dirty and start making some dough.
1. **Activate the Yeast: ** In a large bowl, dissolve the yeast and sugar in warm water. Let it sit for about 5-10 minutes, or until it gets foamy. This is how you know the yeast is alive and ready to party. If it doesn’t foam, your yeast might be dead (RIP yeast). Time to get a new packet.
2. **Combine the Ingredients: ** Add the flour, salt, and olive oil to the yeast mixture. Stir until a shaggy dough forms.
3. **Knead the Dough: ** Turn the dough out onto a lightly floured surface and knead for 5-7 minutes, or until it becomes smooth and elastic. If you have a stand mixer, feel free to use the dough hook attachment. It’s like having a robotic kneading assistant.
4. **First Rise: ** Place the dough in a lightly oiled bowl, turning to coat. Cover with plastic wrap or a damp towel and let it rise in a warm place for about an hour, or until doubled in size. This is where the magic happens. The yeast is working its little heart out, creating all those wonderful air pockets that make bread so fluffy.
5. **Prepare the Filling: ** While the dough is rising, prepare the herb and cheese filling. In a medium bowl, combine the mozzarella cheese, Parmesan cheese, rosemary, thyme, garlic, and olive oil. Mix well. This is where the heavenly aroma begins to develop.
Shaping Your Masterpiece: Creating Delicious Italian Herb and Cheese Bread
Okay, dough has doubled in size? Fantastic! Now it’s time to shape our bread into a thing of beauty.
1. **Deflate and Roll: ** Gently punch down the risen dough to release the air. Turn it out onto a lightly floured surface and roll it into a large rectangle, about 12×18 inches.
2. **Spread the Filling: ** Evenly spread the herb and cheese filling over the entire surface of the dough.
3. **Roll It Up: ** Starting from one of the long edges, tightly roll the dough into a log. Pinch the seam to seal.
4. **Slice and Arrange: ** Using a sharp knife or pizza cutter, slice the log into 1 1/2-inch thick rounds. Arrange the rounds in a greased 9×13 inch baking dish, slightly overlapping.
5. **Second Rise: ** Cover the dish with plastic wrap or a damp towel and let it rise for another 30 minutes. This gives the bread one last chance to get extra fluffy.
Baking to Golden Perfection: Achieving Delicious Italian Herb and Cheese Bread Nirvana
Almost there! Now for the final act: baking our herb and cheese bread to golden, cheesy perfection.
1. **Preheat and Bake: ** Preheat your oven to 375°F (190°C). Bake the bread for 25-30 minutes, or until it’s golden brown and the cheese is melted and bubbly.
2. **Cool and Enjoy: ** Let the bread cool in the dish for a few minutes before serving. This is the hardest part, I know, but trust me, it’s worth the wait.
And there you have it! Your very own *Delicious Italian Herb and Cheese Bread*, fresh from the oven and ready to be devoured. Serve it warm with a side of marinara sauce for dipping, or simply enjoy it on its own. Trust me, this bread is so good, it won’t last long.
Troubleshooting Tips for Perfecting Your Herb and Cheese Bread
- **Dough Not Rising?** Make sure your yeast isn’t expired and that your water isn’t too hot or too cold. Yeast is a bit of a diva, so treat it with care.
- **Bread Too Dense?** You might have added too much flour or not kneaded the dough enough. Remember, kneading is key to developing gluten and creating a light, airy texture.
- **Filling Leaking Out?** Make sure you seal the seam of the dough log tightly. A little leakage is okay, but too much means your filling will end up all over the baking dish.
Remember, baking is a journey, not a destination. Don’t be afraid to experiment, make mistakes, and learn from them. And most importantly, have fun! Because at the end of the day, nothing beats the satisfaction of pulling a warm, delicious loaf of *Delicious Italian Herb and Cheese Bread* out of the oven.
Conclusion for Delicious Italian Herb and Cheese Bread:
In summary, this Delicious Italian Herb and Cheese Bread is more than just a recipe; it’s an experience. With simple ingredients and straightforward steps, you can create a loaf that’s both comforting and impressive. From selecting the perfect herbs and cheese to mastering the art of the golden-brown crust, each element contributes to the bread’s overall charm. Enjoy the process, experiment with flavors, and, most importantly, savor every slice of your homemade masterpiece. It’s a delightful addition to any meal.
Print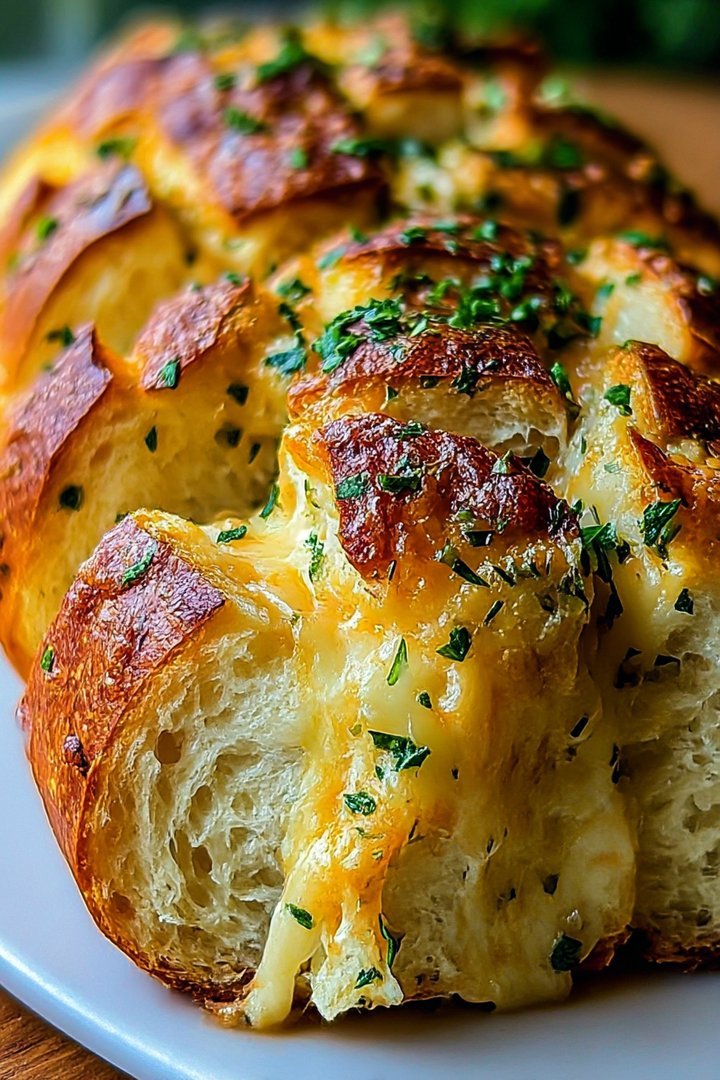
Delicious Italian Herb and Cheese Bread
Delicious delicious italian herb and cheese bread recipe with detailed instructions and nutritional information.
- Total Time: 35 minutes
- Yield: 4 servings
Ingredients
- All-purpose flour: 3 cups
- Active dry yeast: 2 1/4 teaspoons
- Warm water: 1 1/4 cups (105-115°F)
- Granulated sugar: 1 tablespoon
- Salt: 1 teaspoon
- Olive oil: 2 tablespoons
- Italian herb seasoning: 2 tablespoons
- Shredded mozzarella cheese: 1 1/2 cups
Instructions
- Step 1: In a large bowl, dissolve yeast and sugar in warm water. Let stand for 5-10 minutes until foamy.
- Step 2: Add olive oil, salt, and 1 cup of flour to the yeast mixture. Mix until combined. Gradually add the remaining flour, mixing until a dough forms.
- Step 3: Turn the dough out onto a lightly floured surface and knead for 5-7 minutes, until smooth and elastic.
- Step 4: Place the dough in a lightly oiled bowl, turning to coat. Cover and let rise in a warm place for 1-1.5 hours, or until doubled in size.
- Step 5: Preheat oven to 375°F (190°C). Punch down the dough and turn it out onto a lightly floured surface. Knead in the Italian herb seasoning and half of the mozzarella cheese.
- Step 6: Shape the dough into a loaf and place it on a baking sheet lined with parchment paper. Sprinkle the remaining mozzarella cheese on top. Bake for 30-35 minutes, or until golden brown. Let cool slightly before slicing and serving.
Notes
- To keep your bread fresh longer, store it in an airtight bag at room temperature for up to 3 days.
- For a delightful warm treat, reheat slices in a toaster oven or regular oven at 350°F (175°C) for a few minutes until heated through.
- Serve this flavorful bread alongside your favorite pasta dishes or as a delicious appetizer with a drizzle of balsamic glaze.
- For an extra cheesy experience, reserve some mozzarella to add during the last 10 minutes of baking!
- Prep Time: 15 minutes
- Cook Time: 20 minutes
- Method: Stovetop
- Cuisine: American
FAQs:
Can I use different herbs in this Delicious Italian Herb and Cheese Bread?
Absolutely! Feel free to get creative. While this recipe sings with the classic Italian blend, you could easily swap in fresh rosemary, thyme, or even a bit of oregano. If you are feeling adventurous, try adding sun-dried tomatoes or olives for a different flavour profile. Adjust the quantities to your liking, and remember that fresh herbs will have a stronger flavor than dried ones, so use them sparingly at first. Baking should be fun, so experiment and find what works best for your taste buds. It’s your bread, after all!
How do I store my freshly baked Italian Herb and Cheese Bread?
To keep your loaf fresh and delicious, wrap it tightly in plastic wrap or store it in an airtight container at room temperature. If you live in a humid environment, consider adding a piece of paper towel to the container to absorb excess moisture. For longer storage, you can freeze the bread. Just slice it before freezing, and then wrap the slices individually. That way, you can easily grab a piece whenever a bread craving strikes. When ready to eat, thaw the bread at room temperature or pop it in the toaster for a warm, crusty treat.
What’s the best cheese to use for this herb and cheese bread recipe?
While the recipe suggests mozzarella, you can definitely play around with different cheeses to find your favorite combination. Provolone would add a lovely creamy texture and a slightly sharper flavor. Parmesan would provide a salty, nutty taste. For a real cheesy kick, try adding a bit of Asiago or Fontina. The key is to use a cheese that melts well and complements the herbs. Remember to shred your cheese finely so it distributes evenly throughout the dough for maximum cheesy goodness in every bite of this bread delight.
How do I get that perfect crust on my Delicious Italian Herb and Cheese Bread?
Achieving that golden-brown, slightly crispy crust is all about steam and temperature. During the first half of baking, the steam helps to keep the surface of the dough moist, allowing it to expand fully. You can achieve this by placing a pan of hot water on the bottom rack of your oven. Also, be sure to preheat your oven thoroughly before baking. Don’t be afraid to let the bread bake until it’s deeply golden brown – that color is flavor! If you notice the top browning too quickly, you can tent it loosely with foil.


Leave a Comment