
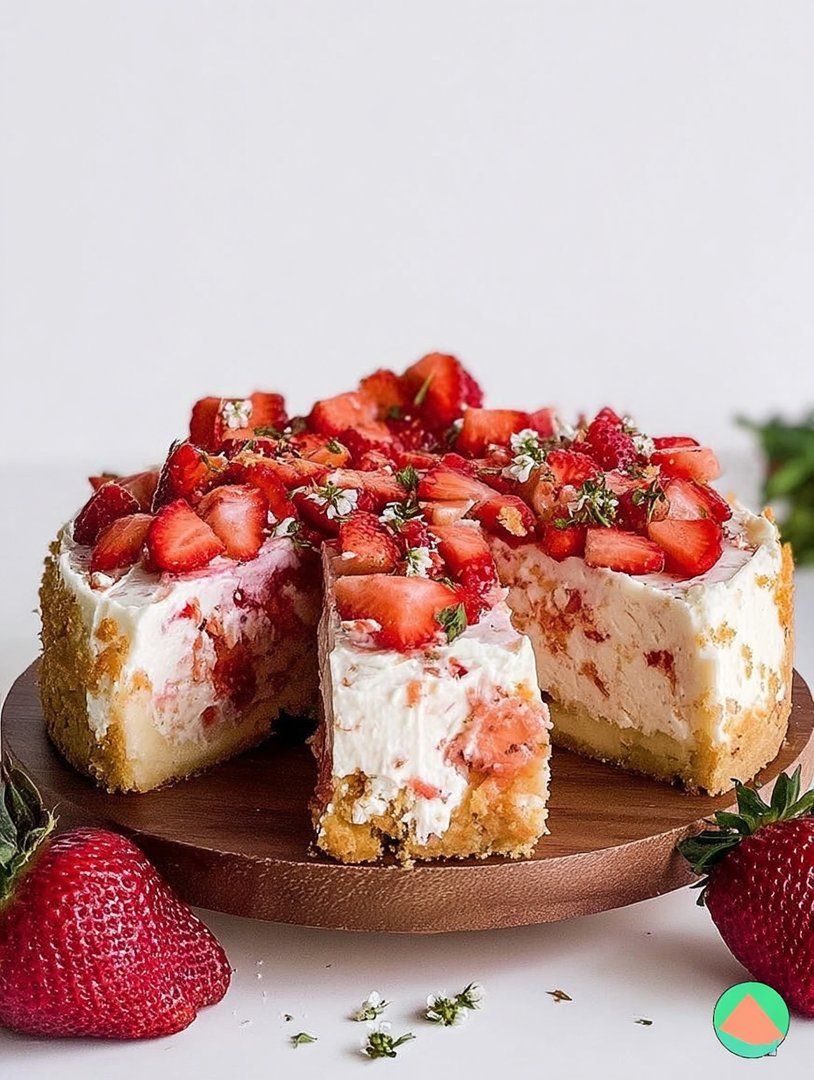
Remember that existential moment when you realized that the truly superior desserts should also be perfectly portable? I did. That is how I created the spectacularly crunchy and creamyDelicious Strawberry Crunch Cheesecake Tacos. These aren’t just sweet treats; they are vibrant, berry-studded vessels of pure joy, guaranteed to steal the show at any gathering and make your former favorite dessert feel deeply inadequate.
Here are the standout features that make this recipe a must-try:
- Quick assembly makes this recipe ideal for novice bakers who want maximum flavor with minimal fuss, ready in under an hour.
- The perfect harmony of tangy cream cheese filling and sweet, bright strawberry topping creates an unforgettable and refreshing taste experience.
- The vibrant red strawberry crunch coating transforms a simple dessert into a spectacularly photogenic masterpiece ready for your social media feed.
- Easily adapt the crunch layer with different freeze-dried fruits or cookie flavors to match any seasonal holiday or special occasion.
The Anatomy of the Perfect Dessert Taco
There is a profound philosophical difference between a regular dessert and a dessert taco. A regular dessert waits patiently on a plate, demanding a fork and respect. A taco? A taco is ready for adventure. It is grab-and-go magnificence. My obsession with turning everything into a taco started innocently enough, maybe with an excess of leftover waffle cones one summer afternoon. But when I combined that crispy shell with the classic, nostalgic flavor of strawberry crunch cake, I knew I had unlocked the next level of dessert architecture.
The secret to this recipe’s success lies in balancing three distinct textures: the satisfying snap of the shell, the velvety richness of the cheesecake filling, and the delightful grit of the strawberry crunch topping. If you nail these three elements, you will find yourself in dessert paradise. This is not a recipe where you can skip steps; each layer plays a critical role in achieving total flavor dominance. We need the creaminess to contrast the crispiness, and the tangy filling must cut through the sweetness of the crunch layer. Get ready to elevate your dessert game far beyond boring slices of pie.
Mastering the Crispy Taco Shell
We are not deep-frying here, friends. We want the crunchy structure without the greasy mess, which is why we utilize either pre-made waffle cones or specialized sugar cone wrappers. If you choose standard waffle cones, you need to gently heat them until pliable—just a few seconds in the microwave usually does the trick—and then immediately drape them over a piece of aluminum foil folded into a taco shape, or use a specific taco holder. Hold them there briefly until they cool and set in that perfect U-shape. This process ensures your finishedDelicious Strawberry Crunch Cheesecake Tacosmaintain their structural integrity, preventing catastrophic dessert failure upon the first bite. If you use crepes or flat sugar cookies, bake them until slightly firm and shape them quickly while still warm. Remember, the goal is a vessel strong enough to carry the weight of pure, unadulterated joy.
A helpful tip for shell creation: work in small batches. If you try to shape six cones at once, the first four will probably harden before you get to them, leading to sad, broken shells. Patience is essential when dealing with hot sugar structures. Once they are all perfectly shaped and cooled, they are ready for the crucial step: coating the rim. Dip the entire edge of the taco shell into melted white chocolate, and then immediately into the strawberry crunch mixture. This acts as the delicious, structural adhesive holding everything together.
Whipping Up the Dreamy Cheesecake Filling
The cheesecake filling is the luxurious heart of this operation, demanding minimal effort for maximum payoff. We use a no-bake method here, relying on high-quality full-fat cream cheese softened perfectly at room temperature. For that cloud-like texture, ensure you beat the cream cheese and granulated sugar thoroughly until it is completely smooth and fluffy. Scrape down the bowl frequently! There is nothing sadder than biting into a delicious taco and hitting a rogue lump of unmixed cream cheese.
Once the base is smooth, introduce a touch of vanilla powder and, crucially, some freshly whipped heavy cream or non-dairy whipping cream alternative. Folding in the whipped cream is where the magic happens; it lightens the mixture, making it airy and pipeable, rather than dense and heavy. Use a spatula for this part, folding gently until just combined. Overmixing the whipped cream will deflate the air you just incorporated, leaving you with a filling that is too runny. We need this filling to hold its shape inside the crunchy taco shell. Once mixed, refrigerle the filling for at least 30 minutes. This allows the ingredients to firm up, making the piping process infinitely less messy.
Ingredients for Delicious Strawberry Crunch Cheesecake Tacos
Here’s what you’ll need to make this delicious dish:
- Waffle Cone ShellsChoose plain waffle cones or dessert crepes that can be gently molded into a taco shape after warming.
- Cream CheeseUse full-fat, brick-style cream cheese, ensuring it is fully softened to achieve a smooth, lump-free filling.
- Granulated Sugar and Powdered SugarGranulated sugar sweetens the cream cheese base, while powdered sugar is essential for stabilizing the whipped cream component.
- Heavy Whipping CreamThis creates the airy texture of the no-bake cheesecake filling; ensure it is very cold before whipping for best results.
- Vanilla PowderUse high-quality pure vanilla powder to enhance the overall flavor depth of the creamy interior.
- Freeze-Dried StrawberriesThese are the star of the crunch topping, providing intense flavor and the signature pink color when pulverized.
- Vanilla Wafer CookiesThese form the base of the crunchy mixture, providing a buttery, solid texture when crushed.
- Unsalted ButterMelted butter binds the crunch topping together, ensuring it adheres properly to the shells and filling.
- White Chocolate Melting WafersUsed to create the adhesive layer on the shells, ensuring the strawberry crunch adheres firmly to the rim.
The full ingredients list, including measurements, is provided in the recipe card directly below.
How to Make Delicious Strawberry Crunch Cheesecake Tacos
Follow these simple steps to prepare this delicious dish:
Step 1: Prepare the Strawberry Crunch Topping
In a food processor, pulse the vanilla wafer cookies until they resemble fine crumbs. Separately, pulse the freeze-dried strawberries until they turn into a fine powder. Combine the cookie crumbs, strawberry powder, and melted butter in a medium bowl. Mix until the mixture is uniformly pink and resembles wet sand. Spread the crunch mixture onto a parchment-lined baking sheet and lightly bake at 300°F (150°C) for 8 minutes to set the texture; let it cool completely.
Step 2: Shape the Taco Shells
If using waffle cones, microwave one cone at a time for about 10 to 15 seconds until pliable. Immediately drape the softened cone over an inverted V-shape mold (like a taco holder or a foil tent) and hold the shape firmly for about 60 seconds until cooled and set. Repeat this careful process for all the shells, ensuring they hold a stable taco shape.
Step 3: Create the No-Bake Cheesecake Filling
In a large bowl using an electric mixer, beat the softened cream cheese, granulated sugar, and vanilla powder until the mixture is perfectly smooth and airy. In a separate, chilled bowl, whip the cold heavy cream and powdered sugar until stiff peaks form. Gently fold the whipped cream into the cream cheese mixture using a rubber spatula until just combined. Transfer the mixture to a piping bag fitted with a large star tip.
Step 4: Coat and Assemble the Crunch Shells
Melt the white chocolate melting wafers according to package directions until smooth. Take one cooled taco shell and carefully dip the entire rim into the melted white chocolate. Immediately dip the coated rim into the prepared strawberry crunch topping, pressing lightly to adhere the coating. Set the shell aside on parchment paper to allow the chocolate to fully harden, securing the crunch.
Step 5: Fill and Chill the Tacos
Once the coating is completely set, pipe the cheesecake filling generously into the center of each crunchy shell, starting from the bottom and working your way up. You want a beautifully mounded filling. Sprinkle any remaining strawberry crunch mixture or fresh, diced strawberries over the top of the filling for an extra pop of color and texture. Refrigerate the assembledDelicious Strawberry Crunch Cheesecake Tacosfor at least one hour before serving to ensure the filling is perfectly set.
Transfer the chilled tacos to a serving platter and get ready for the rave reviews.
Tips for Achieving the Ultimate Crunch
When you name a dessert “crunch taco,” you commit yourself to delivering maximum crunch. If your crunch layer is soggy, you have failed the entire mission. The first rule of crunch club is to ensure your cookie crumbs are dry and firm before application. Even after baking the mixture slightly, make sure it is completely cooled before mixing it with the melted chocolate. Introducing warm crumbs to melted chocolate results in instant clumping and a dull texture.
Another crucial tip involves the handling of the freeze-dried strawberries. Do not substitute these with fresh strawberries in the crunch component! Fresh fruit introduces moisture, which is the nemesis of crispiness. Freeze-dried berries provide concentrated flavor and that signature bright pink color without compromising the structural integrity of the crunch. If you can’t find whole freeze-dried strawberries, specialized strawberry powder works well, but you might need slightly less butter to bind it.
Finally, and perhaps most importantly, storage is key. Always store these sweet tacos in an airtight container in the refrigerator, but try to avoid making them more than 24 hours in advance. The enemy of the crunchy shell is the moist air of the refrigerator, which can slowly soften the waffle cone. If you need to prep ahead, prepare the crunch topping and the filling separately, storing them airtight, and only assemble the tacos a few hours before your guests arrive. This strategy ensures every bite delivers the explosive crunch and creamy center that makes theDelicious Strawberry Crunch Cheesecake Tacosfamous.
You can also experiment with the shell itself. While waffle cones are a classic choice, try using rice paper wrappers quickly fried or baked until crispy for a lighter, more delicate structure. The beauty of the taco format is its adaptability. Feel free to drizzle a little extra white chocolate over the finished filling before sprinkling the final bit of crunch on top; this extra layer of flavor and texture always impresses. These sweet tacos are not just food; they are an experience waiting to happen, perfect for summer parties, potlucks, or simply whenever you need a dose of portable happiness.
The Accidental Discovery of Sunshine on a Plate
One stormy Tuesday, attempting to make strawberry shortcake, I accidentally crushed the vanilla wafer crust too finely and spilled the filling onto a stray, crispy flatbread. The resulting mixture of sweet crunch and tangy cream was so shockingly good, my dog even stopped barking. That mishap evolved into the joy that is these wonderful cheesecake tacos.
Perfecting the Cooking Process
Start by prepping your crunchy coating and strawberry reduction simultaneously—this saves crucial time. Next, whip the cheesecake filling until it achieves peak fluffiness. Finally, carefully assemble your taco shells, fill them generously, and dip them quickly into the prepared crunch mixture for maximum texture.
Add Your Touch
If strawberries aren’t your jam (pun intended), try switching them for fresh raspberries or blueberries! You can also boost the citrus zest in the filling or swap the vanilla wafers for crushed chocolate cookies for a darker, richer “crunch” element. Feel free to drizzle melted white chocolate for extra elegance.
Storing & Reheating
Store filled strawberry tacos in a single layer in an airtight container in the refrigerator for up to two days. Note that the crunch layer softens over time, so for peak crispness, prepare the shells and filling separately and assemble just before serving. Do not attempt to reheat these delightful treats!
There is a profound moment of realization when a dessert ceases to be just a dessert and becomes an experience—a culinary mic drop, if you will. I have spent years perfecting classic techniques, but sometimes, brilliance arrives unexpectedly, usually involving a late-night craving, a surplus of fresh strawberries, and an empty waffle cone box.
I present to you the phenomenon sweeping dessert tables everywhere: theDelicious Strawberry Crunch Cheesecake Tacos. Forget everything you thought you knew about handheld sweets. This recipe takes the creamy, tangy perfection of a classic cheesecake, blends it with the irresistible crunch of a childhood ice cream bar, and serves it all inside a crispy, playful taco shell. It is pure joy folded into a convenient, transportable form. Prepare yourself; this is not just a recipe; it’s an adventure.
Embracing the Crunch: Why These Dessert Tacos Work
The Philosophy Behind the Handheld Dessert
We often treat cheesecake with reverence, expecting it to be served on a pristine plate with a silver fork. But frankly, the world needed a cheesecake solution that you could confidently eat while walking away from your responsibilities. Enter the taco. The beautiful irony of combining the sophistication of cheesecake with the casual nature of a taco shell is what makes this recipe so memorable.
The concept hinges entirely on contrasts: warm cinnamon sugar against cool, tangy cream; soft, velvety filling against intensely crisp topping. When you bite into aDelicious Strawberry Crunch Cheesecake Taco, you get all those elements working in perfect harmony. It is a party in your mouth, and everyone’s invited—especially the texture patrol.
Many dessert enthusiasts shy away from making their own specialized components, assuming it takes too much time, but trust me, the reward here is worth the minimal effort. We are breaking down the steps so even the most novice baker can achieve dessert nirvana.
Building the Strawberry Crunch Foundation
Now, let’s talk about the crunch. The signature flavor of these dessert tacos comes from the iconic strawberry crunch topping. This is traditionally created by combining crushed freeze-dried strawberries (for intense color and flavor), golden vanilla wafers or cookies, and melted butter or oil. I find that incorporating a small amount of finely ground graham cracker into the mix provides a delightful earthiness that balances the intense sweetness of the strawberries.
The process of creating this crunch is simpler than you might imagine. First, crush the vanilla wafers until they resemble coarse sand. Next, blitz the freeze-dried strawberries until they form a vibrant pink powder. Combine the two dry ingredients thoroughly. Lastly, drizzle in just enough melted unsalted butter or a flavorless cooking oil to bind the mixture loosely. It should hold together slightly when pressed but remain crumbly. This ensures that the topping adheres perfectly to the creamy filling. This specific strawberry crumb mixture is crucial for giving the dessert tacos their signature look and flavor.
Crafting the No-Bake Cheesecake Filling
This recipe demands a filling that is both stable and incredibly creamy. We achieve stability by using a combination of full-fat cream cheese and whipped topping (or freshly whipped heavy cream stabilized with a touch of cornstarch or plant-based gelling agents). The choice of sweetener is also crucial. Using powdered sugar instead of granulated sugar ensures a smooth texture without any graininess whatsoever. We are aiming for velvety perfection.
For flavor depth, add a generous amount of lemon zest. The acidity of the lemon cuts through the richness of the cream cheese, making the entire dessert taste brighter and fresher. Don’t underestimate the power of a tiny pinch of salt to enhance all the sweet flavors—it’s the culinary equivalent of turning up the volume on deliciousness.
Essential Ingredients for the Creamy Core
- Cream Cheese (full-fat, room temperature): Provides the essential creamy base and tang.
- Powdered Sugar: Ensures smoothness and optimal sweetness level without graininess.
- Vanilla Bean Paste or Extract: Adds a deep, recognizable aromatic quality.
- Fresh Lemon Zest: Crucial for balancing richness with necessary brightness.
- Stabilized Whipped Cream: Adds lightness and helps the filling maintain structure.
Remember that temperature matters immensely here. If the cream cheese is too cold, the mixture will clump, giving you tiny, disappointing pebbles instead of smooth cloud-like filling. Let that cream cheese hang out on the counter for at least an hour before you introduce it to the mixer.
The Shell Game: Getting the Structure Right
Frying vs. Baking Your Crispy Shells
While purchasing ready-made waffle cone pieces saves time, nothing beats the fresh crispness of a homemade taco shell. Use small, street-taco-sized flour tortillas. If you choose to bake, brush them lightly with melted plant-based butter and sprinkle them liberally with a mix of granulated sugar and ground cinnamon. Bake them quickly over the racks of your oven, or drape them over the edges of a muffin tin, allowing them to cool into a perfect “V” shape. Monitor them closely; they go from perfectly crisp to tragically burned in seconds. Baking results in a cleaner, less greasy shell, which is ideal for holding the creamy filling.
If you prefer a richer flavor, you can lightly fry the tortillas for a minute or two until golden and crisp, immediately shaping them as they cool. Regardless of the method, once cooled, these cinnamon-sugar shells are ready to receive the cheesecake magic. A little trick is to slightly melt white chocolate and brush the inside of the shells before filling. This acts as a moisture barrier, preventing the creamy filling from immediately softening the crisp structure. This step is a game-changer for maintaining the integrity and crunch of your dessert tacos.
The Final Assembly: Showcasing the Delicious Strawberry Crunch Cheesecake Tacos
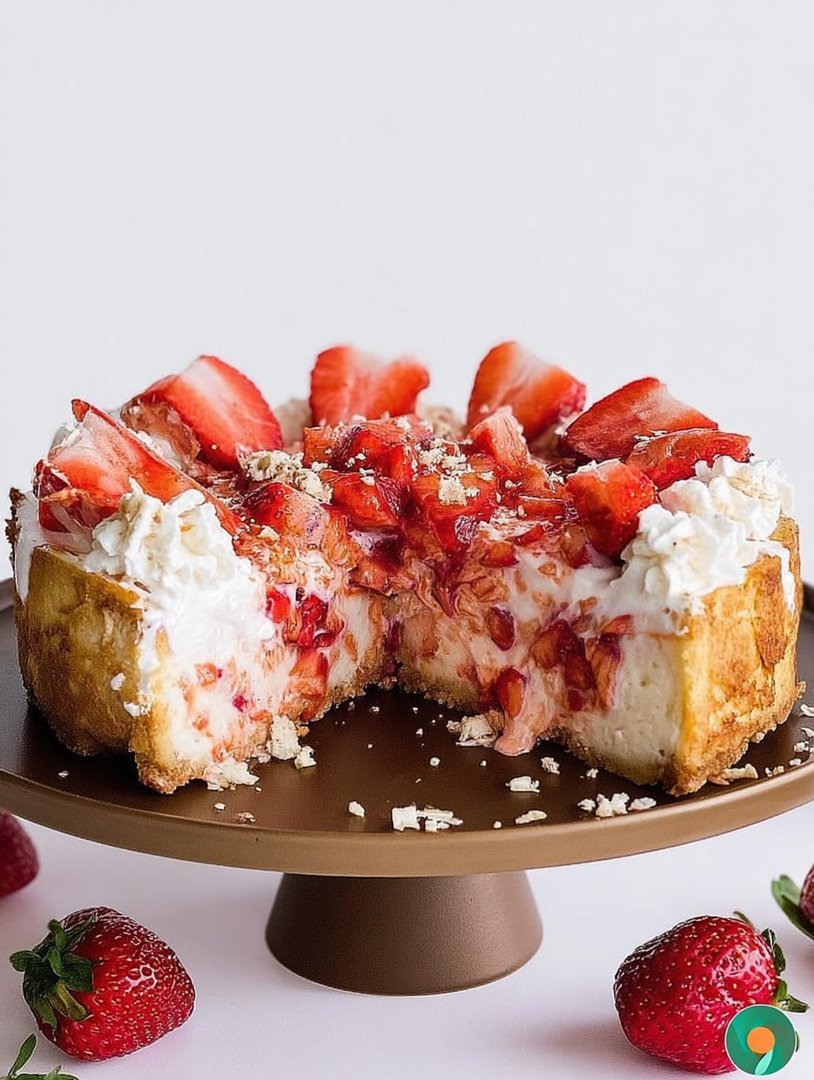
The final assembly is where the visual appeal shines. Using a piping bag fitted with a star tip makes filling the shells neat and professional, ensuring even distribution of the creamy core. Pipe the cheesecake mixture generously into the prepared shells, creating a slight mound at the top. You want the filling to look lush and inviting, ready for its magnificent coat of crumbs.
Immediately after filling, gently roll the exposed cheesecake filling through the prepared strawberry crunch mixture. Aim for maximum coverage. The vibrant pink and golden crumbs should completely coat the filling, sealing in the delicious flavor and texture contrast. Garnish with a fresh slice of strawberry or a sprig of mint for a finishing flourish. Serving these incredible crunchy dessert tacos immediately ensures the perfect textural experience.
I served these unique dessert tacos at a large family gathering last summer, and my usually stoic uncle actually asked for the recipe before finishing his first bite. That’s how you know you have a winner—when the skeptical relatives become immediate fans of these delightful strawberry dessert tacos.
Expert Tips for Perfect Strawberry Cheesecake Tacos
-
Ensure your cream cheese and whipped cream are thoroughly chilled before the final whip; this guarantees a stable, pipeable filling that holds its shape beautifully in the shells.
-
Do not skip the moisture barrier: brushing melted white chocolate inside the shells prevents immediate sogginess, keeping your strawberry crunch cheesecake tacos crispy longer.
-
For the crunch layer, use freeze-dried strawberries, not fresh ones; freeze-dried provide the essential intense flavor and dry texture needed for proper incorporation with the cookie crumbs.
Conclusion for Delicious Strawberry Crunch Cheesecake Tacos
The journey to creating the perfectDelicious Strawberry Crunch Cheesecake Tacosis a delightful exercise in balancing textures: the crisp cinnamon shell, the rich, creamy, no-bake filling, and the unmistakable, vibrant strawberry crunch topping. This recipe transforms simple ingredients into an extraordinary, handheld dessert experience that is perfect for parties, celebrations, or a truly special weeknight treat.
Remember the key steps: achieving room temperature cream cheese for a smooth filling, protecting the shell with a white chocolate barrier, and using quality freeze-dried strawberries for that intense, authentic crunch flavor. Embrace the joy of this playful dessert innovation. These crunchy cheesecake shells are guaranteed to steal the show and leave everyone reaching for seconds.
Print
Delicious Strawberry Crunch Cheesecake Tacos
Crispy cinnamon-sugar shells meet rich, airy cheesecake filling and a vibrant Golden Oreo strawberry crunch. Includes complete cooking instructions and detailed nutritional breakdown.
- Total Time: 35 minutes
- Yield: 4 servings 1x
Ingredients
- 8 small soft flour tortillas (taco sized)
- 8 oz cream cheese, softened
- 1/2 cup powdered sugar (plus extra for dusting)
- 8 oz tub frozen whipped topping (thawed)
- 15 Golden Oreo cookies (or vanilla wafers)
- 3 oz box strawberry pectin mix (dry powder)
- 1 cup fresh strawberries, finely diced
- 1/4 cup cinnamon sugar mix
Instructions
- Step 1: Prepare the Strawberry Crunch. Crush the Golden Oreo cookies into coarse crumbs (using a food processor or Ziploc bag). In a small bowl, combine the cookie crumbs and the dry strawberry pectin mix until fully incorporated. Set aside.
- Step 2: Form and Bake the Taco Shells. Preheat oven to 350°F (175°C). Lightly spray both sides of the tortillas with cooking spray or brush with melted butter, then dredge both sides in the cinnamon sugar mixture. Drape the prepared tortillas over the rungs of an oven safe cooling rack placed over a baking sheet to form a taco shape. Bake for 8-10 minutes until crispy and golden brown. Let cool completely.
- Step 3: Prepare the Cheesecake Filling. In a large mixing bowl, beat the softened cream cheese and powdered sugar until smooth and fluffy. Gently fold in the thawed whipped topping until the mixture is uniform and light. Transfer the filling to a piping bag (or Ziploc bag with the corner snipped).
- Step 4: Assemble the Tacos. Pipe or spoon the cheesecake filling mixture inside each crispy taco shell. Layer the finely diced fresh strawberries over the filling.
- Step 5: Finish and Serve. Holding the taco gently, press the exposed edges of the cheesecake filling and strawberries into the prepared Strawberry Crunch mixture from Step 1 until the edges are coated. Refrigerate for at least 30 minutes before serving for stability, or serve immediately.
Notes
- Store assembled tacos loosely covered in the refrigerator for up to 3 days; for best texture, save any remaining crunch topping and apply right before serving.
- For an extra firm, ice cream-like texture, place the assembled tacos in the freezer for 45 minutes before serving, which is especially satisfying on a hot day.
- Elevate the presentation by drizzling the finished tacos with a light glaze made from melted white chocolate or a hint of balsamic reduction for a gourmet flair.
- To ensure your shells stay perfectly crisp against the creamy filling, use a light hand when dredging the baked tortillas in the strawberry crunch, focusing the coating primarily on the edges.
- Prep Time: 15 minutes
- Cook Time: 20 minutes
- Method: Stovetop
- Cuisine: American


Leave a Comment