

Forget everything you thought you knew about tropical desserts. The ultimate pink layer cake is here! This authenticHawaiian Guava Caketastes exactly like a sunrise on Maui, blending tangy sweetness with a pillowy softness that makes every bite feel like a vacation.
This dessert is less a cake and more a phenomenon. It is impossibly moist, vibrant, and topped with the creamiest tropical glaze, guaranteed to transport you instantly to the islands, no plane ticket required.
- This recipe is effortlessly achievable, even for beginner bakers, promising professional-quality results without excessive kitchen chaos or complexity.
- The flavor profile perfectly balances sweet, rich vanilla cake layers with a distinct, tart guava puree filling and a smooth cream cheese frosting.
- Its vibrant, naturally pink hue makes this tropical cake a stunning, show-stopping centerpiece for any celebration or special family gathering.
- This guava dessert freezes beautifully, making it an excellent, reliable make-ahead solution for busy hosts planning dinner parties weeks in advance.
The Legend of the Pink Paradise
The first time I tasted true Hawaiian Guava Cake, I almost wept. I was in Honolulu for a friend’s wedding, expecting the usual dry wedding cake situation, maybe some stale fondant flowers. Instead, a slice of this ethereal pink creation landed on my plate. It was moist, bouncy, and delivered this intense, slightly floral tang that completely redefined my expectations for dessert.
I spent the next six months attempting to replicate that perfection. My kitchen looked like a guava grenade had exploded. I tried using fresh fruit, canned nectar, thickened paste—you name it. I produced layers that were too dense, glazes that ran off the plate, and frostings that looked suspiciously like cottage cheese. My husband gently suggested I start a career as a guava farmer just to justify the amount of fruit I was destroying. Finally, after countless trials (and significantly reducing the amount of sugar in the glaze), I cracked the code.
What I learned is that the magic isn’t just in the cake base; it’s in the careful layering of flavor. We use guava three times: once in the cake batter for background flavor, again as a potent syrup to soak the warm layers, and finally, infused into the creamy, tangy topping. This layering technique ensures that the guava flavor punches through the sweetness without becoming overwhelming. This is the recipe that finally won, the one that tastes exactly like that slice of paradise I first encountered. Prepare yourself; thisHawaiian Guava Cakeis about to become your new obsession.
Why This Tropical Guava Cake Reigns Supreme
Many recipes for guava cake rely simply on adding guava nectar to the batter, which often results in a weak, sometimes muddy flavor. Our method focuses on achieving maximum moisture and intense tropical tang through a specific soaking procedure. First, we start with a rich, buttery vanilla cake batter, ensuring it bakes up light and fluffy. Immediately after baking, while the layers are still hot, we douse them generously with a sweet-tart guava nectar syrup. This hot bath allows the cake to absorb the liquid completely, guaranteeing an unbelievably moist final product.
The texture contrast between the dense, pink-infused cake and the light, velvety cream cheese frosting is what elevates this dessert from good to legendary. Unlike traditional buttercream, the cream cheese frosting here incorporates a touch of guava paste and fresh lime juice, cutting the richness and mirroring the bright acidity of the tropical fruit. The result is a celebration of flavor—rich, creamy, tart, and undeniably luxurious—a perfect centerpiece for any celebration from a simple birthday to an elaborate summer feast.
Ingredients for Hawaiian Guava Cake
Here’s what you’ll need to make this delicious dish:
- All-Purpose FlourEnsure it is properly measured, spooned into the cup and leveled, to prevent a dense or heavy cake layer.
- Granulated SugarUsed primarily for sweetness in the cake batter and also plays a crucial role in balancing the acidity of the guava syrup.
- Unsalted ButterUse high-quality, room-temperature butter; its creaminess provides necessary richness and structure to the cake crumb.
- EggsThese bind the batter, provide lift, and should also be at room temperature for better emulsification with the butter and sugar.
- Baking Powder and SaltEssential leavening agents that ensure a light rise and enhance the overall depth of the flavor profile.
- Guava Nectar or JuiceThis is the key component for both the cake batter and the syrup; make sure it is pure and vibrant for the best color and taste.
- Cream CheeseThe foundation for the signature frosting; use full-fat, brick-style cream cheese and ensure it is softened completely.
- Powdered SugarUsed for sweetening and stabilizing the frosting, providing a smooth, lump-free texture.
- Heavy Whipping CreamWhipped into stiff peaks, this adds incredible lightness and volume to the cream cheese frosting, making it truly cloud-like.
- Guava Puree or PasteA thickened version of guava fruit that provides intense flavor and the signature pink color to the frosting and syrup.
The full ingredients list, including measurements, is provided in the recipe card directly below.
How to Make Hawaiian Guava Cake
Follow these simple steps to prepare this delicious dish:
-
Prepare the Cake Layers and Preheat the Oven
Preheat your oven to 350°F (175°C). Grease and flour three 8-inch round cake pans, lining the bottoms with parchment paper circles for easy removal. In a large bowl, cream the softened butter and granulated sugar together until the mixture is light and fluffy, about 3 to 5 minutes. Beat in the eggs one at a time, ensuring each is fully incorporated before adding the next, then mix in the vanilla powder.
-
Mix the Dry and Wet Ingredients
In a separate medium bowl, whisk together the flour, baking powder, and salt. Alternate adding the dry mixture and the guava nectar to the wet ingredients, starting and ending with the dry ingredients. Mix only until just combined; overmixing develops gluten and results in a tough cake. Divide the batter evenly among the three prepared cake pans.
-
Bake and Soak the Layers
Bake the layers for 25 to 30 minutes, or until a toothpick inserted into the center comes out clean. While the cakes bake, combine 1 cup of guava nectar and a quarter cup of sugar in a small saucepan and heat until the sugar dissolves; set this soaking syrup aside. As soon as the cake layers emerge from the oven, poke holes all over the top of each layer using a fork or skewer, then immediately brush the warm syrup evenly over the tops.
-
Whip the Guava Cream Cheese Frosting
Once the cakes cool completely, prepare the frosting. Beat the softened cream cheese and butter until smooth and creamy. Gradually beat in the powdered sugar until fully incorporated. In a separate bowl, whip the heavy cream until stiff peaks form. Gently fold the whipped cream and the guava puree into the cream cheese mixture until the frosting is light, fluffy, and uniformly pink.
-
Assemble and Chill the Cake
Place the first cake layer on your serving plate or stand. Spread a generous layer of the guava cream cheese frosting evenly across the top. Place the second layer on top, frost again, and finish with the final cake layer. Apply a thin layer of frosting (the crumb coat) all over the cake, chill for 20 minutes to set, and then apply the final, thicker layer of frosting.
Chill the finished cake for at least four hours before slicing; this allows the guava syrup to fully penetrate the cake layers and the frosting to firm up beautifully.
Expert Tips for a Flawless Tropical Guava Cake
Achieving bakery-quality results requires attention to a few key details. While the recipe is straightforward, these specialized techniques ensure your Hawaiian Guava Cake is the moistest, fluffiest dessert possible, preventing common baking mishaps and maximizing that intense tropical flavor.
Mastering the Guava Glaze Saturation
The secret weapon of this recipe is the warm guava soak, which is crucial for achieving that legendary moist texture. Do not skip this step, and importantly, do not wait for the cakes to cool before applying the syrup. The heat of the freshly baked cake creates steam, which helps draw the liquid deeply into the cake pores, ensuring every crumb is infused with sweet guava flavor. Use a skewer or fork to generously pierce the entire surface of the cake layers before brushing on the warm syrup; you should see the liquid absorbing almost immediately. If the syrup is too cool, it might just sit on the surface, making the cake gummy rather than moist.
Furthermore, ensure you use guava nectar, not just thin juice, for the soak, as nectar has slightly more body and flavor concentration. If you can only find thin juice, simmer it briefly to reduce it slightly before mixing in the sugar for the soaking syrup, concentrating the fruit flavor.
Achieving the Cloud-Like Frosting Texture
The perfect guava cream cheese frosting is light and fluffy, not heavy or dense. The key to achieving this airy texture is folding in whipped heavy cream. First, make sure your cream cheese and butter are thoroughly softened to room temperature so they beat smooth without lumps. Then, when incorporating the heavy cream, whip it until it holds firm peaks before folding it gently into the cream cheese mixture.
Do not use the electric mixer to combine the whipped cream with the cheese mixture; this will deflate the air you worked hard to incorporate. Use a rubber spatula to fold slowly, cutting through the center and bringing the mixture up and over. If the frosting seems too soft due to a warm kitchen, chilling it for 15 minutes before the final application will stiffen it up just enough to make assembly easy and the results stunning.
Serving Suggestions and Flavor Variations
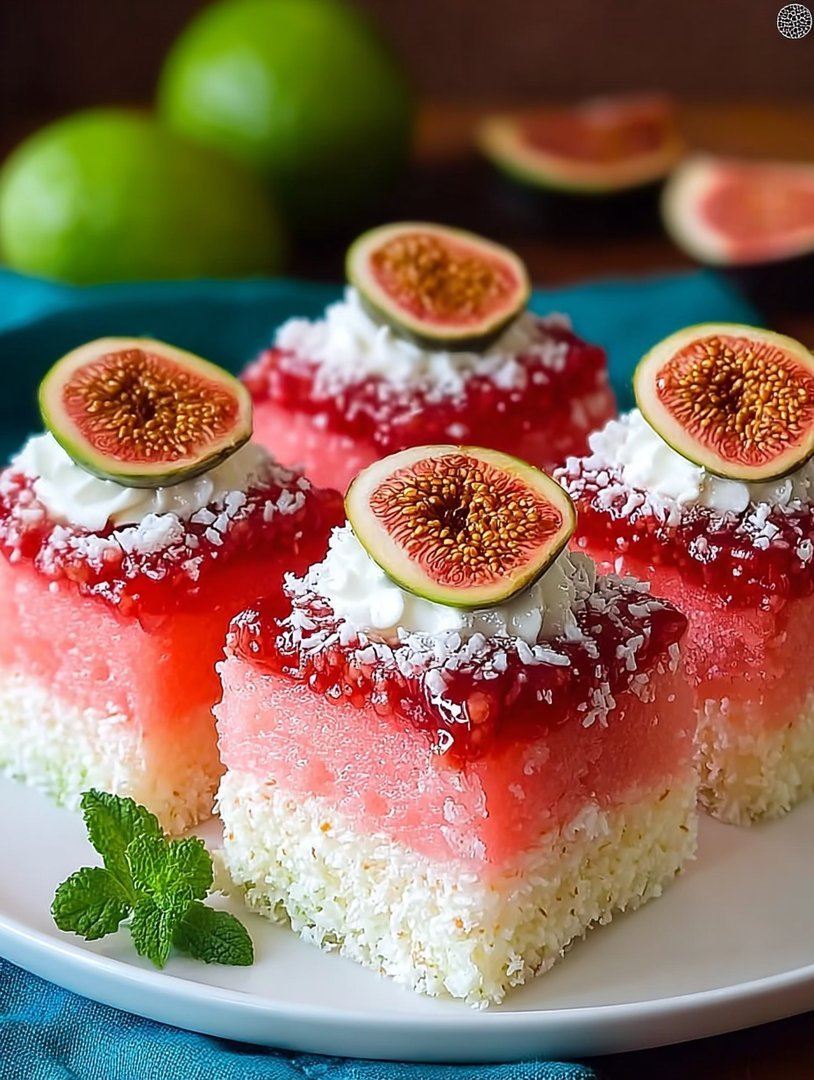
This delicious dessert is fantastic on its own, but a few minor additions can elevate it even further, making it suitable for different seasons or occasions. For an added visual flourish, sprinkle the top of the cake with toasted coconut flakes just before serving. The nuttiness of the coconut provides a wonderful textural contrast to the soft cake and creamy frosting, enhancing the overall tropical profile of the Hawaiian Guava Cake.
If you enjoy citrus, adding a tiny dash of lime zest into the frosting can brighten the flavor considerably, complementing the tanginess of the guava. For a unique twist, consider replacing one of the cake layers with a layer of sweetened whipped cream stabilized with plant-based gelling agents or cornstarch, providing a lighter texture contrast. This cake pairs beautifully with light, unsweetened iced tea or a simple glass of sparkling water infused with fresh mint and lime, allowing the tropical notes of the guava to truly shine.
Guava Cake Frequently Asked Questions (FAQ)
Can I use fresh guava instead of puree or paste?
While fresh guava provides an authentic flavor, it has high water content and should not be substituted directly into the frosting or the soaking syrup. If you use fresh guava, you must cook it down, strain it of seeds, and reduce the resulting pulp until it achieves a thick, concentrated paste consistency before using it in the recipe.
How long does this tropical cake keep and how should I store it?
Because this cake uses cream cheese frosting, you must store it in the refrigerator. When tightly covered, it keeps beautifully for up to 4 days. For the best flavor and texture, allow the slice to sit at room temperature for 15 to 20 minutes before serving.
What is the best way to ensure the cake layers are level before frosting?
For perfectly level cake layers, use a serrated knife or a specialized cake leveler to carefully trim the domed tops off the cooled layers. You can also use moist baking strips around the outside of the cake pans during baking; these help the cake bake evenly and prevent doming.
Can I freeze the finished Hawaiian Guava Cake?
Yes, this cake freezes exceptionally well! After completing the final coat of frosting, place the cake uncovered in the freezer for about an hour until the frosting is firm. Then, wrap it tightly in plastic wrap and a layer of foil. Thaw it slowly overnight in the refrigerator before serving, ensuring it maintains its perfect texture.
This recipe transforms a simple baking project into an event. The intense tropical flavor and beautiful presentation of thisHawaiian Guava Cakewill impress everyone at your table and ensure you are asked to bring it to every gathering henceforth. Enjoy the taste of the tropics!
The Legendary Tale of the Hawaiian Guava Cake
There are two types of bakers in this world: those who bake for necessity, and those who bake for pure, tropical escapism. If you are reading this, chances are you fall into the second category, desperate for a slice of sunshine even when the weather outside is debating whether it should snow or simply drizzle disappointingly. Forget the complicated European tortes or the overly stiff wedding cakes; we are diving headfirst into the creamy, pink paradise that is theHawaiian Guava Cake. This dessert is not just a treat; it is a full-scale vacation for your taste buds, featuring a light, airy cake base, drenched in tangy, fragrant guava glaze, and smothered in rich cream cheese frosting.
My first encounter with this magnificent pink confection happened years ago on a layover that felt less like travel and more like accidental time travel to paradise. I immediately knew I had to recreate that taste—that perfect blend of sweet and tart, nestled in the softest crumb imaginable. The quest took time, involving several catastrophic kitchen failures (ask me about the time I tried to substitute passion fruit and ended up with a distinctly sour, neon-orange hockey puck). But through dedication and a slightly alarming consumption of guava nectar, I cracked the code. Now, I am handing you the keys to the kingdom, so you can achieve tropical dessert nirvana without needing a passport or three days of grueling flight time.
Unlocking the Secret Layers of Flavor
The beauty of this Hawaiian dessert lies in its three essential components, each playing a crucial role in the symphony of texture and flavor. First, you need a sponge cake that is light enough to float away, but sturdy enough to withstand the onslaught of liquid flavor. Most of the magic happens in the second layer: the guava glaze. This isn’t just a simple syrup; it’s a luscious, slightly thickened layer that soaks into the cake, turning it that iconic blush pink and infusing every bite with that unmistakable tropical scent. Finally, the rich, tangy cream cheese frosting offers a cool, slightly acidic contrast, ensuring the whole experience stays balanced and irresistibly fresh.
Getting the texture of the glaze just right is often the trickiest part, but we bypass the need for any animal carrageenan entirely by using a carefully measured amount of cornstarch or, if you prefer a sharper setting, high-quality agar-agar powder. This ensures a beautifully set glaze that holds its shape without compromising the delicate texture of the cake itself. Mastering this recipe means mastering balance: ensuring the cake is moist without being soggy, and the frosting is sweet yet sharp.
Gathering Your Tropical Treasures (Ingredients)
Achieving the perfectHawaiian Guava Cakerequires precision in measurement, especially with the guava component. Don’t skimp on quality; seek out 100% pure, unsweetened guava nectar for the best flavor payoff. For the cake base, ensure your ingredients are at room temperature—this is non-negotiable for achieving that signature, light crumb structure. Using cold eggs is the baking equivalent of running a marathon in flip-flops: entirely possible, but deeply inefficient and slightly painful.
For the Light Sponge Cake:
- 2 cups all-purpose flour, sifted
- 1½ cups granulated sugar
- 3 teaspoons baking powder
- ½ teaspoon fine salt
- ½ cup unsalted butter, softened
- 4 large eggs, room temperature
- 1 cup whole milk, room temperature
- 1 teaspoon pure vanilla powder
For the Guava Glaze & Soak:
- 2 cups guava nectar
- ½ cup granulated sugar
- 2 tablespoons lemon juice
- 2 tablespoons cornstarch (or 1 teaspoon agar-agar powder)
- ¼ cup cold water (to dissolve cornstarch/agar)
For the Cream Cheese Frosting:
- 1 (8 ounce) package full-fat cream cheese, softened
- ½ cup unsalted butter, softened
- 4 cups powdered sugar, sifted
- 1 teaspoon vanilla powder
- 2 tablespoons heavy cream or milk
Step-by-Step Guide to Baking the Hawaiian Guava Cake
Follow these steps closely to ensure your cake turns out fluffy, moist, and perfectly pink. Remember, baking is a science, but decorating is pure art—feel free to get messy with that frosting!
Phase 1: Preparing the Cake Base
Preheat your oven to 350°F (175°C). Grease and flour three 8-inch round cake pans, or line them with parchment paper. In a large bowl, whisk together the flour, sugar, baking powder, and salt. Add the softened butter and milk gradually to the dry ingredients, beating on low speed until just combined. Scrape down the sides of the bowl. Incorporate the eggs one at a time, beating well after each addition, then mix in the vanilla powder.
Divide the batter evenly among the three prepared cake pans. Bake for 20 to 25 minutes, or until a toothpick inserted into the center comes out clean. Let the cakes cool in the pans for 10 minutes before inverting them onto a wire rack to cool completely. Ensure the cakes are fully cooled before attempting to assemble them; otherwise, your glaze will become soup, and your frosting will weep.
Phase 2: Creating the Guava Glory
While the cakes cool, prepare the tropical guava glaze. In a medium saucepan, combine the guava nectar, sugar, and lemon juice. Bring the mixture to a simmer over medium heat. In a separate small bowl, whisk the cornstarch (or agar-agar) with the cold water until completely dissolved, forming a smooth slurry. Slowly pour the slurry into the simmering guava mixture, whisking continuously.
Allow the glaze to simmer gently for about 2 to 3 minutes, stirring constantly until the mixture thickens slightly and becomes glossy. If using agar-agar, bring it to a rolling boil for 1 minute before removing it from the heat. Remove the glaze from the heat and let it cool slightly. You will need to use this glaze while it is still warm and pourable, but not scorching hot, for the best absorption.
Phase 3: Assembly and Frosting Perfection
Prepare the frosting by beating the softened cream cheese and butter together in a stand mixer until light and fluffy. Gradually add the sifted powdered sugar, alternating with small additions of the heavy cream and vanilla powder. Beat until the frosting is smooth and lump-free. If the frosting is too thick, add a touch more cream; if too thin, add a little more powdered sugar.
To assemble theHawaiian Guava Cake, place the first cake layer on your serving plate. Using a spoon or a brush, generously saturate the layer with about one-third of the warm guava glaze. Allow it to sit for a minute or two to absorb. Spread a layer of cream cheese frosting over the glaze. Repeat this process with the second and third layers, ensuring each layer receives a generous soaking of that beautiful pink glaze. Finally, frost the entire cake with the remaining cream cheese frosting. Chill the cake for at least an hour before slicing for neat, clean pieces.
Perfecting the Cooking Process
Start by preparing all cake components first, ensuring they cool fully while you create the guava glaze. Once the glaze is prepared and slightly cooled but still liquid, immediately make the cream cheese frosting. This sequence maximizes efficiency, allowing the cakes to absorb the glaze optimally before the frosting goes on.
Add Your Touch
For an extra textural element, consider folding toasted macadamia nuts into the frosting or sprinkling them on top of the finished cake. You can swap out a portion of the sugar for brown sugar in the cake batter for a deeper, molasses flavor, or replace some guava nectar with passion fruit juice for added tanginess.
Storing & Reheating
Store this layered treat in an airtight container in the refrigerator for up to five days. Since it is best served chilled, reheating is unnecessary. If freezing, wrap the fully frosted cake tightly in plastic wrap and then foil; thaw overnight in the refrigerator before serving.
Expert Tips for a Flawless Result
- Always sift your powdered sugar for the frosting; this eliminates lumps and guarantees that velvety smooth texture we are aiming for in this tropical pink dessert.
- Do not overbake the sponge layers. Overbaking leads to a dry cake that will resist absorbing the crucial guava soak, resulting in a less vibrant flavor.
- If your guava nectar is very thick, dilute it slightly with water before making the glaze. This ensures proper saturation into the cake layers for ultimate moisture.
My grandmother once tried to make this guava-infused layered treat using jarred jam instead of nectar and the result was so sticky, it practically glued the guests to their chairs. Lesson learned: only pure nectar delivers the true lightness required for the perfect Hawaiian Guava Cake.
Frequently Asked Questions About This Tropical Delight
Can I make the Hawaiian Guava Cake ahead of time?
Absolutely! This cake actually improves overnight as the guava glaze fully saturates the sponge. You can bake the layers, soak them, and frost the cake completely 24 hours in advance. Just keep it tightly covered in the refrigerator.
What if I cannot find guava nectar?
While fresh guava nectar provides the best flavor for this recipe, in a pinch, you could use a high-quality guava puree mixed with a bit of simple syrup, or look for canned guava juice. Ensure it is not too sweet, as the recipe already accounts for sugar.
How do I prevent the glaze from running off the cake?
The key is temperature and thickness. Ensure you use the cornstarch slurry to thicken the glaze slightly, and make sure the glaze is absorbed into the cake layers before adding the frosting. Chill the cake between layers if necessary to stabilize the structure.
Can I freeze the cake layers before assembly?
Yes, you can. Once the layers are fully cooled, wrap them individually in plastic wrap and then aluminum foil. They will keep well in the freezer for up to two months. Thaw them overnight on the counter before glazing and assembling your pink paradise cake.
How do I achieve that vibrant pink color naturally?
High-quality guava nectar naturally has a beautiful light pink or orange-pink hue. If you want a deeper color, you can add a tiny drop of natural red food coloring to the glaze, but typically, pure guava nectar provides enough vibrancy for the perfect Hawaiian Guava Cake.
Conclusion for Hawaiian Guava Cake
TheHawaiian Guava Caketruly stands out as a joyous celebration of tropical flavor and effortless elegance. This recipe ensures every bite delivers that perfect balance—a moist, tender crumb, drenched in sweet guava essence, and capped with a light, unforgettable pink frosting. It’s more than just a dessert; it’s a vacation for your taste buds, transforming any ordinary afternoon into an island getaway. Skip the airplane tickets and dive straight into the mixing bowl. Baking this beautiful, vibrant cake is the easiest way to bring the warmth and sunshine of the tropics right to your own kitchen, promising smiles and satisfied sweet tooths all around.
Print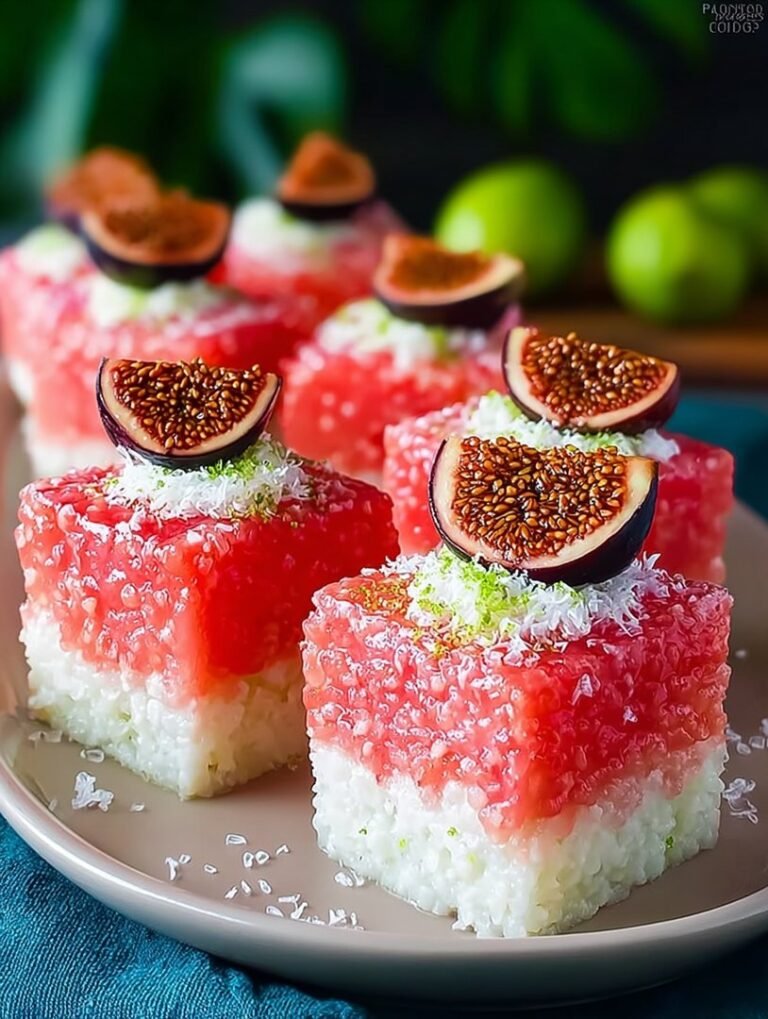
Hawaiian Guava Cake
A tropical dream! This moist Hawaiian Guava Cake features a soft crumb saturated with sweet nectar. The unique chilled guava glaze sets beautifully, locking in island flavor.
- Total Time: 35 minutes
- Yield: 4 servings
Ingredients
- All-purpose flour: 2 cups
- Granulated sugar: 1 1/2 cups
- Large eggs: 4
- Vegetable oil: 1/2 cup
- Guava nectar, chilled: 2 1/2 cups (divided)
- Heavy whipping cream: 2 cups
- Powdered sugar: 1/2 cup
- Unflavored agar-agar: 1 packet (about 1 tablespoon)
Instructions
- Step 1: Preheat oven to 350°F (175°C). Grease and flour a 9×13 inch baking pan. Whisk together the flour and sugar. In a separate bowl, combine the eggs, oil, and 1/2 cup of the guava nectar, then mix wet ingredients into the dry until just combined. Pour batter into the prepared pan and bake for 25-30 minutes, or until a toothpick inserted into the center comes out clean.
- Step 2: Prepare the guava glaze while the cake bakes. Pour 1/2 cup of the guava nectar into a small saucepan and sprinkle the agar-agar over it to bloom for 5 minutes. Heat the mixture over low heat, stirring until the agar-agar is completely dissolved (do not boil). Remove from heat and stir in the remaining 1 1/2 cups of chilled guava nectar. Set aside.
- Step 3: Once the cake is out of the oven, allow it to cool in the pan for 15 minutes. Use a fork or skewer to poke holes evenly across the entire surface of the cake. Slowly pour the liquid guava glaze mixture over the warm cake, allowing the nectar to soak deep into the layers. Transfer the cake to the refrigerator to chill for at least 2 hours, allowing the glaze to set completely.
- Step 4: Prepare the frosting by beating the heavy whipping cream in a large bowl using an electric mixer until soft peaks form. Gradually add the powdered sugar and continue beating until stiff peaks form.
- Step 5: Once the guava layer is fully set and firm, spread the whipped cream frosting evenly over the top of the chilled cake. Return the cake to the refrigerator for at least one hour before slicing and serving.
Notes
- Keep this highly perishable cake covered loosely in the refrigerator for up to 3 days, ensuring it remains chilled below 40°F due to the dairy-based frosting.
- Never reheat this chilled cake; for maximum flavor and a softer texture, pull slices from the fridge 10 to 15 minutes before serving.
- Enhance the tropical experience by garnishing individual slices with toasted coconut flakes or pairing with a scoop of passion fruit sorbet.
- To achieve the signature deep soak, ensure the cake is still significantly warm (around 15 minutes rest time is perfect) when you slowly pour the guava glaze over the poked holes.
- Prep Time: 15 minutes
- Cook Time: 20 minutes
- Method: Stovetop
- Cuisine: American
FAQs
How should I store leftoverHawaiian Guava Caketo keep it fresh?
To ensure your tropical masterpiece stays delightfully moist and vibrant, immediate refrigeration is key. Always store leftover Hawaiian Guava Cake in an airtight container. The high moisture content of the cake and the perishable nature of the whipped cream or cream cheese frosting mean it should not be left at room temperature for long. If stored correctly in the refrigerator, it will remain fresh and delicious for three to four days. If you bake ahead of time, you can also freeze unfrosted layers wrapped tightly in plastic wrap for up to two months. Just thaw them gently before assembling the famous pink layers!
Why does theHawaiian Guava Cakehave a distinctive pink color?
The dazzling, signature pink of this classic island treat is mainly derived from the guava fruit itself, though many bakers enhance the shade. Guava puree or nectar naturally possesses a light salmon or peachy-pink hue. To achieve that iconic, eye-popping vibrant color often seen in bakeries, especially in the creamy frosting layer, a few drops of red or pink food coloring are usually added. This tradition isn’t just for looks; it visually signifies the sweet, tangy guava flavor within, making the cake as photogenic as it is delicious. It’s the visual punch that makes this tropical delight so unforgettable.
Can I substitute the guava nectar for fresh guava fruit in the cake recipe?
Absolutely, but you need to adjust the preparation slightly to match the consistency required for the guava glaze and soak. Canned guava nectar or frozen puree are preferred for their consistent sweetness and liquid content. If you use fresh guava, you will need to simmer the peeled fruit until very tender, then strain it thoroughly to remove all the seeds and fibrous material. This process yields a thick puree. Ensure you thin it down with a bit of water or juice if the recipe calls for a nectar consistency, as a dense puree might make the cake too heavy or the glaze too thick. Consistency is key for that perfect tropical soak!
What is the best type of frosting to pair with the light, airy texture of a guava layer cake?
The traditional and arguably most heavenly pairing for a guava layer cake is a light, airy whipped cream frosting, often referred to as Chantilly or haupia cream in some island variations. This frosting provides a delicate, cloud-like texture that beautifully contrasts the slightly dense, moist cake layers. While some recipes use cream cheese frosting for added tang and richness, the whipped cream version is highly recommended because it keeps the entire dessert feeling light and tropical, preventing it from becoming overly heavy. It melts wonderfully on your tongue, ensuring the sweet, tangy guava flavor shines through.


Leave a Comment