
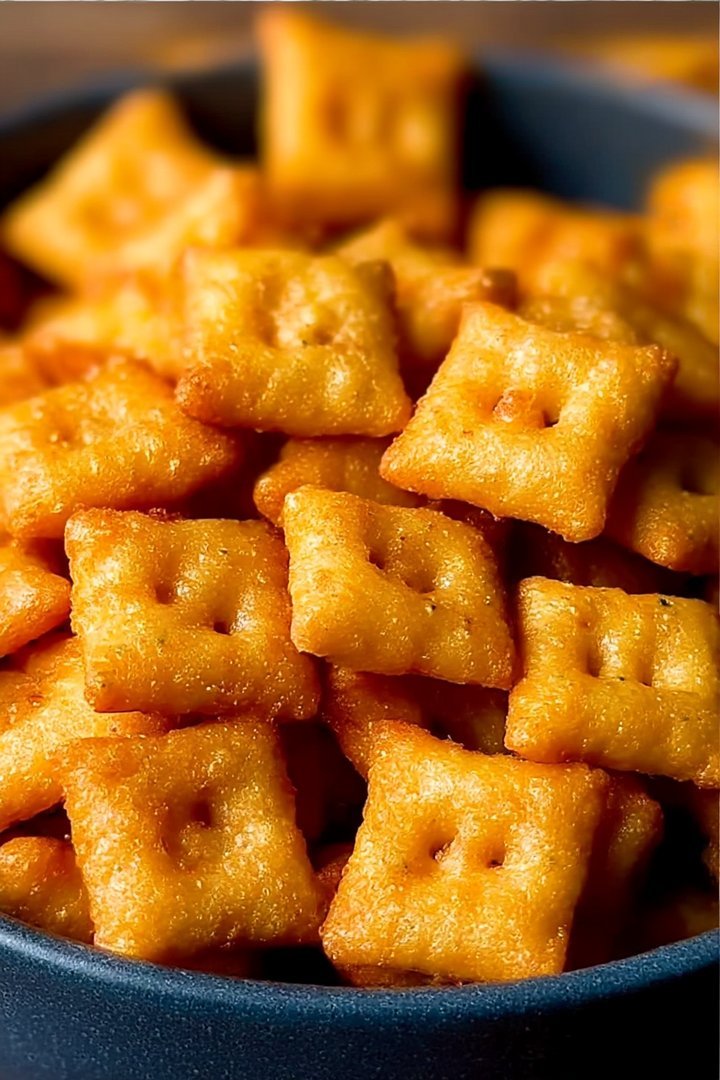
Imagine tiny, golden squares of cheesy perfection, each bite a burst of savory goodness that dances on your tongue. We’re about to embark on a culinary adventure where we transform simple ingredients into irresistible *Homemade Cheez-Its*, the snack that will have everyone begging for more.
Forget the store-bought version with its questionable ingredients and cardboard texture. These *Homemade Cheez-Its* are ridiculously easy to make, bursting with real cheese flavor, and utterly addictive. Get ready to unleash your inner snack wizard!
- Enjoy a straightforward baking process with minimal effort and maximum flavor return.
- Experience a delightful harmony of sharp cheddar and subtle spices creating an unforgettable taste.
- Witness a visually appealing treat with a vibrant orange hue and perfectly crisp edges that pop.
- Adapt the recipe to suit any occasion, from everyday snacking to elevated party platters.
Ingredients for Homemade Cheez-Its
Here’s what you’ll need to make this delicious dish:
The full ingredients list, including measurements, is provided in the recipe card directly below.
How to Make Homemade Cheez-Its
Follow these simple steps to prepare this delicious dish:
Step 1: Cheese Grating Frenzy
Grate the sharp cheddar cheese using a box grater or food processor. The finer the cheese is grated, the better it will incorporate into the dough.
Step 2: Dough Formation Mission
In a large bowl, whisk together the flour, salt, paprika, and garlic powder. Add the grated cheddar cheese and cold, cubed butter. Use a pastry blender or your fingers to cut the butter into the flour mixture until it resembles coarse crumbs.
Step 3: Water Works
Gradually add the cold water, one tablespoon at a time, mixing until the dough just comes together. Be careful not to overmix! The dough should be slightly crumbly but hold together when pressed.
Step 4: Chill Out Session
Wrap the dough in plastic wrap and refrigerate for at least 30 minutes. This chilling time is crucial for allowing the gluten to relax and the butter to solidify, resulting in a flakier cracker.
Step 5: Roll Out the Fun
Preheat oven to 375°F (190°C). Line a baking sheet with parchment paper. On a lightly floured surface, roll out the dough to about 1/8-inch thickness. Use a pizza cutter or knife to cut the dough into small squares (about 1-inch each).
Step 6: Prickly Situation
Transfer the crackers to the prepared baking sheet, spacing them slightly apart. Use a toothpick or skewer to prick each cracker several times. This prevents them from puffing up too much in the oven.
Step 7: Bake to Perfection
Bake for 12-15 minutes, or until the crackers are golden brown around the edges. Let them cool on the baking sheet for a few minutes before transferring them to a wire rack to cool completely.
Transfer to a bowl and enjoy your homemade Cheez-Its; they’re perfect for snacking!
Mastering the Homemade Cheez-Its Dough (H2)
Dough is crucial to *Homemade Cheez-Its*. It’s the foundation upon which cheesy dreams are built. But fear not, dough-making doesn’t have to be a daunting task. Here are some tips and tricks to ensure your dough turns out perfectly every time.
The Butter Breakdown (H3)
Cold butter is your best friend. I mean really, really cold. Think butter that’s been chilling in the freezer for a bit before you start. Why? Because as the butter melts during baking, it creates steam, which in turn creates those lovely, flaky layers we all crave in a good cracker.
Water Works Wonders (H3)
Just like the butter, the water needs to be ice cold. Add it gradually, mixing until the dough just comes together. Overmixing develops the gluten, resulting in a tough cracker. We want tender, crumbly goodness, not shoe leather.
The Chilling Effect (H3)
Don’t skip the chilling time! This is where the magic happens. The cold temperature allows the butter to firm up, preventing it from melting too quickly in the oven. It also gives the gluten a chance to relax, resulting in a more tender cracker. Thirty minutes is the minimum, but you can chill the dough for up to a few hours.
Cheese Please: Choosing the Right Cheddar for your Homemade Cheez-Its (H2)
The cheese you choose will heavily influence the taste of your *Homemade Cheez-Its*. While you can use different cheeses, cheddar is the classic choice. However, not all cheddars are created equal.
Sharp Cheddar is the Name of the Game (H3)
Opt for sharp or extra-sharp cheddar for the most intense cheese flavor. Mild cheddar will get lost in the mix. Look for a cheese that’s been aged for at least a few months for the best flavor.
Freshly Grated vs. Pre-Shredded (H3)
While pre-shredded cheese is convenient, it often contains cellulose, which can prevent it from melting properly. For the best results, grate your own cheese. It only takes a few minutes, and the difference in flavor and texture is well worth the effort.
Experiment with Flavors (H3)
Feel free to experiment with different types of cheddar. White cheddar, aged cheddar, or even a blend of cheddar and Parmesan can all add unique flavors to your *Homemade Cheez-Its*. Just make sure the cheese is relatively dry, or you may need to adjust the amount of water in the dough.
Spice It Up: Adding Flavor to Your Homemade Cheez-Its (H2)
While cheddar cheese is the star of the show, a few spices can take your *Homemade Cheez-Its* to the next level.
Paprika Power (H3)
Paprika not only adds color but also a subtle smoky flavor. You can use regular paprika, smoked paprika, or even a blend of both.
Garlic Goodness (H3)
A pinch of garlic powder adds a savory depth to the crackers. Just be careful not to overdo it, as too much garlic can overpower the cheese flavor.
Other Spice Sensations (H3)
Don’t be afraid to get creative with other spices. Onion powder, cayenne pepper, dried herbs like thyme or rosemary, or even a dash of hot sauce can all add unique flavors to your *Homemade Cheez-Its*.
Baking Your Homemade Cheez-Its to Golden Perfection (H2)
Baking is the final step in your *Homemade Cheez-Its* journey. Here are some tips to ensure your crackers come out perfectly golden brown and crispy every time.
Oven Temperature is Key (H3)
Preheat your oven to 375°F (190°C). An accurate oven temperature is crucial for even baking. If your oven runs hot or cold, adjust the temperature accordingly.
Parchment Paper is Your Friend (H3)
Line your baking sheet with parchment paper to prevent the crackers from sticking. Parchment paper also makes cleanup a breeze.
Prickly Perfection (H3)
Don’t forget to prick each cracker with a toothpick or skewer before baking. This prevents them from puffing up too much in the oven.
Watch Them Carefully (H3)
Baking time can vary depending on your oven. Keep a close eye on the crackers and remove them from the oven when they are golden brown around the edges. They will continue to crisp up as they cool.
Storing Your Homemade Cheez-Its (H2)
If, by some miracle, you have any *Homemade Cheez-Its* left over, here’s how to store them to keep them fresh and crispy.
Airtight is the Way to Go (H3)
Store the crackers in an airtight container at room temperature. They will stay fresh for up to a week.
Freezer Friendly (H3)
For longer storage, you can freeze the crackers. Place them in a freezer-safe bag or container and freeze for up to two months. Thaw at room temperature before serving.
Homemade Cheez-Its: Beyond the Snack (H2)
While *Homemade Cheez-Its* are delicious on their own, they can also be used in a variety of other dishes.
Cracker Crumbs Crust (H3)
Crush the crackers and use them as a coating for chicken or fish. The cheesy, savory flavor adds a unique twist to classic breaded dishes.
Soup Topper (H3)
Sprinkle crushed crackers over soup for a crunchy, cheesy topping.
Charcuterie Board Addition (H3)
Add a bowl of *Homemade Cheez-Its* to your next charcuterie board for a fun and unexpected addition.
With this recipe and these tips, you’re well on your way to becoming a *Homemade Cheez-Its* master. So go forth, bake, and enjoy the cheesy goodness!
Perfecting the Cooking Process
To achieve cracker nirvana, ensure your oven is preheated accurately; this guarantees even baking. Mix your dough until just combined to avoid tough crackers. Docking the dough with a fork prevents unwanted puffing, maintaining that signature Cheez-It flatness.
Add Your Touch
Feeling adventurous? Incorporate a pinch of cayenne pepper for a spicy kick or some garlic powder for extra flavor. Experiment with different cheeses like sharp cheddar or even a smoky Gouda. A sprinkle of everything bagel seasoning can also elevate these treats.
Storing & Reheating
Store your Homemade Cheez-Its in an airtight container at room temperature to maintain their crispness. Reheating isn’t typically necessary, but a few minutes in a warm oven can revive them if they lose their crunch. Enjoy within a week for peak flavor.
3 Helpful Tips for Cheez-It Mastery:
- Grate your cheese finely; this helps it incorporate evenly into the dough, creating a smooth and consistent texture.
- Use a pizza cutter for precise and uniform cracker shapes; even baking ensures every bite is perfectly crisp.
- Don’t overbake! Watch closely and remove when golden brown; overbaking leads to bitterness, avoid that.
(Personal anecdote formated as paragraph subheading)
My friend Sarah once declared my homemade Cheez-Its better than the original. I think it was the extra sharp cheddar and a dash of paprika that sealed the deal.
Conclusion for Homemade Cheez-Its :
So there you have it – a surprisingly simple recipe for Homemade Cheez-Its that will put those store-bought squares to shame. With just a handful of ingredients and a little bit of patience, you can create a batch of crispy, cheesy crackers that are guaranteed to disappear in a flash. Customize the flavors to your liking, get the kids involved, and prepare to experience a level of cheesy satisfaction that you never thought possible. Happy baking, and may your cracker cravings be forever satisfied!
Print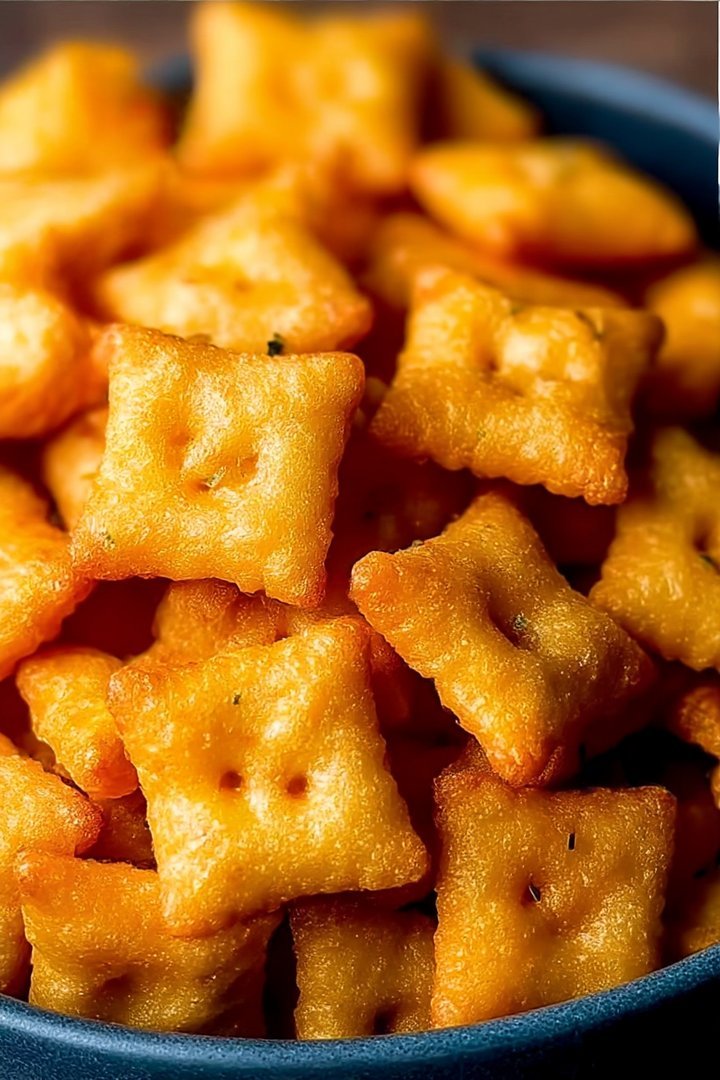
Homemade Cheez-Its
Delicious homemade cheez-its recipe with detailed instructions and nutritional information.
- Total Time: 35 minutes
- Yield: 4 servings
Ingredients
- All-purpose flour: 1 cup
- Sharp cheddar cheese, finely grated: 4 ounces
- Cold unsalted butter, cut into cubes: 4 tablespoons
- Cold water: 2-4 tablespoons
- Salt: 1/2 teaspoon
- Paprika: 1/4 teaspoon
- Garlic powder: 1/4 teaspoon
- Optional: A pinch of cayenne pepper
Instructions
- Step 1: In a food processor, combine the flour, cheese, butter, salt, paprika, garlic powder, and optional cayenne pepper. Pulse until the mixture resembles coarse crumbs.
- Step 2: Gradually add cold water, one tablespoon at a time, pulsing until the dough just comes together. Be careful not to overmix.
- Step 3: Form the dough into a disc, wrap it in plastic wrap, and refrigerate for at least 30 minutes.
- Step 4: Preheat your oven to 350°F (175°C). On a lightly floured surface, roll the dough out to about 1/8 inch thickness.
- Step 5: Use a pizza cutter or knife to cut the dough into small squares (about 1 inch). Poke a hole in the center of each square with a toothpick or skewer.
- Step 6: Transfer the Cheez-Its to a baking sheet lined with parchment paper and bake for 12-15 minutes, or until golden brown and crisp. Let them cool completely on the baking sheet before serving.
Notes
- Store cooled Cheez-Its in an airtight container at room temperature to maintain their crispness.
- Reheat slightly softened Cheez-Its in a 300°F oven for a few minutes to restore their crunch.
- Serve these homemade Cheez-Its with a creamy dip or alongside your favorite soup for a satisfying snack.
- For extra cheesy flavor, use a blend of sharp and extra-sharp cheddar, ensuring it's finely grated for even distribution in the dough.
- Prep Time: 15 minutes
- Cook Time: 20 minutes
- Method: Stovetop
- Cuisine: American
FAQs :
Can I make Homemade Cheez-Its ahead of time?
You bet your cheesy britches you can! In fact, a little planning ahead can actually improve the flavor. The dough for these crackers can happily chill in the fridge for up to 48 hours. Just wrap it tightly in plastic wrap to prevent it from drying out. When you’re ready to bake, simply take it out, let it soften slightly, and proceed with rolling and cutting. This gives the flavors a chance to meld together beautifully, resulting in an even more delicious cheesy snack. Talk about a win-win!
What’s the secret to getting that perfect Cheez-It texture when they are Homemade Cheez-Its?
Ah, the million-dollar question! The key lies in rolling the dough thinly – like, *really* thinly. We’re talking about 1/8 inch thick, or even a smidge thinner if you’re feeling ambitious. This ensures that the crackers bake up crisp and snappy, just like the ones from the box. Also, don’t skip the docking (pricking with a fork). This prevents the crackers from puffing up too much in the oven, maintaining that flat, signature Cheez-It shape. Nobody wants a puffy Cheez-It impersonator!
How do I store my Homemade Cheez-Its to keep them fresh?
If you manage to not devour them all in one sitting (a feat of immense willpower, I might add), storing them properly is crucial. Once the crackers have cooled completely, transfer them to an airtight container. A zip-top bag works wonders too, just make sure to squeeze out any excess air. Stored this way, your Homemade Cheez-Its will stay fresh and crunchy for up to a week. Although, let’s be honest, they’ll probably be gone long before that.
Can I customize the flavor of my Homemade Cheez-Its?
Absolutely! That’s the beauty of making them from scratch – you’re the master of your cheesy destiny! Feel free to experiment with different types of cheese. A sharp cheddar will give you that classic Cheez-It tang, while a blend of cheddar and parmesan will add a nutty depth. You can also add spices like garlic powder, onion powder, or even a pinch of cayenne pepper for a little kick. Get creative and find your perfect cheesy flavor profile!


Leave a Comment