

Ah, the Homemade Herby Cheese Loaf! Imagine the aroma wafting through your kitchen, a symphony of savory herbs mingling with the comforting scent of freshly baked bread and melted cheese. It’s a culinary hug in loaf form.
This isn’t just any loaf; it’s a flavor explosion waiting to happen, a golden-crusted masterpiece begging to be devoured. Think warm, gooey cheese, fragrant herbs, and a soft, yielding interior—perfect for sharing (or not!).
Here’s why you absolutely NEED this Homemade Herby Cheese Loaf in your life:
Ease of Preparation: This recipe is surprisingly simple, perfect for both novice bakers and seasoned pros looking for a quick win.
Flavor Profile: The herby cheese combination creates a taste sensation that is both comforting and incredibly satisfying.
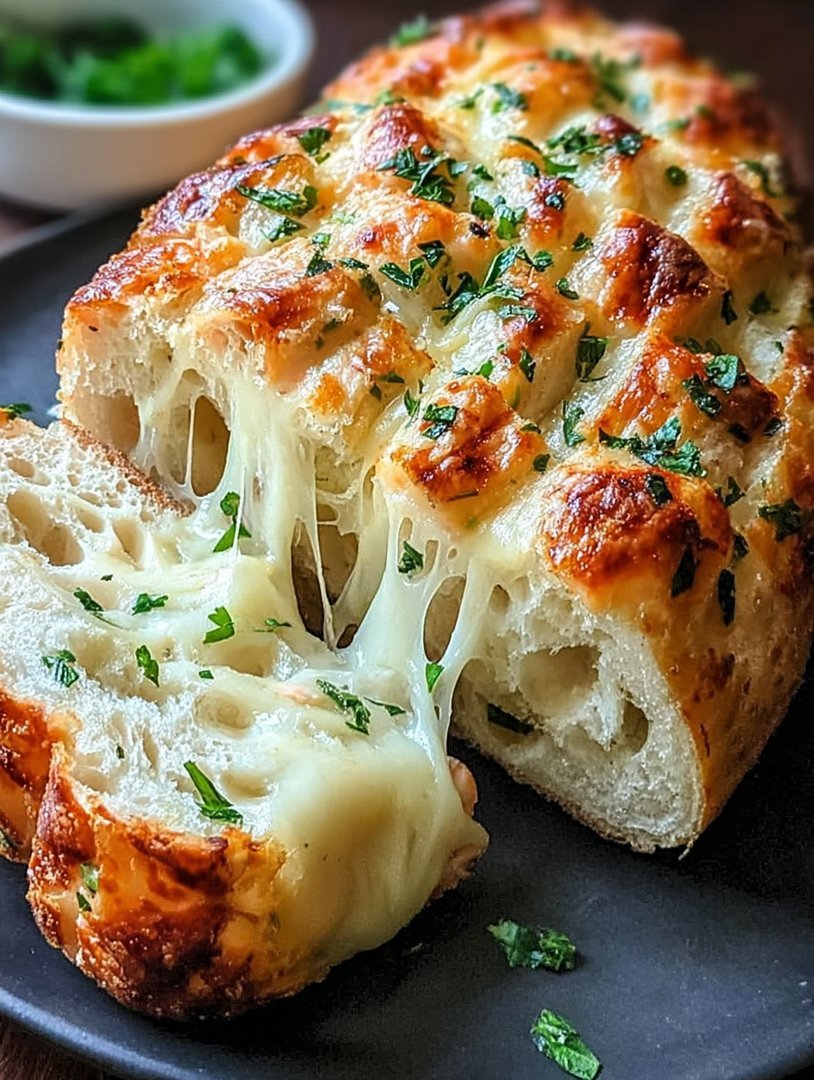
Visual Appeal: The golden-brown crust, studded with herbs, makes this loaf a stunning centerpiece for any table.
Versatility: Enjoy it as an appetizer, a side dish, or even as the star of a cheesy, herby sandwich creation!
Ingredients for Homemade Herby Cheese Loaf
Here’s what you’ll need to make this delicious dish:
The full ingredients list, including measurements, is provided in the recipe card directly below.
How to Make Homemade Herby Cheese Loaf
Follow these simple steps to prepare this delicious dish:
Step 1: Activating the Yeast
In a large bowl, dissolve the active dry yeast and sugar in warm water. Let it stand for 5-10 minutes, until foamy. This indicates that the yeast is active and ready to use. If it doesn’t foam, the yeast might be old and needs to be replaced.
Step 2: Mixing the Dough
Add the olive oil, salt, and half of the flour to the yeast mixture. Mix until combined. Gradually add the remaining flour, mixing until a shaggy dough forms. Turn the dough out onto a lightly floured surface and knead for 5-7 minutes, until smooth and elastic. The dough should be slightly tacky but not sticky.
Step 3: First Rise
Place the dough in a lightly oiled bowl, turning to coat. Cover with plastic wrap and let it rise in a warm place for 1-1.5 hours, or until doubled in size. This allows the yeast to work its magic and develop the dough’s flavor and texture.
Step 4: Preparing the Cheese and Herb Mixture
While the dough is rising, prepare the cheese and herb mixture. In a medium bowl, combine the shredded cheddar cheese, shredded mozzarella cheese, fresh rosemary, fresh thyme, fresh chives, and garlic powder. Mix well to ensure all the ingredients are evenly distributed.
Step 5: Shaping and Filling the Loaf
Once the dough has doubled in size, punch it down to release the air. Turn it out onto a lightly floured surface and roll it into a large rectangle, about 12×18 inches. Sprinkle the cheese and herb mixture evenly over the dough, leaving a 1-inch border along one long edge.
Step 6: Baking the Loaf
Preheat oven to 375°F (190°C). Carefully roll the dough up tightly, starting from the edge opposite the border. Pinch the seam to seal. Place the loaf, seam-side down, on a baking sheet lined with parchment paper. Brush the top with the beaten egg. Bake for 30-35 minutes, or until golden brown and the cheese is melted and bubbly. Let the loaf cool for at least 10 minutes before slicing and serving. Serve warm and enjoy every cheesy, herby bite!
Perfecting the Cooking Process
First, gently warm the milk and melt the butter; this ensures a smooth, even distribution of moisture. Then, mix your dry ingredients and combine everything carefully. A slow, steady bake guarantees a golden crust and a wonderfully airy inside.
Add Your Touch
Feel free to swap out the herbs; rosemary and thyme would be divine! Experiment with different cheeses; a sharp cheddar or a nutty Gruyère can add a lovely depth of flavor. For an extra kick, add a pinch of red pepper flakes.
Storing & Reheating
Wrap the loaf tightly in plastic wrap or foil and store it at room temperature for up to two days, or in the refrigerator for up to a week. To reheat, slice and toast or warm it in a low oven for a few minutes.
Here are a few secrets to baking the ultimate Homemade Herby Cheese Loaf that even grandma would envy:
- Don’t skip the proofing stage; it’s crucial for a light and airy texture. Patience is a virtue, especially when baking bread!
- Use room temperature ingredients to ensure everything blends together seamlessly, creating a homogenous batter.
- Resist the urge to slice into it immediately; letting it cool slightly allows the loaf to retain its moisture and structure.
(Personal anecdote formated as paragraph subheading (very important! don’t write any title for this paragraph))
I remember the first time I made this loaf for a potluck. It vanished so quickly; I barely snagged a slice! Now, I always double the recipe just to be safe.
Crafting Your Perfect Loaf: A Baker’s Journey
Let’s be honest; baking bread can feel a little like performing alchemy. You’re mixing simple ingredients, applying a bit of heat, and *poof*, you’ve got a loaf of edible magic. But fear not, aspiring bakers! This guide to creating a *Homemade Herby Cheese Loaf* is designed to be your trusty spellbook, leading you to bread-baking brilliance. Forget dense, flavorless disappointments; we’re aiming for a light, airy, cheesy masterpiece that will have everyone begging for seconds.
Gathering Your Arsenal: The Ingredients
Before we dive into the mystical mixing process, let’s gather our ingredients. Think of this as assembling your potions ingredients, each with its unique purpose in the grand scheme of things:
- **All-Purpose Flour:** The backbone of our loaf, providing structure and substance.
- **Active Dry Yeast:** The magical leavening agent, responsible for that beautiful rise.
- **Warm Milk:** The gentle activator, coaxing the yeast into bubbly action.
- **Melted Butter:** The richness provider, adding moisture and flavor.
- **Sugar:** The subtle sweetness enhancer, feeding the yeast and balancing the savory.
- **Salt:** The flavor balancer, bringing all the other ingredients into harmony.
- **Eggs:** The binder, adding richness and structure.
- **Shredded Cheese (Cheddar, Gruyère, or a blend):** The star of the show, imparting cheesy goodness.
- **Fresh Herbs (Rosemary, Thyme, Chives, Parsley):** The aromatic flourish, adding depth and complexity.
The Ritual: Step-by-Step Instructions
Now that we have our ingredients, it’s time to begin the ritual – I mean, the recipe. Follow these steps carefully, and you’ll be rewarded with a loaf of unparalleled deliciousness.
Activating the Yeast: The Bubbling Beginning
In a small bowl, dissolve the yeast and sugar in warm milk. Let it stand for 5-10 minutes, or until foamy. This is how you know the yeast is alive and ready to work its magic. If it doesn’t foam, your yeast might be past its prime, and it’s best to start with a fresh batch.
Combining the Elements: Mixing the Dough
In a large bowl, whisk together the flour and salt. Add the foamy yeast mixture, melted butter, and eggs. Mix until a shaggy dough forms. Then, turn the dough out onto a lightly floured surface and knead for 5-7 minutes, or until smooth and elastic. Alternatively, use a stand mixer with a dough hook to knead for the same amount of time.
The First Rise: Patience is Key
Place the dough in a lightly oiled bowl, turning to coat. Cover with plastic wrap and let rise in a warm place for 1-1.5 hours, or until doubled in size. This is where the yeast does its heavy lifting, creating all those lovely air pockets that give the bread its light texture.
Adding the Goodness: Cheese and Herbs
Punch down the dough to release the air. Knead in the shredded cheese and chopped fresh herbs until evenly distributed. This is where the magic truly happens; the aroma alone is enough to make your mouth water.
Shaping the Loaf: Creating Beauty
Shape the dough into a loaf and place it in a greased loaf pan. Cover with plastic wrap and let rise for another 30-45 minutes, or until almost doubled in size.
The Grand Finale: Baking to Perfection
Preheat your oven to 375°F (190°C). Bake for 30-35 minutes, or until golden brown and the internal temperature reaches 200°F (93°C). If the top starts to brown too quickly, tent it with foil.
The Cooling Period: Resisting Temptation
Let the loaf cool in the pan for 10 minutes before transferring it to a wire rack to cool completely. This is the hardest part, but trust me, it’s worth the wait. Slicing into a warm loaf can result in a gummy texture.
Variations and Twists: Unleash Your Inner Baker
Now that you’ve mastered the basic recipe, feel free to experiment and add your own personal touch. Here are a few ideas to get you started:
- **Garlic Herb Cheese Loaf:** Add minced garlic to the dough for an extra layer of flavor.
- **Spicy Cheese Loaf:** Incorporate chopped jalapeños or red pepper flakes for a fiery kick.
- **Sun-Dried Tomato and Basil Cheese Loaf:** Add sun-dried tomatoes and fresh basil for a Mediterranean-inspired twist.
- **Everything Bagel Cheese Loaf:** Top the loaf with everything bagel seasoning before baking for a savory and crunchy crust.
Serving Suggestions: Sharing the Love
This Homemade Herby Cheese Loaf is delicious on its own, but it also pairs well with a variety of dishes. Serve it with soup, salad, or your favorite charcuterie board. It’s also fantastic as a base for sandwiches or toast.
Troubleshooting Tips: Conquering Common Challenges
Even the most experienced bakers encounter challenges from time to time. Here are a few troubleshooting tips to help you overcome common bread-baking obstacles:
- **Dense Loaf:** This could be due to using old yeast, not kneading the dough enough, or not allowing it to rise properly.
- **Gummy Texture:** This can happen if you slice into the loaf while it’s still warm or if you didn’t bake it long enough.
- **Burnt Crust:** Reduce the oven temperature or tent the loaf with foil to prevent the crust from burning.
Frequently Asked Questions: Addressing Your Concerns
**Can I use a different type of flour?**
While all-purpose flour is recommended for this recipe, you can experiment with other types of flour, such as bread flour or whole wheat flour. Keep in mind that different flours may require adjustments to the liquid content.
**Can I use dried herbs instead of fresh?**
Yes, you can substitute dried herbs for fresh herbs. Use about one-third the amount of dried herbs as you would fresh herbs.
**Can I freeze the loaf?**
Yes, you can freeze the loaf for up to 2 months. Wrap it tightly in plastic wrap and then in foil. Thaw it overnight in the refrigerator before reheating.
**My dough is too sticky. What should I do?**
Add a tablespoon of flour at a time until the dough is easier to handle. Be careful not to add too much flour, as this can result in a dry loaf.
(Personal anecdote formated as paragraph subheading (very important! don’t write any title for this paragraph))
Once, I accidentally added double the amount of cheese. The result was a gooey, incredibly delicious mess! Everyone agreed it was the best mistake I’d ever made.
Conclusion: Embrace the Baking Adventure
Baking a *Homemade Herby Cheese Loaf* is more than just following a recipe; it’s an experience. It’s about the joy of creating something delicious with your own hands, the satisfaction of filling your home with the aroma of freshly baked bread, and the pleasure of sharing it with loved ones. So, embrace the adventure, don’t be afraid to experiment, and most importantly, have fun! Happy baking!
Conclusion for Homemade Herby Cheese Loaf:
This Homemade Herby Cheese Loaf is more than just bread; it’s a flavor explosion waiting to happen! From customizing the cheese and herbs to perfecting that golden-brown crust, this recipe is your ticket to baking bliss. Its savory aroma and delightful taste makes it an excellent option. So, grab your ingredients, preheat that oven, and prepare to impress with this irresistible treat.
Print
Homemade Herby Cheese Loaf
Delicious homemade herby cheese loaf recipe with detailed instructions and nutritional information.
- Total Time: 35 minutes
- Yield: 4 servings
Ingredients
- All-purpose flour: 3 cups
- Rapid rise yeast: 2 1/4 teaspoons
- Salt: 1 teaspoon
- Warm milk: 1 cup
- Olive oil: 2 tablespoons
- Shredded cheddar cheese: 1 1/2 cups
- Dried Italian herbs: 2 tablespoons
- Garlic powder: 1 teaspoon
Instructions
- Step 1: In a large bowl, combine the flour, yeast, salt, dried Italian herbs, and garlic powder.
- Step 2: Add the warm milk and olive oil to the dry ingredients. Mix until a shaggy dough forms. Gradually add 1 cup of the shredded cheddar cheese and knead for 5-7 minutes until smooth.
- Step 3: Place the dough in a lightly oiled bowl, turning to coat. Cover and let rise in a warm place for 1 hour, or until doubled in size.
- Step 4: Preheat oven to 375°F (190°C). Punch down the dough and shape it into a loaf. Place the loaf in a greased 9×5 inch loaf pan. Sprinkle the remaining 1/2 cup of cheese on top.
- Step 5: Bake for 30-35 minutes, or until golden brown and the internal temperature reaches 200°F (93°C). Let cool in the pan for 10 minutes before transferring to a wire rack to cool completely.
Notes
- To keep your herby cheese loaf fresh, wrap it tightly in plastic wrap or foil and store at room temperature for up to 3 days.
- For a warm, gooey treat, slice and microwave individual portions for 15-20 seconds.
- This loaf is delicious served with a hearty soup or as a savory side to a pasta dish, complementing the Italian herbs.
- Make sure your milk is warm, not hot, to avoid killing the yeast and preventing your loaf from rising properly.
- Prep Time: 15 minutes
- Cook Time: 20 minutes
- Method: Stovetop
- Cuisine: American
FAQs:
Can I use different cheeses in this Homemade Herby Cheese Loaf?
Absolutely! Feel free to experiment with different cheese blends to customize your Homemade Herby Cheese Loaf to your liking. Cheddar, Gruyere, Monterey Jack, or even a sprinkle of parmesan can add unique flavor profiles. Just ensure the cheeses you choose melt well for that perfect cheesy pull. Consider the saltiness of each cheese, as some might require adjusting the overall salt content of the loaf. Don’t be afraid to get creative and discover your ultimate herby cheese bread masterpiece.
What herbs work best in this cheesy herby bread?
The beauty of this cheesy herby bread recipe lies in its versatility! While the recipe suggests a blend of rosemary, thyme, and parsley, you can easily adapt it to your favorite herbs. Consider using oregano, chives, dill, or even a touch of sage. Fresh herbs will provide the most vibrant flavor, but dried herbs can also be used in a pinch. Remember to use about half the amount of dried herbs compared to fresh, as their flavor is more concentrated.
How do I prevent the cheese from burning on top?
Nobody wants a burnt cheese topping! To prevent this culinary catastrophe, tent the Homemade Herby Cheese Loaf with aluminum foil during the last 15-20 minutes of baking. This will shield the top from direct heat, allowing the cheese to melt beautifully without browning excessively. Alternatively, you can lower the oven temperature slightly after the initial baking period. Keep a close eye on the loaf and adjust baking time as needed.
Can I freeze this Homemade Herby Cheese Loaf?
Yes, you can definitely freeze this cheesy herby bread for later enjoyment! Allow the loaf to cool completely before wrapping it tightly in plastic wrap, followed by a layer of aluminum foil. For best results, freeze it as soon as possible after baking. When ready to eat, thaw the loaf overnight in the refrigerator or at room temperature for a few hours. You can then reheat it in the oven or microwave until warmed through. Freshly baked is always best, but frozen is a great option.


Leave a Comment