
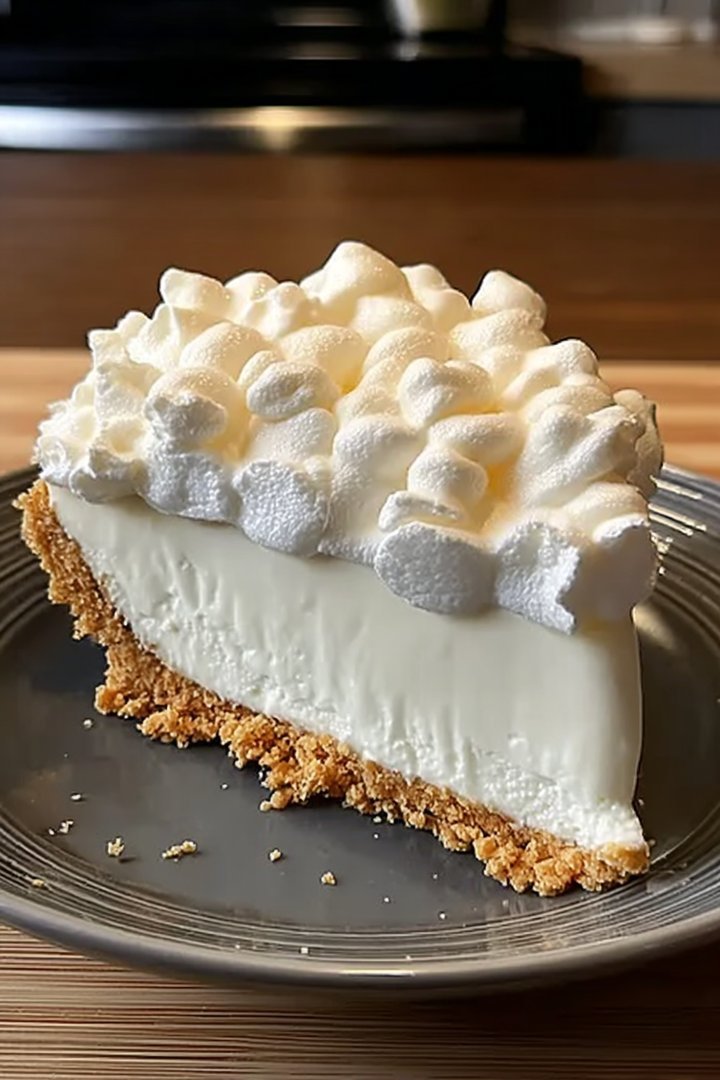
The creamy, dreamy, and utterly irresistible Marshmallow Whip Cheesecake beckons with its fluffy texture and sweet, delicate flavor, promising a delightful escape with every single bite. Its cloud-like consistency and subtle vanilla notes create a symphony of sweetness, a treat that soothes and satisfies the senses.
Imagine yourself sinking into a pillowy cloud of marshmallow-infused bliss; this dessert is the culinary equivalent of that, only better. Perfect for celebrations or just a sweet craving, get ready to experience a flavor journey that will leave you smiling from ear to ear.
- Effortlessly create a show-stopping dessert that tastes like a gourmet masterpiece.
- Experience the perfect balance of creamy cheesecake and light, airy marshmallow.
- Impress your friends and family with its elegant appearance and delightful flavor.
- Customize it with your favorite toppings for a unique and personalized treat.
Ingredients for Marshmallow Whip Cheesecake
Here’s what you’ll need to make this delicious dish:
The full ingredients list, including measurements, is provided in the recipe card directly below.
How to Make Marshmallow Whip Cheesecake
Follow these simple steps to prepare this delicious dish:
Step 1: Prepare the Graham Cracker Crust
In a medium bowl, combine graham cracker crumbs and melted butter until well combined. Press the mixture firmly into the bottom of a 9-inch springform pan. Bake in a preheated oven at 350°F (175°C) for 8-10 minutes. Remove from oven and let cool completely.
Step 2: Make the Cheesecake Filling
In a large bowl, beat the softened cream cheese and granulated sugar together until smooth and creamy. Add the eggs one at a time, beating well after each addition. Stir in the Alcohol-free vanilla extract and lemon juice.
Step 3: Incorporate the Marshmallow
Gently fold in the marshmallow fluff until evenly distributed throughout the cream cheese mixture.
Step 4: Set the Cheesecake
In a small saucepan, whisk agar-agar powder with 1/4 cup of water. Bring to a simmer over medium heat, stirring constantly, until the agar-agar is completely dissolved. This usually takes about 3-5 minutes. Let it cool slightly, then pour it into the cream cheese mixture. Mix thoroughly to ensure even distribution.
Step 5: Bake and Chill
Pour the cheesecake filling over the cooled graham cracker crust. Bake in the preheated oven at 325°F (160°C) for 55-65 minutes, or until the edges are set and the center is slightly jiggly. Turn off the oven and let the cheesecake cool inside with the door ajar for one hour. Then, remove from the oven and chill in the refrigerator for at least 4 hours, or preferably overnight.
Step 6: Serve and Enjoy
Once chilled, carefully remove the cheesecake from the springform pan. Slice and serve cold. Garnish with extra marshmallow fluff, fresh berries, or chocolate shavings for an extra touch of indulgence. This Marshmallow Whip Cheesecake is best enjoyed with a dollop of whipped cream and a sprinkle of your favorite toppings.
Perfecting the Cooking Process
For the ultimate Marshmallow Whip Cheesecake experience, start by prepping your crust and filling ingredients. Get that crust baking while you whip up the dreamy marshmallow filling. This ensures a seamless transition and a cheesecake that’s chilled to perfection.
Add Your Touch
Feeling adventurous? Swap out the classic Alcohol-free vanilla extract for almond or lemon extract for a twist. Consider adding a layer of fresh berries or a drizzle of chocolate syrup to make it uniquely yours. Let your creativity shine and invent your own dream Marshmallow Whip Cheesecake!
Storing & Reheating
To keep your Marshmallow Whip Cheesecake tasting its best, store it covered in the refrigerator. It’s best enjoyed cold, straight from the fridge. Leftovers (if there are any!) will stay fresh for up to five days, ready for another delightful slice.
Tips for Marshmallow Whip Cheesecake Success
- For a perfectly smooth cheesecake, ensure your cream cheese is at room temperature before whipping. This prevents lumps and guarantees a velvety texture.
- Don’t overbake your cheesecake. A slight wobble in the center is perfectly fine; it will firm up as it cools. Nobody likes a dry cheesecake!
- Chill your cheesecake for at least four hours, or preferably overnight, to allow the flavors to meld and the texture to set properly. Patience, young grasshopper!
(Personal anecdote formated as paragraph subheading)
I remember when I first made this for my friend’s birthday. He said it was the best cheesecake he’d ever had, and he practically licked the plate clean! That’s when I knew I had a winning recipe.
Marshmallow Whip Cheesecake: A Slice of Heaven (Without the Fuss!)
Alright, let’s talk cheesecake. But not just *any* cheesecake. We’re diving headfirst into a Marshmallow Whip Cheesecake – a cloud of creamy, dreamy goodness that’s surprisingly easy to make. Forget those complicated recipes with a million steps and ingredients you’ve never heard of. This is cheesecake for the rest of us, the ones who want maximum flavor with minimum fuss.
Now, I know what you might be thinking: “Marshmallow? In cheesecake? Is that even legal?” Trust me on this one. The marshmallow whip adds a lightness and a subtle sweetness that takes this cheesecake to another dimension. It’s like your favorite childhood treat got a sophisticated makeover and decided to grace your dessert table. And the best part? It’s a guaranteed crowd-pleaser. I’ve yet to meet someone who can resist a slice of this fluffy masterpiece.
Why This Marshmallow Whip Cheesecake Recipe Rocks
So, what makes this particular Marshmallow Whip Cheesecake recipe so special? First off, it’s incredibly forgiving. Unlike some cheesecake recipes that demand perfection at every step, this one is pretty laid-back. A few cracks on the surface? No problem! A slightly uneven crust? Adds character! It’s more about embracing the deliciousness than striving for culinary perfection.
Second, it’s adaptable. Feel free to experiment with different crusts, toppings, and flavorings. Want to add some chocolate chips? Go for it! Craving a hint of citrus? Zest some lemon or orange into the batter. The possibilities are endless. This recipe is more of a starting point, a blank canvas for your own cheesecake masterpiece.
And finally, it’s just plain fun to make. Whipping up that marshmallow filling is strangely therapeutic, and the anticipation of that first bite is almost unbearable. Plus, you get to impress your friends and family with your mad baking skills. Who doesn’t love that?
Gather Your Dreamy Ingredients
Before we get started, let’s make sure we have all the necessary ingredients. Don’t worry, you probably already have most of them in your pantry. Here’s what you’ll need:
- **For the Crust:**
- 1 1/2 cups graham cracker crumbs (or any cookie crumbs you like!)
- 5 tablespoons unsalted butter, melted
- 1/4 cup granulated sugar
- **For the Filling:**
- 3 (8 ounce) packages cream cheese, softened
- 1 1/2 cups granulated sugar
- 1 teaspoon Alcohol-free vanilla extract
- 1/2 teaspoon salt
- 3 large eggs
- 1 cup marshmallow crème (that fluffy, cloud-like stuff)
See? Nothing too intimidating. And if you’re missing an ingredient or two, don’t be afraid to get creative with substitutions. That’s the beauty of this recipe!
Crafting the Perfect Crust
Let’s start with the foundation of our cheesecake masterpiece: the crust. A good crust is essential for supporting that luscious filling and adding a bit of textural contrast.
Mixing the Crumbs
In a medium bowl, combine the graham cracker crumbs, melted butter, and sugar. Mix well until everything is evenly moistened and resembles wet sand. This is where you can get a little hands-on and really work those ingredients together.
Pressing into the Pan
Press the crumb mixture into the bottom of a 9-inch springform pan. You can use the bottom of a measuring cup or your fingers to create a nice, even layer. Make sure to press firmly to create a solid base.
Baking the Base
Bake the crust in a preheated oven at 350°F (175°C) for 8-10 minutes, or until lightly golden brown. This step helps to set the crust and prevent it from becoming soggy later on. Let it cool completely before adding the filling.
Whipping Up the Marshmallow Dream
Now for the star of the show: the marshmallow whip filling! This is where the magic happens, where simple ingredients transform into a cloud of creamy, dreamy goodness.
Creaming the Cheese
In a large bowl, beat the softened cream cheese with the sugar until smooth and creamy. This is crucial for achieving that velvety texture. Make sure there are no lumps!
Adding the Flavor
Stir in the Alcohol-free vanilla extract and salt. Don’t skip the salt! It helps to balance the sweetness and enhance the other flavors.
Eggs-cellent Addition
Add the eggs one at a time, beating well after each addition. Be careful not to overmix at this stage, as it can cause the cheesecake to crack.
The Marshmallow Finale
Gently fold in the marshmallow crème until just combined. Don’t overmix! You want to keep that light and airy texture. This is where the marshmallow magic happens.
Pouring into the Crust
Pour the marshmallow filling into the cooled crust, spreading it evenly. Now it’s time to say a silent prayer for no cracks.
Baking Your Masterpiece
Carefully place the springform pan in a preheated oven at 325°F (160°C).
Baking Time
Bake for 55-70 minutes, or until the edges are set and the center is slightly jiggly. Remember, a little wobble is okay! It will firm up as it cools.
Cooling Down
Turn off the oven and let the cheesecake cool inside with the door slightly ajar for an hour. This helps to prevent cracking.
Chilling Out
After an hour, remove the cheesecake from the oven and let it cool completely at room temperature. Then, cover it with plastic wrap and refrigerate for at least 4 hours, or preferably overnight. Patience is a virtue, especially when it comes to cheesecake.
Serving & Savoring
Once your cheesecake is thoroughly chilled, it’s time to unleash its deliciousness upon the world.
Unleashing the Goodness
Carefully remove the sides of the springform pan. Admire your handiwork. You’ve created a masterpiece!
Topping Time
Now for the fun part: the toppings! Get creative with whipped cream, fresh berries, chocolate sauce, caramel drizzle, or whatever your heart desires.
Slicing & Enjoying
Slice the cheesecake into generous portions and serve with a smile. Prepare for the compliments to roll in. You deserve them!
The Art of Customization
One of the best things about this recipe is how easily it can be customized. Feel free to experiment and make it your own!
Crust Variations
Try using different types of cookies for the crust, such as chocolate wafers, gingersnaps, or even Oreo cookies.
Flavor Infusions
Add a few drops of your favorite extract to the filling, such as almond, lemon, or peppermint.
Topping Ideas
Get creative with your toppings! Try fresh fruit, chocolate shavings, nuts, or even a sprinkle of edible glitter.
(Personal anecdote formated as paragraph subheading)
One time, I added a layer of raspberry jam to the bottom of the crust before adding the filling, and it was a total game-changer! The tartness of the raspberry complemented the sweetness of the marshmallow perfectly.
Troubleshooting Your Cheesecake
Even the best bakers encounter a few bumps in the road. Here are some common cheesecake problems and how to fix them:
Cracked Cheesecake
If your cheesecake cracks, don’t panic! It happens. You can try covering the cracks with whipped cream or fruit topping. Or, just embrace the imperfections!
Soggy Crust
To prevent a soggy crust, make sure to bake it properly and let it cool completely before adding the filling.
Lumpy Filling
To avoid a lumpy filling, make sure your cream cheese is at room temperature before mixing.
(Personal anecdote formated as paragraph subheading)
I remember once, I completely forgot to add the sugar to the filling. The result was… interesting. Let’s just say it wasn’t my finest moment.
Enjoying Your Marshmallow Whip Cheesecake
So there you have it: a Marshmallow Whip Cheesecake recipe that’s easy, delicious, and guaranteed to impress. Now go forth and bake!
Conclusion for Marshmallow Whip Cheesecake :
This Marshmallow Whip Cheesecake is a guaranteed crowd-pleaser, offering a delightful balance of creamy, sweet, and utterly addictive flavors. Its simple preparation makes it accessible to bakers of all skill levels, while its customizable nature allows you to create a unique dessert tailored to your preferences. Remember the tips for preventing cracks and feel free to experiment with crusts and toppings. With minimal effort and a few simple ingredients, you can create a show-stopping dessert that will leave everyone wanting more. So, grab your whisk and get ready to whip up some magic!
Print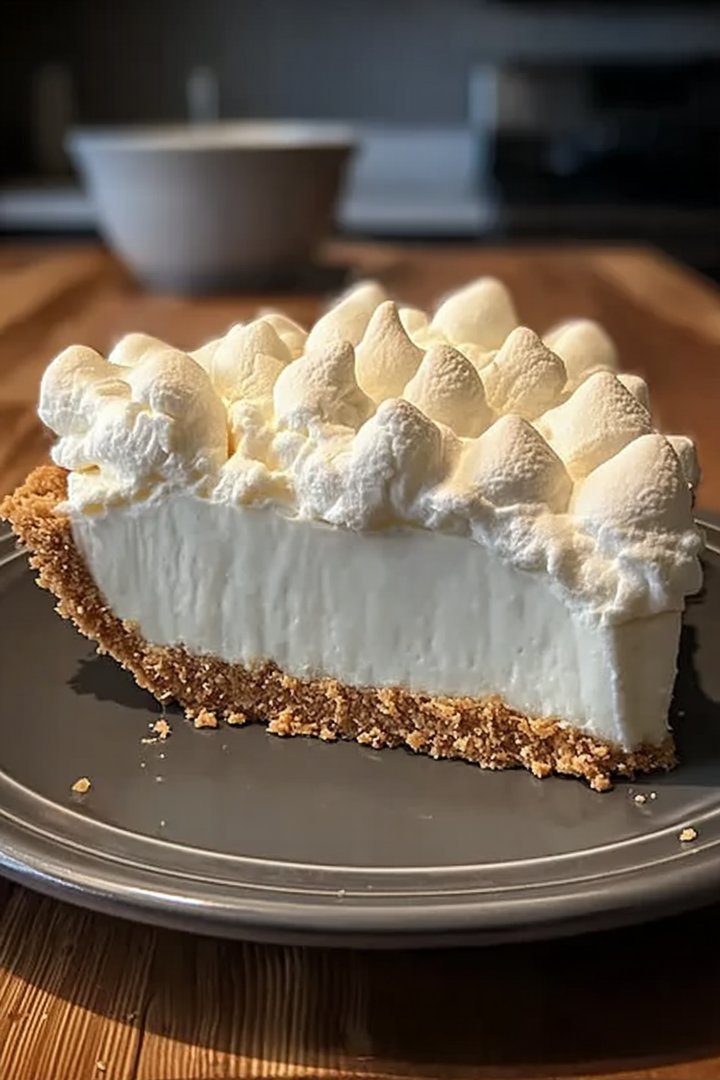
Marshmallow Whip Cheesecake
Delicious marshmallow whip cheesecake recipe with detailed instructions and nutritional information.
- Total Time: 35 minutes
- Yield: 4 servings
Ingredients
- Graham cracker crumbs: 1 1/2 cups
- Melted butter: 1/4 cup
- Cream cheese, softened: 24 ounces
- Granulated sugar: 1 cup
- Large eggs: 3
- Marshmallow creme: 1 cup
- Vanilla extract: 1 teaspoon
Instructions
- Step 1: Preheat oven to 350 degrees F (175 degrees C). In a bowl, combine graham cracker crumbs and melted butter. Press the mixture into the bottom of a 9-inch springform pan.
- Step 2: In a large bowl, beat cream cheese and sugar until smooth and creamy. Beat in the eggs one at a time, then stir in the marshmallow creme and vanilla extract.
- Step 3: Pour the cream cheese mixture over the graham cracker crust.
- Step 4: Bake in preheated oven for 45-50 minutes, or until the center is just set.
- Step 5: Let cool completely before refrigerating for at least 4 hours, or preferably overnight.
Notes
- For best results, chill the cheesecake overnight to allow the flavors to fully meld and the texture to set perfectly.
- If you want to warm a slice, microwave it in 10-second intervals to prevent the marshmallow from melting too much.
- Garnish with fresh berries or a drizzle of chocolate syrup for an extra touch of elegance when serving.
- Don't overbake the cheesecake; a slight wobble in the center indicates it's done and will set perfectly as it cools.
- Prep Time: 15 minutes
- Cook Time: 20 minutes
- Method: Stovetop
- Cuisine: American
FAQs :
Can I use a different crust for this Marshmallow Whip Cheesecake?
Absolutely! While the graham cracker crust is a classic for a reason (it’s ridiculously easy and tasty), feel free to experiment. Try using crushed vanilla wafers, chocolate cookies, or even a gluten-free cookie for a different flavor profile. Just make sure to adjust the amount of butter accordingly to get that perfect, crumbly texture. A gingersnap crust would also add a lovely warmth, especially during the cooler months. Get creative and personalize your cheesecake experience! Don’t be afraid to test different textures to find what delights your taste buds most.
How do I prevent cracks in my Marshmallow Whip Cheesecake?
Ah, the dreaded cheesecake crack! Don’t worry, it happens to the best of us. To minimize the risk, bake your cheesecake in a water bath. This creates a humid environment that helps the cheesecake bake evenly. Also, avoid overbaking! The cheesecake should still have a slight jiggle in the center when you take it out of the oven. Lastly, let it cool gradually in the oven with the door ajar. Rapid temperature changes are a cheesecake’s worst enemy. Follow these tips, and you’ll have a smooth, crack-free masterpiece.
Can I freeze this Marshmallow Whip Cheesecake?
You sure can! This marshmallow dream freezes beautifully. Make sure to wrap it tightly in plastic wrap and then in foil to prevent freezer burn. When you’re ready to enjoy it, thaw it in the refrigerator overnight. The texture might be slightly different after freezing, but it will still be incredibly delicious. Freezing is a great way to prepare this treat in advance for parties or to have a little indulgence readily available whenever you need a sweet pick-me-up.
What are some topping ideas for my Marshmallow Whip Cheesecake?
The topping possibilities are endless! Fresh berries are always a crowd-pleaser. A drizzle of homemade fruit sauce would also be divine. If you’re feeling fancy, you could make a chocolate ganache or a caramel sauce. Toasted nuts add a nice crunch, and a sprinkle of mini marshmallows is always a fun and festive touch. Let your imagination run wild, and create a topping that complements the creamy, marshmallow-y goodness of the cheesecake. Get creative with colors and textures!


Leave a Comment