
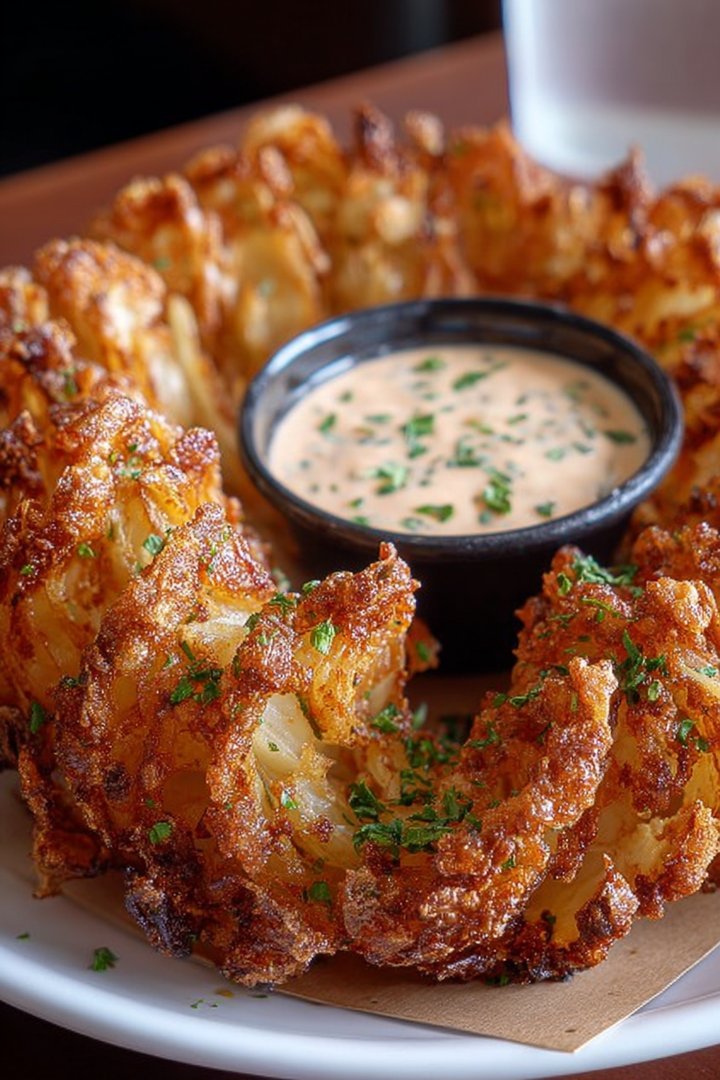
Imagine biting into a crispy, golden, colossal onion, each petal perfectly seasoned and begging to be devoured. The Outback Steakhouse Blooming Onion, that iconic appetizer, is a symphony of textures and flavors that’s surprisingly easy to recreate at home.
This shareable sensation elevates any gathering, transforming a simple onion into a show-stopping centerpiece. We’re talking about an impressive dish ready to steal the spotlight at your next party or family get-together.
- Easy to make: Simple ingredients transform ordinary onions into extraordinary flavor.
- Flavor explosion: A perfect blend of savory spices creates an irresistible taste experience.
- Visually stunning: The blooming presentation will wow your guests.
- Great for sharing: The perfect appetizer for parties, game days, or family nights.
Ingredients for Outback Steakhouse Blooming Onion
Here’s what you’ll need to make this delicious dish:
The full ingredients list, including measurements, is provided in the recipe card directly below.
How to Make Outback Steakhouse Blooming Onion
Follow these simple steps to prepare this delicious dish:
Step 1: Prepare the Onion
Peel the onion and trim the top, leaving the root end intact. Place the onion root-side down on a cutting board. Using a sharp knife, make cuts from about 1/2 inch from the root to the top, dividing the onion into 12-16 even sections, being careful not to cut through the root.
Step 2: Create the Breading Mixture
In a large bowl, whisk together the flour, cornstarch, paprika, garlic powder, onion powder, chili powder, cumin, dried oregano, salt, and black pepper. Make sure all the spices are evenly distributed.
Step 3: Prepare the Egg Wash
In a separate bowl, whisk the eggs and milk together until well combined. This will help the breading adhere to the onion.
Step 4: Breading the Onion
Gently open the onion petals and dredge it thoroughly in the flour mixture, ensuring the mixture gets between all the layers. Dip the onion into the egg wash, coating it completely. Then, dredge it again in the flour mixture, pressing lightly to help the breading stick.
Step 5: Frying the Onion
Heat vegetable oil in a large pot or deep fryer to 350°F (175°C). Carefully lower the breaded onion into the hot oil, root-side down. Fry for 5-7 minutes, or until golden brown and crispy, turning occasionally to ensure even cooking.
Step 6: Drain and Serve
Remove the onion from the oil and place it on a wire rack or paper towel-lined plate to drain excess oil. Serve immediately with your favorite dipping sauce. A creamy horseradish or spicy mayo works wonderfully.
Perfecting the Cooking Process
Timing is everything when recreating this crispy masterpiece! First, get your dipping sauce chilling. Then, slice your onion while the oil heats up, ensuring even cooking. Finally, fry the onion until golden brown. This sequence prevents a soggy, oily mess!
Add Your Touch
Feel like a kitchen rockstar? Customize your Outback Steakhouse Blooming Onion! Swap the traditional spices for a Cajun blend for a fiery kick. Or, try different dipping sauces like a creamy sriracha mayo or a tangy honey mustard. The possibilities are endless!
Storing & Reheating
Let’s be honest, a blooming onion is best fresh. But, if you have leftovers, store them in an airtight container in the fridge. Reheat in the oven or air fryer to revive some crispiness, though it won’t be quite the same as the first time.
Here are some pro tips to bloom like a boss:
- Use a sharp knife and cut almost to the core but not all the way through, so that the onion can bloom properly without falling apart.
- Make sure the oil is hot enough before frying; otherwise, you’ll end up with a soggy onion instead of a crispy, golden one.
- Don’t overcrowd the fryer. Cook the onion in batches to maintain the oil temperature and ensure even cooking.
(Personal anecdote formated as paragraph subheading)
My attempt the first time resulted in a sad, deflated onion-like creature. Then I realized the oil wasn’t hot enough! Now, it’s a hit, and I even made a blooming onion for my family.
The Legend of the Blooming Onion
Let’s be honest, folks, the Outback Steakhouse Blooming Onion. It’s not just an appetizer; it’s a culinary event. A deep-fried spectacle of oniony goodness that somehow manages to be both ridiculously decadent and utterly irresistible. It’s the kind of dish that makes you throw your diet out the window and say, “Bring on the creamy dipping sauce!” But how did this golden behemoth come to be? And more importantly, how can we recreate it in our own kitchens without deep-frying our eyebrows off? Well, buckle up buttercup, because we’re about to embark on a delicious adventure!
Understanding the Anatomy of a Bloom
Before we dive into the frying pan, let’s break down what makes a blooming onion so darn special. It’s not just any onion, haphazardly thrown into hot oil. It’s a carefully orchestrated masterpiece of slicing, seasoning, and deep-frying wizardry. The key is to create those delicate “petals” that bloom outwards, maximizing the surface area for crispy goodness and dipping sauce absorption.
Choosing Your Weapon (The Onion, That Is)
First things first, you’ll need a large yellow onion. Size matters here, folks. The bigger the onion, the more impressive the bloom. Look for one that’s firm and feels heavy for its size. Avoid onions with soft spots or bruises. Nobody wants a sad, wilted bloom.
Avoid onions that are too pungent, as the frying process will amplify the taste. A milder, sweeter onion is ideal for this application.
The Art of the Slice
This is where things get a little tricky, but don’t fret. Grab your sharpest knife (a chef’s knife works best) and get ready to channel your inner onion surgeon.
- Place the onion root-side up on a cutting board.
- Starting about an inch from the root, make vertical slices down towards the cutting board, but don’t cut all the way through. You want to leave the root intact so the onion stays together.
- Rotate the onion 90 degrees and repeat the slicing process. You should end up with the onion sliced into quarters, but still connected at the root.
- Now, carefully peel back the outer layers of the onion to create those signature “petals.”
Spice is Nice: Seasoning the Bloom
Once you’ve bloomed your onion, it’s time to infuse it with flavor. This is where you can get creative. A classic Outback Steakhouse Blooming Onion seasoning blend typically includes paprika, garlic powder, onion powder, chili powder, and a touch of cayenne pepper for a little kick.
Dipping into Deliciousness: The Sauce is Boss
A blooming onion without a dipping sauce is like a car without wheels. It just doesn’t work. The sauce is the yin to the onion’s yang, the peanut butter to its jelly, the… well, you get the idea. It’s essential.
Remoulade, But Make It (Slightly) Healthier
While the traditional Outback Steakhouse sauce is delicious, it can be a bit heavy on the mayo. Let’s lighten things up, shall we?
Ingredients:
- 1/2 cup mayonnaise
- 1/4 cup sour cream
- 2 tablespoons ketchup
- 1 tablespoon horseradish
- 1 teaspoon Dijon mustard
- 1/2 teaspoon paprika
- 1/4 teaspoon garlic powder
- A dash of cayenne pepper
- Salt and pepper to taste
Instructions:
1. Combine all ingredients in a bowl and whisk until smooth.
2. Refrigerate for at least 30 minutes to allow the flavors to meld.
Alternative Dipping Delights
Feel free to experiment with other dipping sauces. A creamy ranch, a spicy sriracha mayo, or even a tangy honey mustard can all be fantastic complements to the blooming onion. Don’t be afraid to get adventurous!
The Frying Frenzy: Achieving Golden Perfection
Alright, folks, it’s showtime. We’ve got our bloomed, seasoned onion, our dipping sauce is chilling in the fridge, and now it’s time to fire up the fryer.
Oil Up! Choosing the Right Frying Medium
You’ll need a large pot or deep fryer filled with about 3-4 inches of oil. Vegetable oil, canola oil, or peanut oil all work well. The key is to heat the oil to around 350°F (175°C). Use a thermometer to ensure accuracy. Too cold, and you’ll end up with a soggy onion. Too hot, and you’ll burn the outside before the inside is cooked.
Dusting for Success
Before the onion hits the hot oil, you’ll want to give it a good dusting of flour. This helps the breading stick and creates a crispy crust.
Ingredients:
- 1 cup all-purpose flour
- 1 teaspoon paprika
- 1/2 teaspoon garlic powder
- 1/4 teaspoon onion powder
- Salt and pepper to taste
Instructions:
1. Combine all ingredients in a shallow dish.
2. Dredge the bloomed onion in the flour mixture, making sure to coat all the petals.
Into the Inferno: Frying the Bloom
Carefully lower the floured onion into the hot oil, root-side up. Fry for about 5-7 minutes, or until golden brown and crispy. Use a slotted spoon or spider to carefully flip the onion and fry for another 3-5 minutes, until evenly cooked.
The Grand Finale: Presentation is Key
Once the onion is golden brown and crispy, carefully remove it from the oil and place it on a wire rack to drain excess oil. Serve immediately with your chosen dipping sauce. And there you have it, folks: your very own Outback Steakhouse Blooming Onion. Prepare to be amazed (and slightly greasy).
Blooming Onion: Frequently Asked Questions
Can I bake it instead of frying?
While you can bake a blooming onion, it won’t be quite the same. Baking won’t achieve the same level of crispiness. However, you can try spraying it with cooking spray before baking at 400°F (200°C) for about 20-25 minutes, flipping halfway through.
How do I keep the onion from falling apart?
The key is to leave the root intact when slicing. This will hold the petals together. Also, avoid overcooking the onion, as this can cause it to become too soft and fall apart.
What if I don’t have a deep fryer?
No problem! You can use a large pot filled with oil. Just make sure the pot is deep enough to completely submerge the onion.
Can I prepare the onion ahead of time?
You can slice and season the onion ahead of time, but it’s best to fry it right before serving for optimal crispiness.
Beyond the Bloom: Creative Variations
Once you’ve mastered the classic Outback Steakhouse Blooming Onion, feel free to experiment with different variations. Try using different types of onions, like red onions or Vidalia onions. You can also try adding different spices to the breading, like Cajun seasoning or Italian herbs.
Mini Blooming Onions: Bite-Sized Bliss
Use smaller onions and adjust the cooking time accordingly. These are perfect for parties or appetizers.
Blooming Sweet Potato: A Healthier Twist
Swap the onion for a sweet potato for a slightly healthier and sweeter version.
Spicy Sensation: Fiery Flavors
Add a generous amount of cayenne pepper to the breading for a spicy kick.
The Final Bite: Savoring the Moment
There you have it, folks: the ultimate guide to recreating the iconic Outback Steakhouse Blooming Onion. It’s a labor of love, but trust me, it’s worth it. So, gather your ingredients, put on your apron, and get ready to bloom like never before.
Conclusion for Outback Steakhouse Blooming Onion :
So, there you have it – a homemade Outback Steakhouse Blooming Onion that’s sure to impress. By mastering the slicing technique, creating a flavorful batter, and finding your perfect dipping sauce, you can recreate this iconic appetizer in your own kitchen. Forget the restaurant wait times and enjoy this crispy, savory delight whenever the craving strikes. Go forth, bloom those onions, and prepare for a taste bud explosion!
Print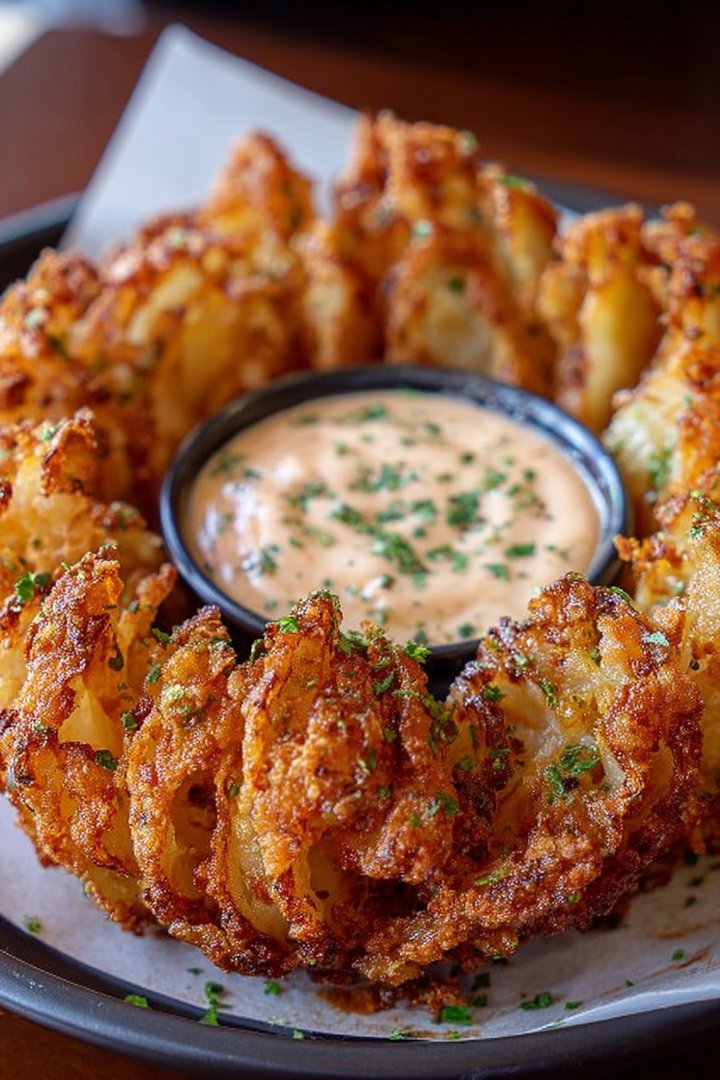
Outback Steakhouse Blooming Onion
Delicious outback steakhouse blooming onion recipe with detailed instructions and nutritional information.
- Total Time: 35 minutes
- Yield: 4 servings
Ingredients
- Large Onion (Vidalia or Sweet) – 1 large
- All-Purpose Flour – 2 cups
- Cornstarch – 1/2 cup
- Paprika – 2 tablespoons
- Garlic Powder – 1 tablespoon
- Onion Powder – 1 tablespoon
- Cayenne Pepper – 1 teaspoon
- Eggs – 2 large
Instructions
- Step 1: Prepare the onion. Peel the onion, leaving the root end intact. Place the onion root-side down on a cutting board. Starting about 1/2 inch from the root, make slices down to the cutting board, spacing them about 1/2 inch apart. Rotate the onion and repeat until completely sliced around.
- Step 2: Gently separate the petals. Carefully turn the onion over and gently spread the petals apart, being careful not to break them.
- Step 3: Prepare the batter. In a large bowl, whisk together the flour, cornstarch, paprika, garlic powder, onion powder, and cayenne pepper. In a separate bowl, beat the eggs.
- Step 4: Coat the onion. Dip the onion in the egg mixture, ensuring it's fully coated. Then, dredge the onion in the flour mixture, making sure the batter gets between all the petals. Shake off any excess flour.
- Step 5: Fry the onion. Heat vegetable oil in a large pot or deep fryer to 375°F (190°C). Carefully lower the onion into the hot oil and fry for 5-7 minutes, or until golden brown and crispy.
- Step 6: Drain and serve. Remove the onion from the oil and place it on a wire rack or paper towels to drain excess oil. Serve immediately with your favorite dipping sauce.
Notes
- Store any leftover Blooming Onion in an airtight container in the refrigerator, but be aware it will lose its crispness.
- For best results, reheat the Blooming Onion in an air fryer to help restore some of its original crispy texture.
- Serve your blooming onion with a variety of dipping sauces like ranch, spicy mayo, or even a tangy BBQ sauce for a crowd-pleasing appetizer.
- To ensure the spice mixture clings well, lightly mist the onion petals with cooking spray before dredging it in the flour mixture.
- Prep Time: 15 minutes
- Cook Time: 20 minutes
- Method: Stovetop
- Cuisine: American
FAQs :
Can I really recreate an Outback Steakhouse Blooming Onion at home?
Absolutely! Forget wrestling a kangaroo (please don’t wrestle kangaroos, they’re adorable and strong). This recipe brings the magic of that crispy, flavorful, shareable appetizer straight to your kitchen. With a little patience, some clever slicing, and a delicious dipping sauce, you’ll be wowing your friends and family with a homemade version that rivals the original. Trust me, the hardest part is waiting for it to cook, the aroma alone will test your self-control. Plus, you get to control the ingredients and make it exactly to your liking!
What’s the secret to getting the Outback Steakhouse Blooming Onion to open properly?
The key is in the slicing! You need to cut deep enough to create the petals, but not so deep that you slice through the bottom. Think of it like a delicate floral arrangement, but instead of flowers, it’s an onion destined for deliciousness. Also, soaking the onion in ice water helps those “petals” separate and become gloriously crisp when fried. Don’t skip this step, it’s crucial for achieving that signature bloom! It’s like giving your onion a spa day before its big debut.
What dipping sauce goes best with a blooming onion similar to Outback Steakhouse?
While Outback Steakhouse’s exact sauce recipe is a closely guarded secret, a creamy horseradish sauce is the classic pairing. But don’t be afraid to get creative! A spicy sriracha mayo, a tangy ranch dressing, or even a sweet and savory BBQ sauce can all be fantastic accompaniments. Experiment and find your perfect dipping partner. After all, what’s a blooming onion without a fabulous sauce to dive into? It’s like Batman without Robin, or a peanut butter without jelly!
How do I keep my Outback Steakhouse style Blooming Onion from getting soggy?
Nobody wants a soggy onion! The key is to fry it at the right temperature (around 350°F or 175°C) and avoid overcrowding the fryer. Frying at a lower temperature will result in the onion absorbing too much oil. Also, make sure to drain it well on a wire rack after frying. This allows excess oil to drip off, leaving you with a crispy, crunchy, and utterly irresistible blooming onion. Think of it as giving your onion a chance to breathe and maintain its crunch factor.


Leave a Comment