
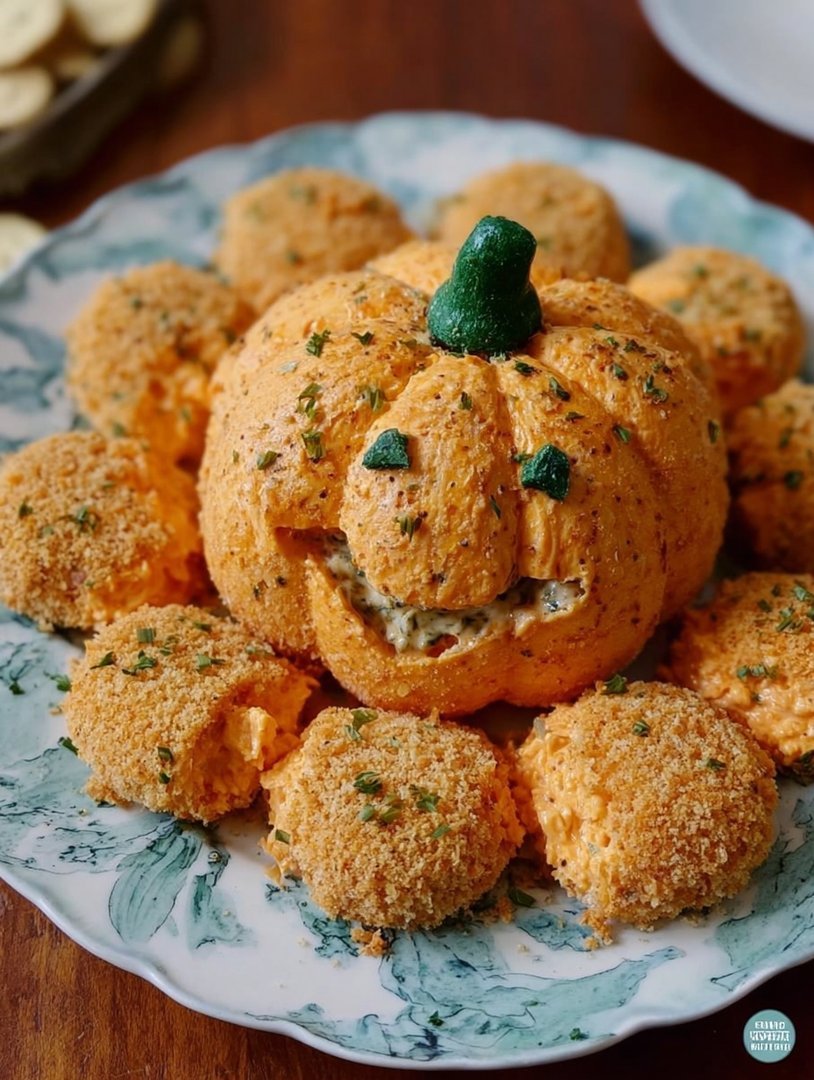
Imagine a sphere of creamy, savory goodness, transformed into a festive pumpkin, ready to be the star of your autumn gathering. This **Pumpkin Shaped Cheeseball Recipe** is not just food; it’s an edible centerpiece that brings smiles and deliciousness together.
Picture this: you’re at a cozy fall party, and everyone’s gathered around a table laden with treats. But amidst the sea of sweets and snacks, one dish stands out – a perfectly sculpted pumpkin cheeseball, begging to be devoured with crackers and veggies.
- Effortless to make, perfect for last-minute party needs, and brings joy with minimal stress.
- A symphony of savory cheeses, and spices that creates a flavor explosion, delighting everyone.
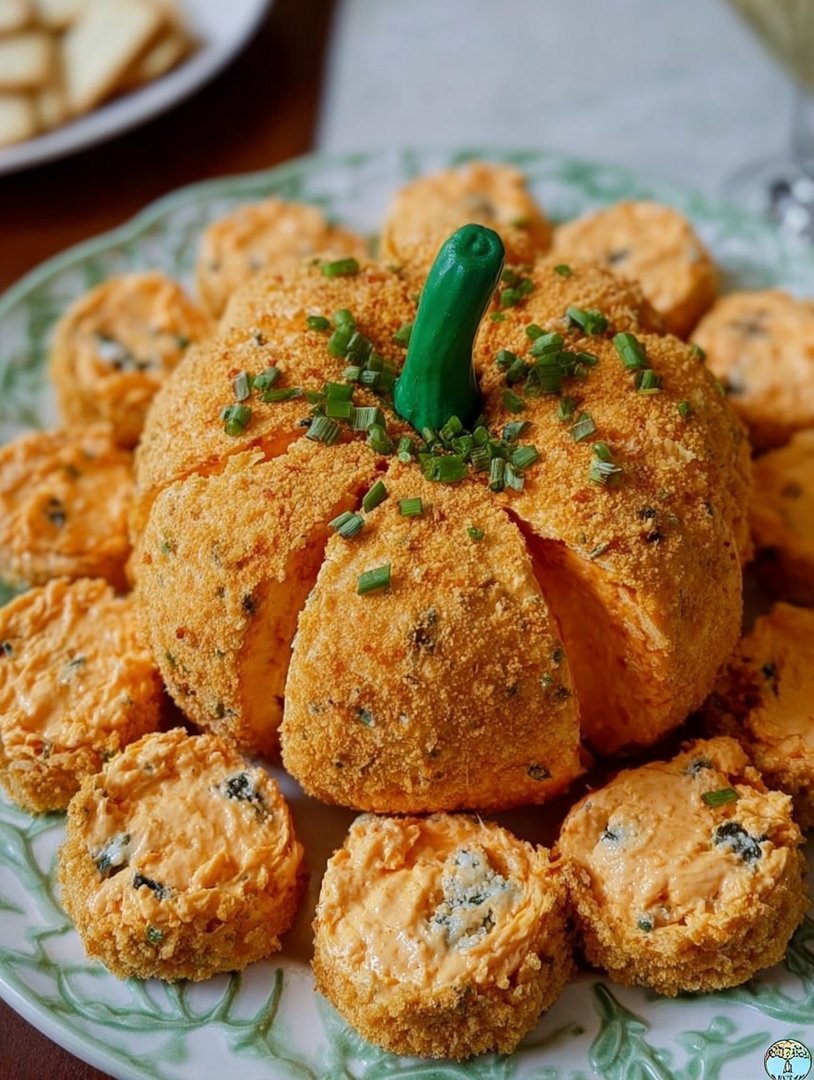
- Visually stunning, shaped like a pumpkin with a pretzel stem, sure to wow and impress your guests.
- It pairs excellently with crackers, pretzels, and veggies; it will be the greatest appetizer.
Ingredients for Pumpkin Shaped Cheeseball Recipe
Here’s what you’ll need to make this delicious dish:
The full ingredients list, including measurements, is provided in the recipe card directly below.
How to Make Pumpkin Shaped Cheeseball Recipe
Follow these simple steps to prepare this delicious dish:
Step 1: Soften the Cream Cheese
Allow the cream cheese to sit at room temperature for at least 30 minutes to soften. This will make it easier to mix with the other ingredients. Make sure that it’s pliable but not melted for best results.
Step 2: Combine the Ingredients
In a large mixing bowl, combine the softened cream cheese, shredded cheddar cheese, shredded Monterey Jack cheese, chopped green onions, Worcestershire sauce, garlic powder, onion powder, smoked paprika, salt, and black pepper. Mix until well combined, ensuring that all ingredients are evenly distributed.
Step 3: Shape the Cheeseball
Place a large piece of plastic wrap on a flat surface. Transfer the cheese mixture onto the plastic wrap. Shape the mixture into a ball, then gently flatten the bottom slightly so it sits stably. Wrap the plastic wrap tightly around the cheeseball and refrigerate for at least 2 hours to allow the flavors to meld and the cheeseball to firm up.
Step 4: Add the Pretzel Stem
Remove the cheeseball from the refrigerator and unwrap it. Place the cheeseball on a serving platter. Gently insert a few pretzel sticks into the top of the cheeseball to create a pumpkin stem.
Step 5: Serve and Enjoy
Serve the **Pumpkin Shaped Cheeseball Recipe** with crackers, pretzels, and vegetables. Arrange the dippers around the cheeseball on the platter for an inviting presentation. Watch your guests enjoy this festive and flavorful treat!
Perfecting the Cooking Process
To achieve cheeseball perfection, begin by softening the cream cheese for easy mixing. Then, combine all ingredients thoroughly and chill before shaping. This ensures the flavors meld beautifully and the cheeseball holds its delightful pumpkin form.
Add Your Touch
Feel free to experiment with different nuts like pecans or walnuts for coating. For a spicier kick, add a pinch of cayenne pepper. You can also incorporate dried cranberries or apricots for a touch of sweetness that balances the savory flavors.
Storing & Reheating
Store your **Pumpkin Shaped Cheeseball Recipe** in an airtight container in the refrigerator for up to five days. There’s no need to reheat it – simply remove it from the fridge about 15 minutes before serving to soften slightly and let the flavors bloom.
Here are some helpful tips for the perfect pumpkin cheeseball:
- Make sure your cream cheese is fully softened before mixing to avoid lumps and ensure a smooth, creamy texture for your cheeseball.
- Use plastic wrap to help shape the cheeseball, making it easier to mold into a perfect pumpkin shape and keep it clean.
- Toast the nuts before coating the cheeseball to bring out their flavor and add a delightful crunch to every bite.
(Personal anecdote formated as paragraph subheading (very important! don’t write any title for this paragraph))
I once brought this to a Halloween party, and it was gone in minutes! Everyone raved about the taste and the adorable pumpkin shape. It’s a guaranteed crowd-pleaser every time.
Alright, folks, let’s dive into the wonderfully cheesy, delightfully nutty world of the **Pumpkin Shaped Cheeseball Recipe**! Now, I know what you’re thinking: “Another pumpkin recipe? Really?” But hold on to your gourds, because this isn’t your basic PSL situation. This is a showstopper, a conversation starter, and a surefire way to impress your friends and family at any fall gathering. We’re talking about a cheeseball that’s not just delicious, it’s downright adorable. Think of it as the edible equivalent of a perfectly carved jack-o’-lantern, only way tastier!
This **Pumpkin Shaped Cheeseball Recipe** is surprisingly easy to make, and trust me, if I can do it (and I once set fire to water trying to boil an egg), you definitely can too. We’re skipping all the complicated steps and focusing on pure, unadulterated cheesy goodness. So, grab your mixing bowls, channel your inner artist, and let’s get ready to create a masterpiece – one cheesy pumpkin at a time!
Why This Cheeseball is the Bomb (Dot Com)
Let’s be honest, there are a million cheeseball recipes out there. So, what makes this one so special? Well, for starters, it’s shaped like a pumpkin! I mean, come on, that’s instant points right there. But beyond its undeniable cuteness, this **Pumpkin Shaped Cheeseball Recipe** boasts a flavor profile that’s both savory and subtly sweet, with a creamy texture that will have you coming back for more. It’s the perfect blend of comfort food and festive flair, guaranteed to be a hit at any party or potluck. Plus, it’s incredibly versatile! Serve it with crackers, veggies, pretzels, or even apple slices – the possibilities are endless. Think of it as the little black dress of the appetizer world – it goes with everything!
The Anatomy of a Pumpkin Cheeseball
Alright, let’s break down the components of this culinary masterpiece. First, we have the base: creamy, dreamy cream cheese. This is the foundation upon which all cheeseball greatness is built. Then, we add in some sharp cheddar for a little bit of zing, because who wants a boring cheeseball? Not us! Next, we’re throwing in some finely chopped green onions for a touch of freshness and a pop of color. And finally, the pièce de résistance: the coating. We’re talking about a glorious blend of chopped pecans, because everything is better with nuts, right? This combination creates a symphony of flavors and textures that will have your taste buds singing. And the best part? You can totally customize it to your liking!
Gathering Your Pumpkin-Shaped Arsenal
Before we get started, let’s make sure you have everything you need. Here’s your shopping list:
- Two 8-ounce packages of cream cheese, softened (very important!)
- 1 cup of shredded sharp cheddar cheese
- ½ cup of finely chopped green onions
- 1 cup of chopped pecans
- A few pretzel sticks for the stem (because every pumpkin needs a stem)
- Crackers, veggies, pretzels, or apple slices for serving
That’s it! See? Nothing too scary. Now, let’s get cooking!
Crafting the Perfect Pumpkin Cheeseball: Step-by-Step
Okay, time to roll up those sleeves and get cheesy! Here’s the lowdown on how to make this **Pumpkin Shaped Cheeseball Recipe** a reality:
Step 1
: The Creamy Foundation
In a large bowl, beat the softened cream cheese and cheddar cheese together until smooth and creamy. This is where your arm workout for the day comes in. Make sure there are no lumps! Nobody wants a lumpy cheeseball.
Step 2
: Flavor Fusion
Add the chopped green onions to the cheese mixture and stir until well combined. This is where the magic happens. The green onions add a subtle sharpness that cuts through the richness of the cheese.
Step 3
: Chill Out
Cover the bowl with plastic wrap and refrigerate for at least 30 minutes. This step is crucial! Chilling the mixture allows the flavors to meld together and makes it easier to shape the cheeseball. Trust me, you don’t want to skip this step.
Step 4
: Shaping the Pumpkin
Remove the cheese mixture from the refrigerator and place it on a large sheet of plastic wrap. Use your hands to form it into a round ball, then gently flatten the top and bottom to create a pumpkin-like shape. Don’t worry if it’s not perfect! Pumpkins come in all shapes and sizes.
Step 5
: Nutty Goodness
Place the chopped pecans in a shallow dish. Roll the cheeseball in the pecans, pressing gently to help them adhere. Make sure the entire cheeseball is covered in nutty goodness. This is where the flavor explosion happens!
Step 6
: The Grand Finale
Carefully transfer the cheeseball to a serving platter. Insert a pretzel stick into the top of the pumpkin to create the stem. And there you have it! Your very own **Pumpkin Shaped Cheeseball Recipe** masterpiece.
Step 7
: Serve and Enjoy!
Serve immediately with your favorite dippers, or refrigerate until ready to serve. Watch as your guests marvel at your culinary creation and devour every last cheesy bite.
Variations and Twists on the Classic Pumpkin Shaped Cheeseball Recipe
Okay, so you’ve mastered the basic **Pumpkin Shaped Cheeseball Recipe**. Now what? Time to get creative! Here are a few ideas to spice things up:
Spicy Pumpkin Cheeseball
Add a pinch of cayenne pepper or a dash of hot sauce to the cheese mixture for a fiery kick. This is perfect for those who like a little heat with their cheese.
Sweet and Savory Pumpkin Cheeseball
Incorporate some dried cranberries or apricots into the cheese mixture for a touch of sweetness that balances the savory flavors. This is a great option for those who like a little bit of everything.
Garlic Herb Pumpkin Cheeseball
Add some minced garlic and your favorite herbs, such as rosemary or thyme, to the cheese mixture for a more complex flavor profile. This is a sophisticated twist on the classic cheeseball.
Everything Bagel Pumpkin Cheeseball
Coat the cheeseball in everything bagel seasoning instead of pecans for a savory and crunchy coating. This is a fun and unexpected twist that everyone will love.
Sun-Dried Tomato and Basil Pumpkin Cheeseball
Mix finely chopped sun-dried tomatoes and fresh basil into the cream cheese mixture for a Mediterranean-inspired flavor. This variation adds a bright, tangy, and aromatic profile that pairs well with crackers or toasted baguette slices.
Tips and Tricks for Cheeseball Success
Making a cheeseball is pretty straightforward, but here are a few tips and tricks to ensure cheeseball perfection:
- **Soften the Cream Cheese:** I cannot stress this enough! Softened cream cheese is essential for a smooth and creamy cheeseball.
- **Don’t Overmix:** Overmixing can make the cheeseball tough. Mix just until the ingredients are combined.
- **Chill Out:** Chilling the cheeseball is crucial for both flavor and shape. Don’t skip this step!
- **Get Creative with the Coating:** The coating is where you can really let your personality shine. Experiment with different nuts, seeds, herbs, and spices.
- **Have Fun!** Making a cheeseball should be fun! Don’t be afraid to get a little messy and experiment with different flavors and textures.
Serving Suggestions for Your Pumpkin Shaped Cheeseball Recipe
Now that you’ve created this masterpiece of cheesiness, it’s time to serve it up! Here are a few ideas:
- **Crackers:** The classic choice. Choose a variety of crackers to cater to different tastes.
- **Veggies:** Carrots, celery, cucumbers, and bell peppers all make great dippers.
- **Pretzels:** For a salty and crunchy contrast.
- **Apple Slices:** For a sweet and savory combination.
- **Toasted Baguette Slices:** For a more sophisticated presentation.
No matter how you choose to serve it, your **Pumpkin Shaped Cheeseball Recipe** is sure to be a hit. So, go forth and create some cheesy magic!
And there you have it, folks! The ultimate guide to making the most adorable and delicious **Pumpkin Shaped Cheeseball Recipe**. Now, go forth and impress your friends and family with your newfound cheeseball skills. And remember, life’s too short for boring appetizers! Happy cheeseballing!
Conclusion for Pumpkin Shaped Cheeseball Recipe :
This pumpkin shaped cheeseball recipe is a guaranteed crowd-pleaser for any fall gathering. It’s incredibly easy to make, surprisingly delicious, and undeniably adorable. The blend of creamy cheese, savory seasonings, and a touch of sweetness creates a flavor explosion that will have everyone reaching for more. So, ditch the store-bought dip and impress your guests with this homemade masterpiece. It’s the perfect combination of fun, flavor, and festive flair!
Print
Pumpkin Shaped Cheeseball Recipe
Delicious pumpkin shaped cheeseball recipe recipe with detailed instructions and nutritional information.
- Total Time: 35 minutes
- Yield: 4 servings 1x
Ingredients
- 2 (8 ounce) packages cream cheese, softened
- 1 cup shredded cheddar cheese
- 1/2 cup shredded Monterey Jack cheese
- 1/4 cup finely chopped green onions
- 1/4 cup bacon bits
- 1 teaspoon garlic powder
- 1 teaspoon onion powder
- 1 bag pretzel sticks (for the stem)
Instructions
- Step 1: In a large bowl, combine the softened cream cheese, cheddar cheese, Monterey Jack cheese, green onions, bacon bits, garlic powder, and onion powder. Mix well until all ingredients are thoroughly combined.
- Step 2: Cover the bowl with plastic wrap and refrigerate for at least 30 minutes to allow the mixture to firm up. This will make it easier to shape.
- Step 3: Remove the cheese mixture from the refrigerator and shape it into a pumpkin shape.
- Step 4: Cover the formed pumpkin with plastic wrap and chill for at least another 30 minutes to help maintain the shape.
- Step 5: Before serving, insert pretzel sticks into the top of the pumpkin to create a stem. Serve with crackers, vegetables, or more pretzel sticks.
Notes
- Store leftover cheeseball tightly wrapped in the refrigerator for up to 3 days.
- This cheeseball is best served cold, so there's no need to reheat!
- Surround your pumpkin cheeseball with colorful autumn veggies like bell pepper strips and carrot sticks for a festive presentation.
- For extra flavor, lightly toast the bacon bits before adding them to the cheese mixture.
- Prep Time: 15 minutes
- Cook Time: 20 minutes
- Method: Stovetop
- Cuisine: American
FAQs :
Can I make this pumpkin shaped cheeseball recipe ahead of time?
Absolutely! In fact, I highly recommend it. Prepare the entire cheeseball, wrap it tightly in plastic wrap, and refrigerate it for at least two hours, or even overnight. This allows the flavors to meld together beautifully and the cheeseball to firm up. Just remember to add the pretzel stem right before serving to prevent it from getting soggy. Nobody wants a droopy pumpkin stem at their party, right? Trust me; a little planning goes a long way!
What can I serve with this cheesy pumpkin appetizer?
Oh, the possibilities are endless! Think crackers, baguette slices, vegetable sticks (carrots, celery, cucumber), or even apple slices for a sweet and savory combo. Personally, I love serving it with a variety of textures. A mix of crispy crackers, soft bread, and crunchy veggies makes for a delightful snacking experience. Get creative and offer your guests a fun assortment of dippers to choose from. They’ll thank you for it! This pumpkin recipe is truly the party’s hero.
How do I prevent the cheeseball from sticking to my hands?
Ah, a classic cheeseball dilemma! The key is to keep your hands slightly damp. Not soaking wet, mind you, just a little moist. This will prevent the cheeseball mixture from clinging to your fingers like superglue. You can also try chilling the mixture for a bit before shaping it. Cold cheese is easier to handle. Think of it as giving your cheeseball a mini spa treatment before its big debut. Nobody wants a sticky situation at a party!
How long will this pumpkin shaped cheeseball last?
Properly stored in the refrigerator, your cheesy creation will last for up to three to four days. Be sure to wrap it tightly in plastic wrap to prevent it from drying out or absorbing any unwanted flavors from the fridge. Although, let’s be real, it probably won’t last that long! This appetizer is usually devoured in a matter of hours, especially when surrounded by hungry snack enthusiasts. It’s that good!


Leave a Comment